

|
|||||||
Post Reply |
|
|
Thread Tools | Search this Thread |
| 12-02-2015, 03:31 PM | #1 |
|
Brigadier General
 
1862
Rep 3,661
Posts |
Moderators: Please don't merge this thread with this one......... http://f80.bimmerpost.com/forums/sho....php?t=1057236. The responses on that thread are not making much sense.
So this is the one solitary DIY that I have not seen posted and looking at all the questions that surround the install I am not surprised this has not been tackled yet. I ordered received my front Splitter and Lip over the Thanksgiving weekend and in looking at the instruction provided by BMW AG I like many others are left with many questions. The hope here on this thread is that I can get my questions answered and in return I can prepare a pictorial DIY for any future DIY'ers out there. So that said I am calling on all vendors who I think may be familiar with this install to please help with my questions. Am tagging a few vendors who might know  Doctor///M Jesal@IND Alex@AUTOcouture Status Gruppe MNF Pat@sonictuning supremepower Sam@ModeCarbon JBSPEED VIBE Motorsports AutoTalent David@TAG Sal@AUTOcouture Any other experts please feel free to chime in. I have arranged my questions on the BMW instruction page itself. That way everyone knows what i am talking about. They are in the red boxes on the right. . You can provide answers by referencing the question numbers or steps listed below. Please note the first picture below is for parts reference only BMW refers to some parts by different names than what we are used to so this should help. For example they call the splitter a "Carbon right or left add on section" Thank you all.
__________________
=========================
2016 F80 M3 AW/SO (Manual) - Picked up at the Welt 08/28/15  My Amazing European Delivery Story Last edited by ///M///; 12-03-2015 at 08:29 AM.. |
| 12-02-2015, 03:34 PM | #2 |
|
Brigadier General
1862
Rep 3,661
Posts |
Not sure why a of the tags are not working?
__________________
=========================
2016 F80 M3 AW/SO (Manual) - Picked up at the Welt 08/28/15 My Amazing European Delivery Story |
|
Appreciate
0
|
| 12-02-2015, 03:37 PM | #3 |
|
Captain
 246
Rep 635
Posts
Drives: 2016 F80 & 2016 F15
Join Date: Oct 2015
Location: Seattle, WA
|
someone should create a YouTube video on how to do it
|
|
Appreciate
0
|
| 12-02-2015, 03:38 PM | #4 |
|
Lieutenant
122
Rep 595
Posts |
Wow i am very confused about you been confused.
Let me give you a hint: All the pictures in the instructions are from under the car looking up and only one side perspective. So anything you do in one side you need to do on the other side of the car. Once you understand this it will be making more sense to you. Hope this helps a little. |
|
Appreciate
0
|
| 12-02-2015, 03:43 PM | #5 | |
|
Brigadier General
1862
Rep 3,661
Posts |
Quote:

__________________
=========================
2016 F80 M3 AW/SO (Manual) - Picked up at the Welt 08/28/15 My Amazing European Delivery Story |
|
|
Appreciate
0
|
| 12-02-2015, 03:46 PM | #6 | ||
|
Lieutenant
122
Rep 595
Posts |
Quote:
|
||
|
Appreciate
0
|
| 12-02-2015, 11:34 PM | #7 |
|
Major
 397
Rep 1,204
Posts |
I can only answer question towards the splitter portion but
Q6 you are to push the grill behind the air dam in order to wrap the black adhesive tape around the edge. (The splitter doesn't fit flush and this is BMW's method to cover up the gap) Q7 yes you would put 3m tape in the same area |
|
Appreciate
1
|
| 12-03-2015, 09:30 AM | #8 |
|
Brigadier General

1792
Rep 4,216
Posts |
Q1: the apron is the bottom exterior of the painted bumper as seen in the photo below. You line up the piece using the two holes on the long side of the stencil that should align with the two holes for the engine cover.
  Q2: You will drill two holes into the bumper. This is so that the center part of the bottom adapter (what I refer to as the lip frame) can be screwed in to the brace that you would have previously installed and should be hidden inside (above) the front apron/air dam. 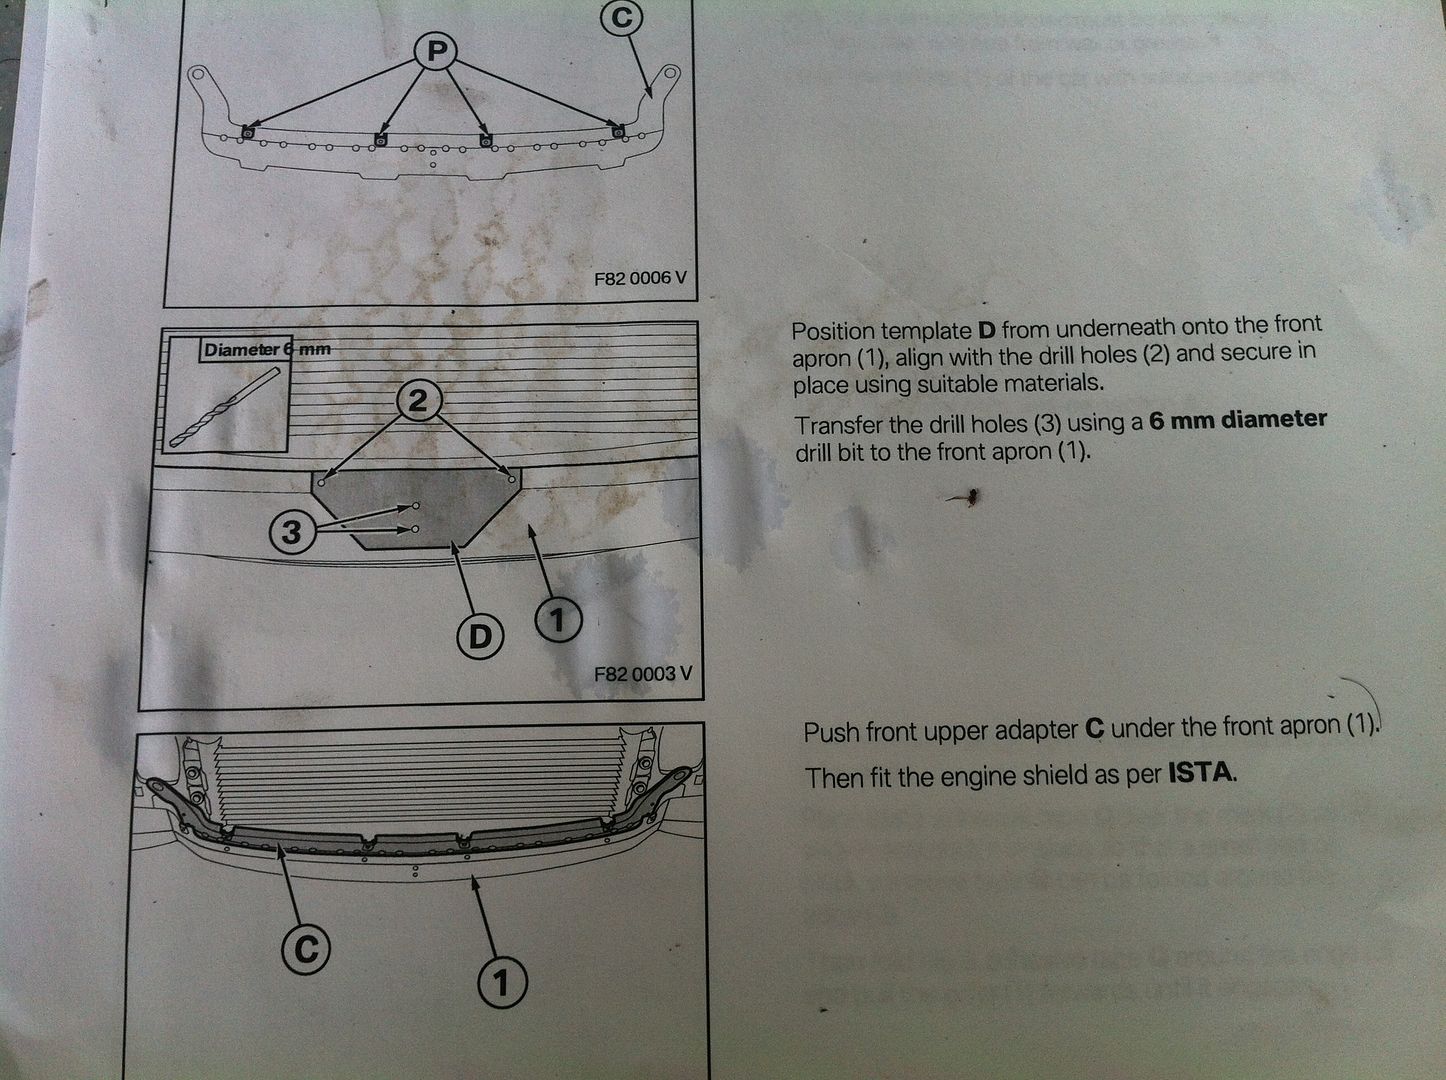 Q3: You are mounting the adapter above the plastic engine cover, and is bolted into place at the two extremes of the adapter (your instructional photo 4). Like I mentioned in Q2, the adapter is also tucked inside/above the air dam so that it is concealed. It is simply serves as an anchor point for the central part of the lip, otherwise there is no factory-built structural support. Note: Before you close everything up, ensure that the two supplied bolts (I cant remember what part letter they are), ensure that they screw easily into place through the holes you've drilled. In the event that you didn't drill the exact place, you will avoid the hassle of uninstalling a lot of pieces and having to redo this step. This will make sense to you when you're further along in the process, but at least do the q-c at this step to avoid any future hassle. Q4: Correct. Q5: I can't remember here. There are some clips that I reused from the front engine shield, but I can't say for these clips. If there aren't clips in the provided part box, then you'll have to reuse any OEM ones that you pulled. The clips are simply serve as the anchor/fastener for any screws that you use on the exterior. Q6: What it means is that it's difficult to slide the splitter in place if you put the tape on and peel off the plastic. As with the installation of the spoiler, you leave the film on the outside portion of the tape, but cut it in a way so that excess sticks out beyond the surface area covered by the splitter. That way you can easily slide the splitter on in place, and then simply peel off the film around its edges. See after the 1:00 mark in this video for the technique: Q7: Not necessarily. You'd want the tape on You will want the tape at the very least around the flat outer portions of the splitter. The reason I say that is that it facilitates peeling off the top part of the 3M tape film without any issue as you're setting it in place. Second, if you're installing the lip with the splitter, you'll be drilling holes into the underside of the splitter and screwing the lip/splitter into place. The tape is therefore secondary at this point. Q7b: Because BMW sees the splitter installation as a separate process from the lip installation, given that the betalink adhesive needs time to cure (if you were using betalink). If you use the tape, you don't have to follow this step if you're planning to install the lip right away. I would still screw it in to place to test that the splitter can be securely anchored without issue. You wouldn't want to go through it all, get the splitter on, only to realize that the bolt can't fasten because there is a mismatch in the alignment! Q8: Yes, only if you are installing the splitters by themselves to facilitate the bolt that fastens the splitter into place on the underside. If you use the template to cut the deflectors (which I didn't), I'm sure the slit won't be needed. Q9/10: Yes, you are drilling through the carbon splitter and the underside of the bumper. This allows the lip to be properly secured to the car... it's there to provide front end down force after all. Note: I shortened my drill bit length so that I wouldn't make the mistake of drilling through the entire bumper. You definitely won't want that! Q11: If you hold the bottom adapter, it's quite flexible and not rigid at all. It requires further securing for a solid fit. Q12: No, do not skip this step. Q13. I asked myself the same question. It was however the only bolt that you fasten at an angle and goes fully into the bumper. I assume it's for proper fastening near the central air dams on the lip, since that may be an easy place for the lip to get ripped off with a lot of down force. Q14. You'd definitely need these extra rivets for a clean installation so as to avoid a gap between the splitter and the underside of the car. Q15:The plates just provide surface area to secure the bolt since there is space behind the mounting point and not in front of it. Think of it as an elongated bolt. Q16: They are installed on the inside, and not under the lip. Q17: In 22, you're simply using the template to cut both soft and hard plastic from the deflector lip. The white portion on your photo 22 is the soft rubber that remains on the deflector piece, and what many are getting hung up about as the *proper* way to do it. Q18: Provided that you cut the hard plastic portion of the deflector piece, you can install it at the very last. If not, as in my case, I had to reinstall it before I continued with any of the bottom adapter/lip installation steps. Hope this helps!!!
__________________
2020 F87 M2 Competition /l\ LBB /i\ Executive Package 2013 E70 X5M /l\ Space Grey /i\ Full Silverstone Leather /l\ LED Headlights /i\ Comfort Access /l\ HUD /i\ Ventilated Seats /l\ 22" BBS SV BMW CCA Member Last edited by Doctor///M; 12-03-2015 at 09:50 AM.. |
|
Appreciate
1
|
| 12-03-2015, 10:01 AM | #9 |
|
Brigadier General
1862
Rep 3,661
Posts |
Thanks a lot Doctor///M
  Some followup questions on some of your answers. Q3: You are mounting the adapter above the plastic engine cover, and is bolted into place at the two extremes of the adapter (your instructional photo 4). Like I mentioned in Q2, the adapter is also tucked inside/above the air dam so that it is concealed. It is simply serves as an anchor point for the central part of the lip, otherwise there is no factory-built structural support. They don't mention anywhere what bolts or screws go in these two holes. What did you put in here? Q6: What it means is that it's difficult to slide the splitter in place if you put the tape on and peel off the plastic. As with the installation of the spoiler, you leave the film on the outside portion of the tape, but cut it in a way so that excess sticks out beyond the surface area covered by the splitter. That way you can easily slide the splitter on in place, and then simply peel off the film around its edges. See after the 1:00 mark in this video for the technique: How do you address the gap that remains between the splitter and the grill? I am thinking in your car you see a yellow line. Q9/10: Yes, you are drilling through the carbon splitter and the underside of the bumper. This allows the lip to be properly secured to the car... it's there to provide front end down force after all. Note: I shortened my drill bit length so that I wouldn't make the mistake of drilling through the entire bumper. You definitely won't want that! So we have to be careful only to pierce the bottom layer of the splitter without hitting the bumper. Correct? I haven't put the splitter on but was thinking the splitter is flush with the bumper so how can one avoid this especially when the hexagonal screws comes through. I am thinking they should be pushing at the bumper. Yes? I am still very surprised that we drill the splitter with 7 holes  Why would they not have them pre-drilled? Why would they not have them pre-drilled?Q17: In 22, you're simply using the template to cut both soft and hard plastic from the deflector lip. The white portion on your photo 22 is the soft rubber that remains on the deflector piece, and what many are getting hung up about as the *proper* way to do it. I am still waiting for a unanimous decision on this one New question: All the drill holes are 3mm and 6mm. Did you go with the corresponding 1/8" and 1/4" drill bits which are very slightly larger or did you end up buying metric ones? Thanks again for all the help.
__________________
=========================
2016 F80 M3 AW/SO (Manual) - Picked up at the Welt 08/28/15 My Amazing European Delivery Story |
|
Appreciate
0
|
| 12-03-2015, 11:32 AM | #11 | |
|
Brigadier General
1862
Rep 3,661
Posts |
Quote:
__________________
=========================
2016 F80 M3 AW/SO (Manual) - Picked up at the Welt 08/28/15 My Amazing European Delivery Story |
|
|
Appreciate
0
|
| 12-03-2015, 11:50 AM | #12 | ||
|
Major
397
Rep 1,204
Posts |
Quote:
|
||
|
Appreciate
0
|
| 12-03-2015, 12:05 PM | #13 | |
|
Brigadier General
1862
Rep 3,661
Posts |
Quote:
__________________
=========================
2016 F80 M3 AW/SO (Manual) - Picked up at the Welt 08/28/15 My Amazing European Delivery Story |
|
|
Appreciate
0
|
| 12-03-2015, 12:11 PM | #14 | ||
|
Major
397
Rep 1,204
Posts |
Quote:
|
||
|
Appreciate
1
|
| 12-03-2015, 12:20 PM | #15 |
|
Brigadier General
1862
Rep 3,661
Posts |
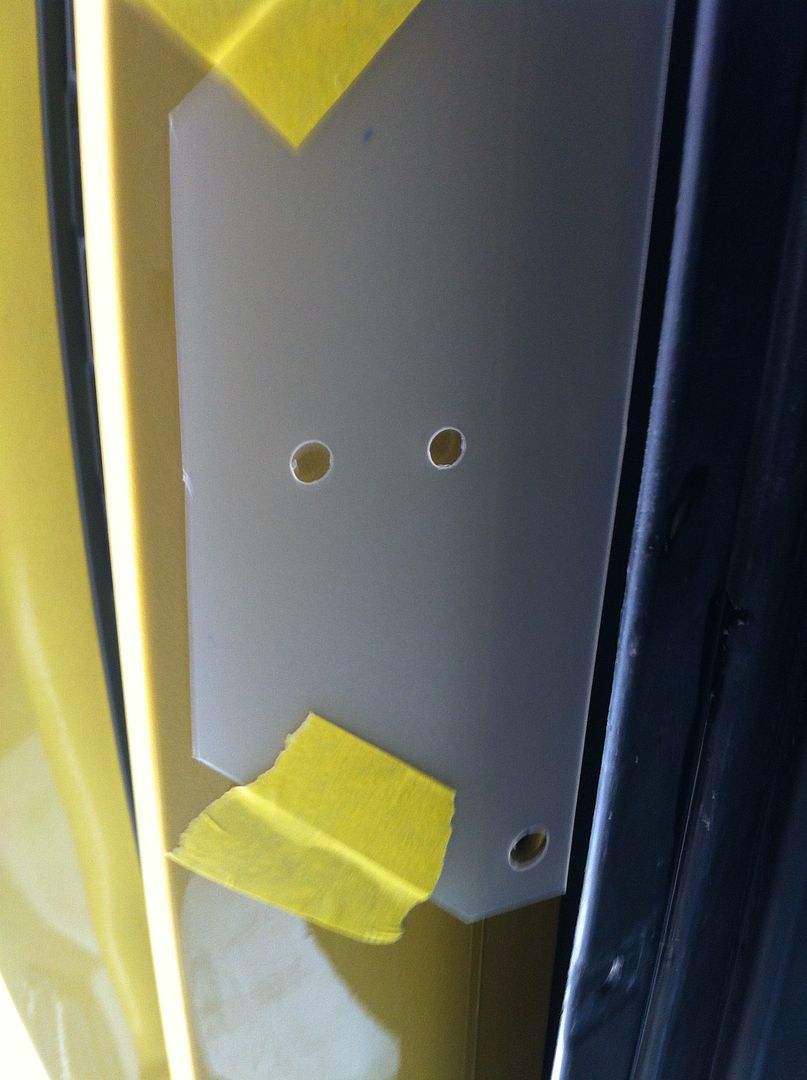
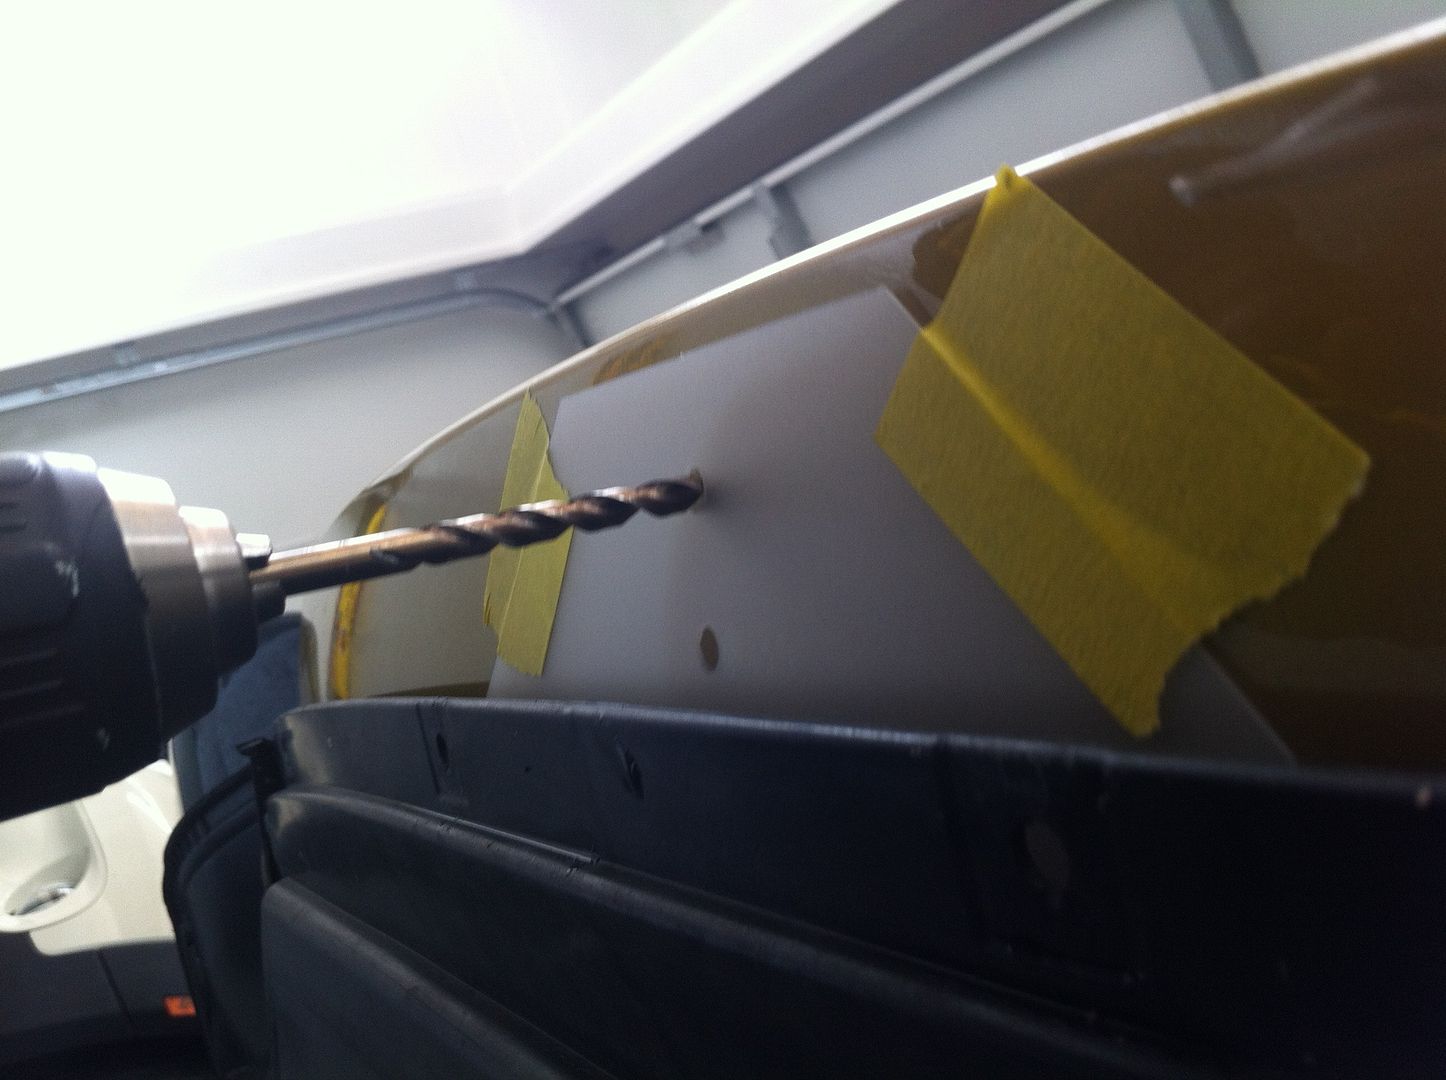
Happy to report that I have finally figured out the answer to Question 6. This step has nothing to do with the CF Splitter. What they stating here is to push back the grill that's on the stock bumper splitter and that will expose the edge of the stock bumper lip. Next use the supplied black adhesive tape and apply it in the marked area and fold it under the stock bumper splitter. The idea here is to cover the small gap that may remain after the CF splitter is installed. You can see the gap in the second picture below. Per Doctor///M this gap should not exist if the splitter is installed properly. I will see how mine goes and if it is needed. Am just glad I finally understand this
__________________
=========================
2016 F80 M3 AW/SO (Manual) - Picked up at the Welt 08/28/15 My Amazing European Delivery Story |
|
Appreciate
0
|
| 12-03-2015, 03:46 PM | #16 | |
|
Brigadier General
1862
Rep 3,661
Posts |
Quote:
__________________
=========================
2016 F80 M3 AW/SO (Manual) - Picked up at the Welt 08/28/15 My Amazing European Delivery Story |
|
|
Appreciate
1
|
| 12-10-2015, 07:52 PM | #17 |
|
Second Lieutenant
33
Rep 205
Posts |
Thanks for this thread. It seems pretty straight forward! Now to ask my dealer how they will treat a lease return with ~20 holes drilled into the underside of the bumper...
|
|
Appreciate
0
|
| 12-11-2015, 12:11 AM | #18 | |
|
Lieutenant
122
Rep 595
Posts |
Quote:
|
|
|
Appreciate
0
|
Post Reply |
| Bookmarks |
|
|


