

|
|||||||
Post Reply |
|
|
Thread Tools | Search this Thread |
| 04-02-2020, 04:16 PM | #1 |
|
Major
 
1047
Rep 1,264
Posts |
DIY Guide: How To Install Lowering Springs (F80 M3/F82 M4)
I can't stand the wheel gap these cars have from the factory, especially in the front. So I combed through forums and Facebook groups to find the best way to lower my F80 M3.
My goal: eliminate wheel gap and retain comfortable ride quality without spending thousands of dollars. I narrowed it down to Emmanuele Design lowering springs. I could go on and on about why I bought these lowering springs instead of others, or even coilovers. But I don't want to clutter up this DIY thread, so I wrote a dedicated blog post about them: The Best Lowering Springs for BMW F8X: EMD Auto Review. Brief summary:
If you don't want to watch the video above, check out my comprehensive step-by-step guide with photos: How To Install Lowering Springs in Your BMW F80 M3 or F82 M4 REQUIRED TOOLS:
First things first! Start by using a low-pro floor jack, QuickJack floor lift or MaxJax 2-post lift to raise the car off the ground. I have experience with all three of these lifting methods and would recommend each of them depending on your situation. Use BMW jack pad adapters no matter which lifting method you choose. Be sure to properly secure the car with jack stands if not using a lift. For this install, I'll be using a 2-post lift. With the car in the air, use a 1/2" cordless impact wrench with a 17mm BMW wheel-saver socket to remove the lug bolts. Carefully remove each wheel from your BMW M3 or M4 and set aside. Let's start with the front suspension Before installing our new lowering springs, we need to remove the OEM springs first. Start in the front by opening the hood and removing the rubber top-hat cover and plastic cowl on each side.  To remove the rubber top-hat cover, use a trim removal tool to un-clip six plastic push rivets (red arrows). Use a 10mm nut driver to loosen the plastic nuts (green arrows). Be careful not to break these nuts, they only require a 1/4 turn to loosen. With the main top-hat cover and plastic cowl removed, you should see a smaller rubber cover directly on top of the strut top. Remove this with a plastic pry tool. If you have adaptive suspension, pop off the electric connector on top of the strut. 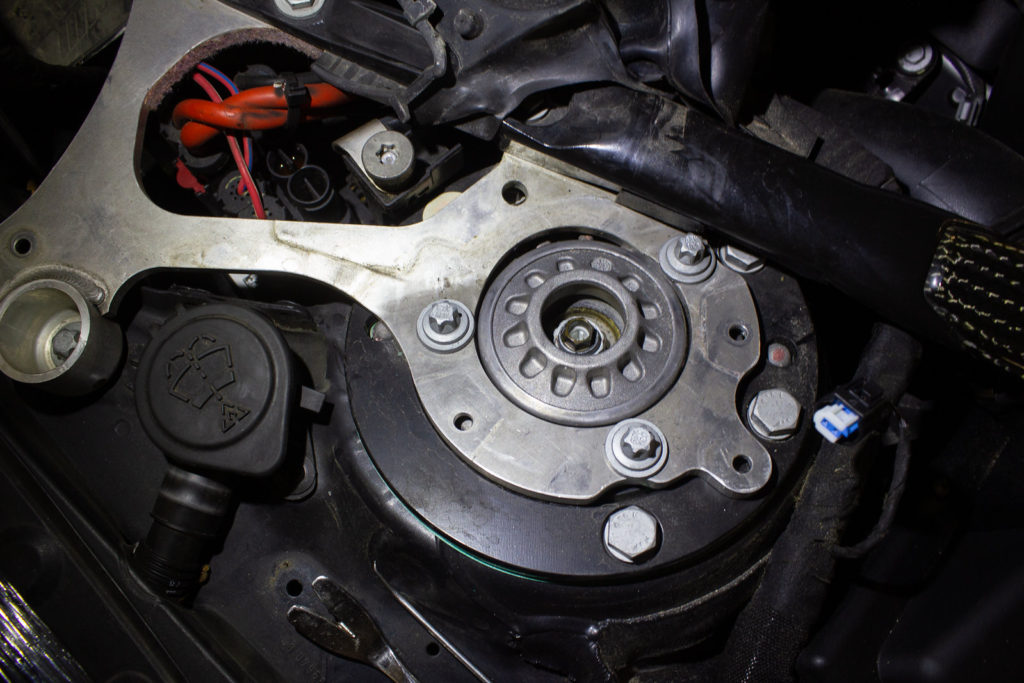 At this point, we're going to go back under the car and use a jack to compress the suspension on this corner. Lift the control arm until the suspension is completely compressed and on the verge of lifting the corner of the vehicle from your lift arm or jack stand. 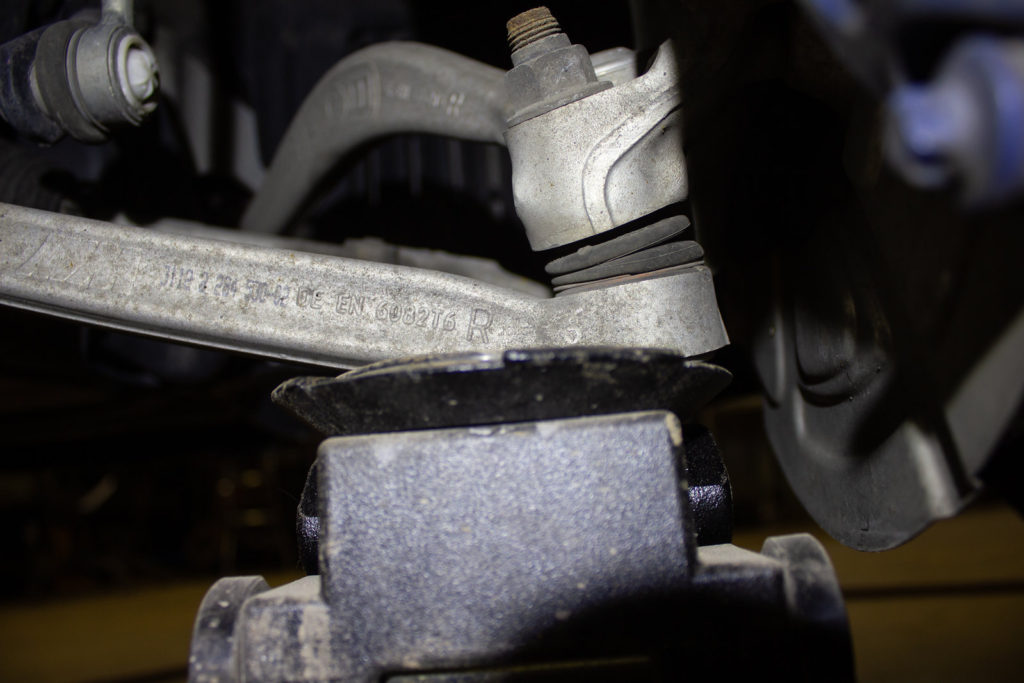 Front spring removal With the suspension compressed, we need to remove the sway bar end link, unplug the adaptive suspension sensor (if applicable), disconnect the headlight-leveling sensor (driver-side only), and unclip wires for the brake pad sensor and wheel speed sensor. 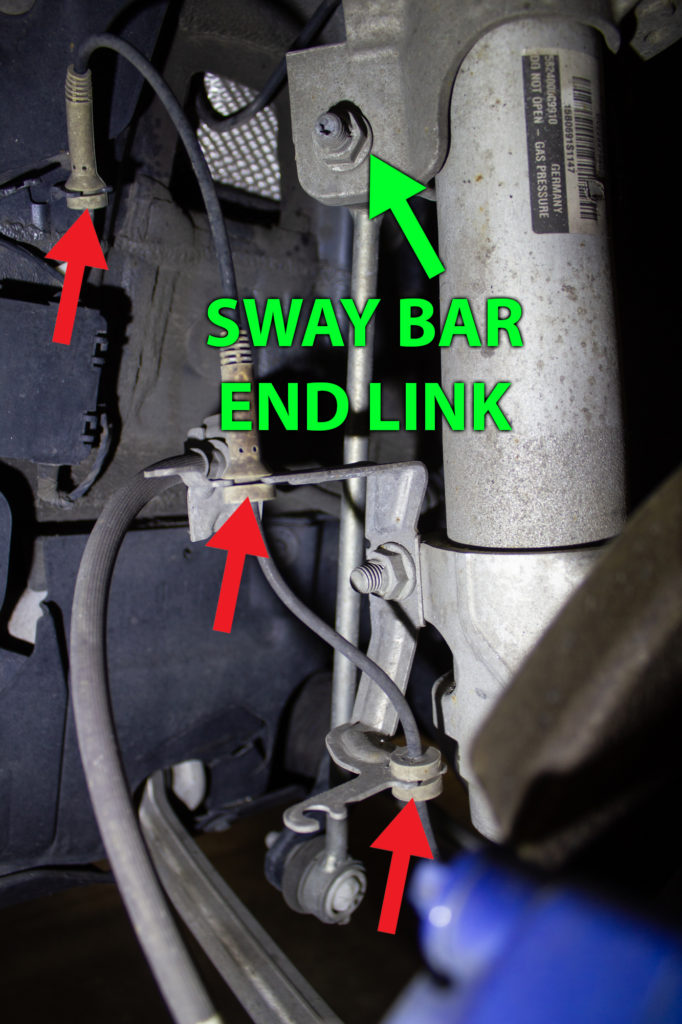 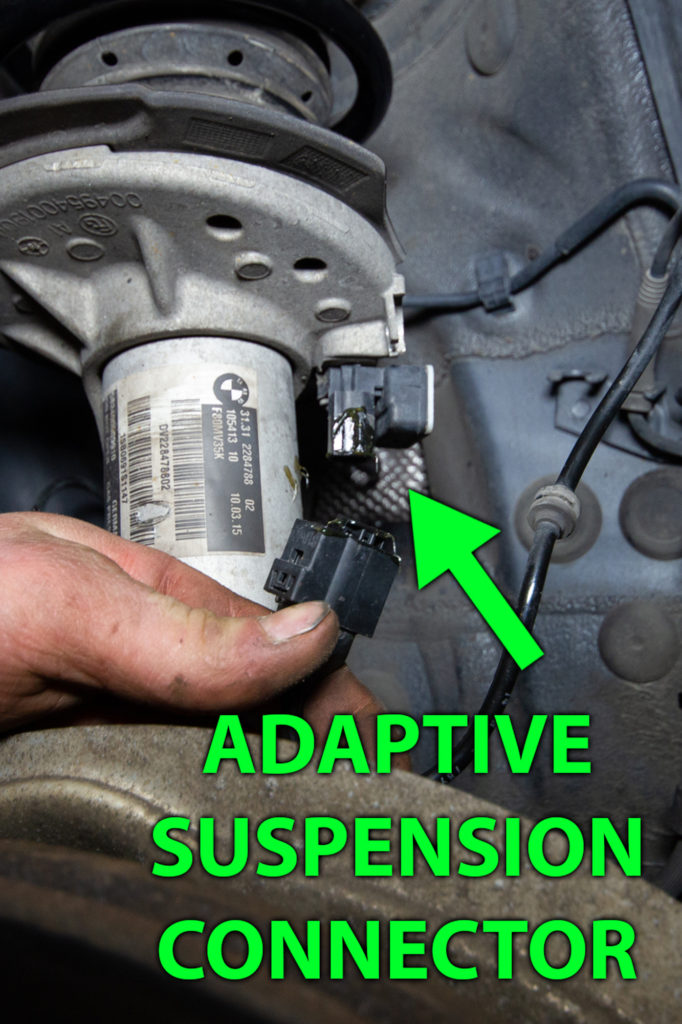 Disconnect the sway bar end link by removing the nut with a 16mm socket and impact wrench, or by using a 16mm wrench on the nut while holding the threads with a T30 torx wrench. Remove the driver's side headlight-leveling sensor by loosening the nut with a 10mm socket. Be sure to hold the joint of the headlight-leveling sensor with a 9mm wrench while loosening the nut (not pictured, reference video at the top of this post). With all of the above items disconnected and the floor jack still compressing the suspension, let's head back up to the engine bay. Use a deep 12-point 18mm socket or the strut nut socket with the impact wrench to remove the nut on the top of the strut. 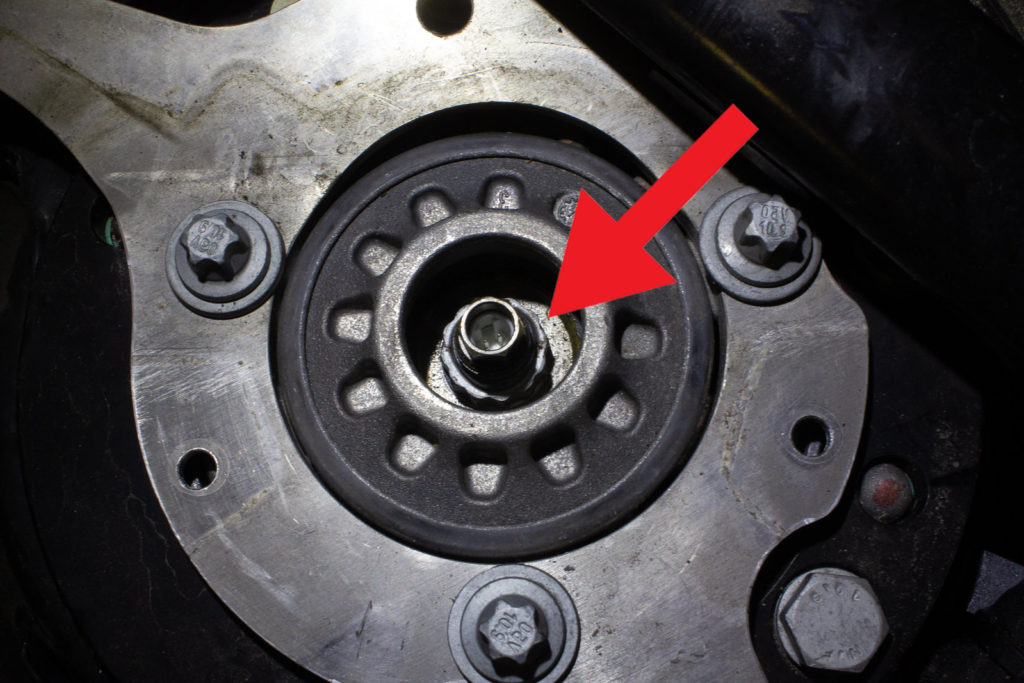 Once the nut is removed, slowly lower the floor jack to naturally decompress the spring and free the strut. Carefully pull the strut and spring outside of the fender well to remove the OEM spring, dust boot and bump stop. 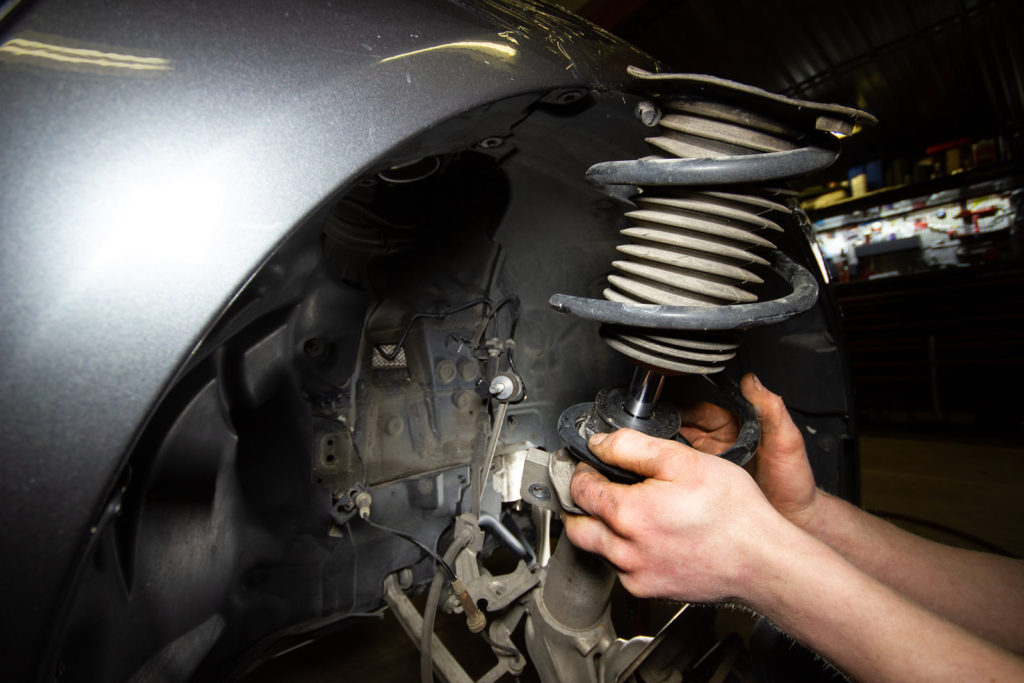 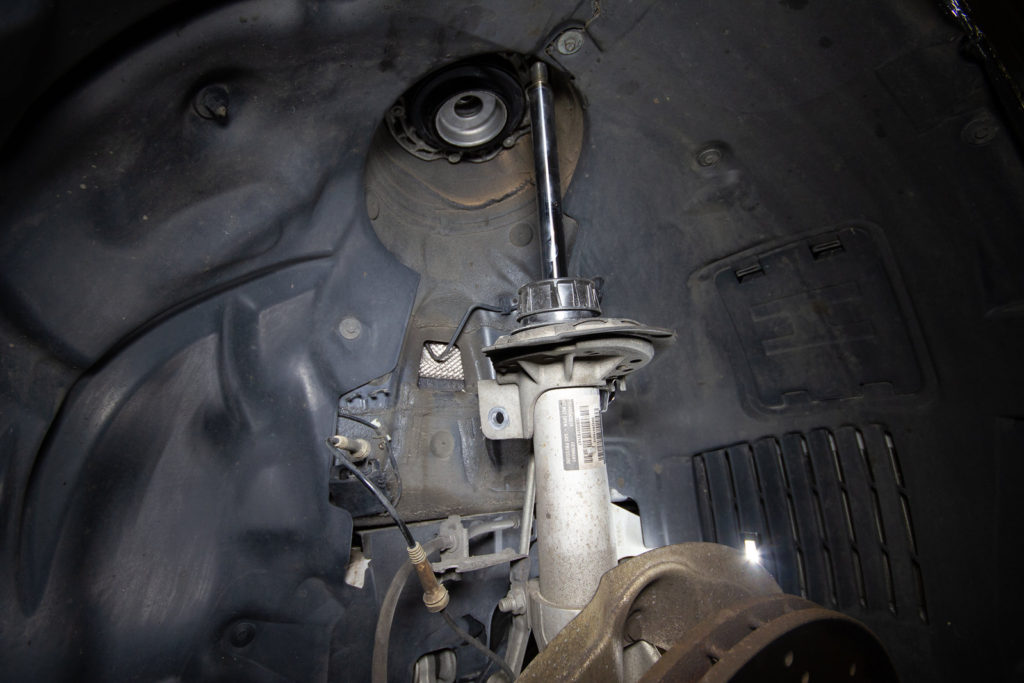 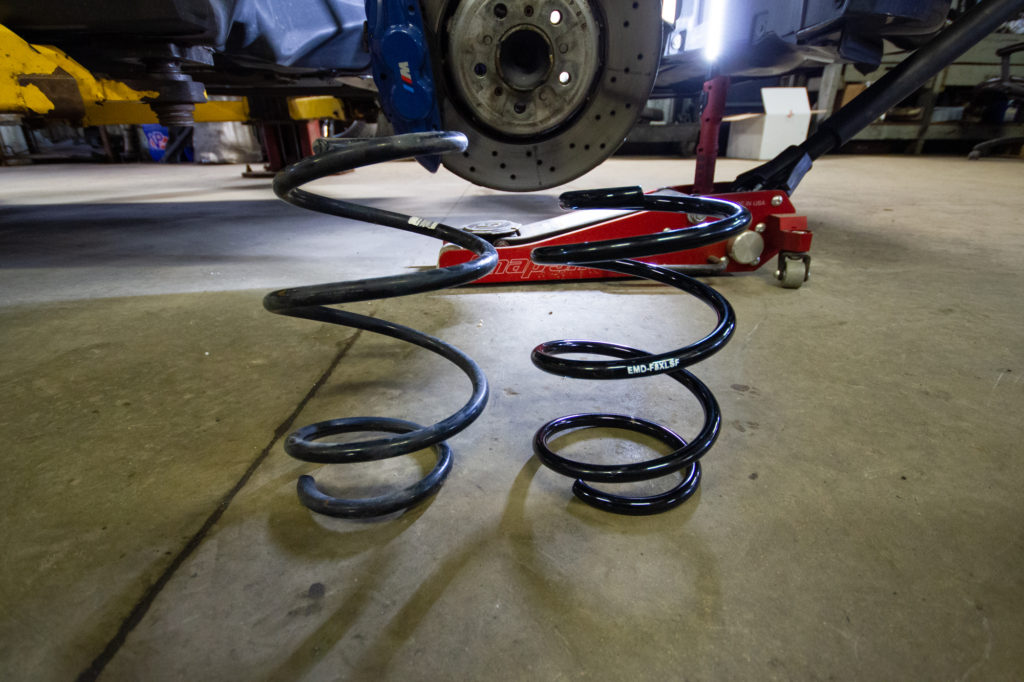 Install front lowering springs Replace the OEM spring with one of your front EMD lowering springs. Re-use the dust boot and bump stop. Ensure the spring is properly seated on the strut, then re-insert the strut into the top hat. 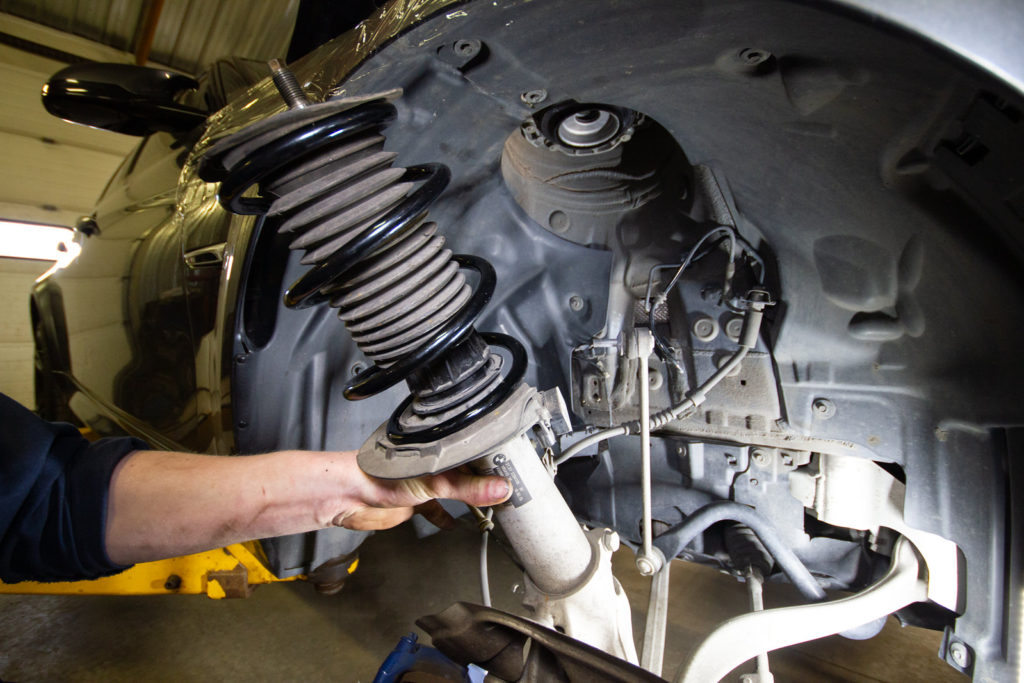 Jack up the control arm to compress the suspension again, while guiding it into the top hat. Use a torque wrench with a specialty 18mm strut nut socket and small 10mm wrench to tighten the 18mm nut on the top of the strut to 25 ft/lbs. 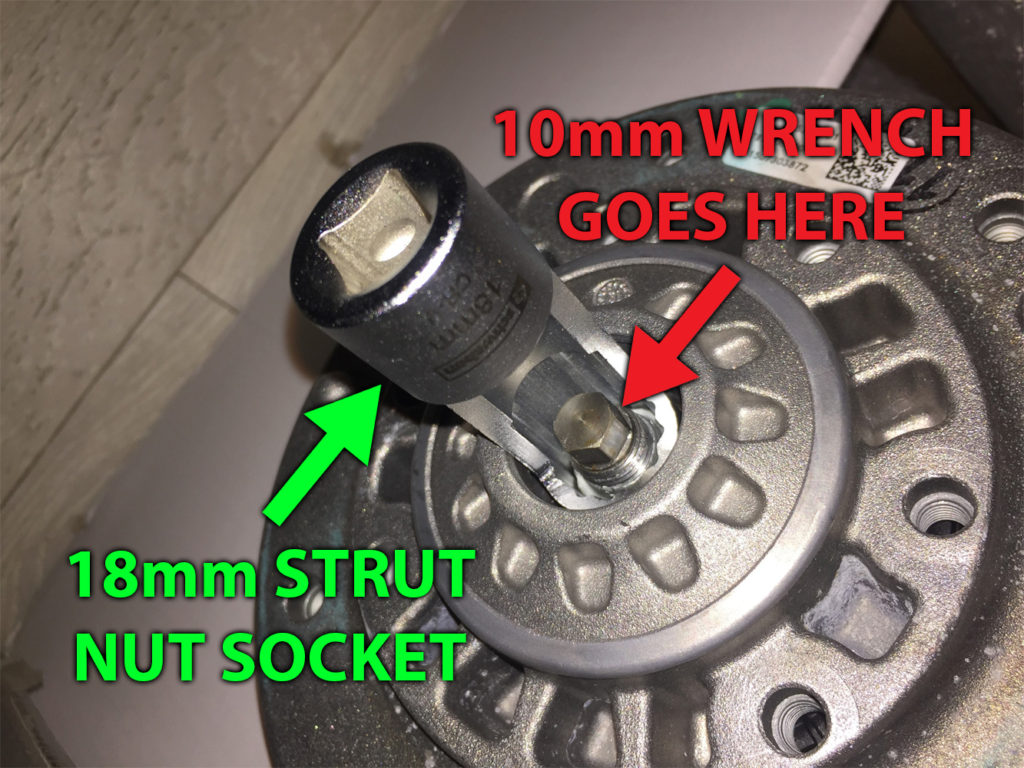 Re-install the sway bar end link and tighten the 16mm nut to 44 ft/lbs. Then connect the adaptive suspension sensor, headlight-leveling sensor and other previously-removed wires. In the engine bay, plug in the adaptive suspension sensor and install the rubber dust caps and plastic cowl. Re-inspect the whole area, making sure everything is connected and all nuts are tight. You've successfully completed the first corner! Repeat the same process on the other front side. Remove OEM rear springs Get started in the rear by supporting the spring arm with a jack, compressing the suspension. You can see the tall adjustable jack stand we used, but you can use a floor jack if you don't have a lift. 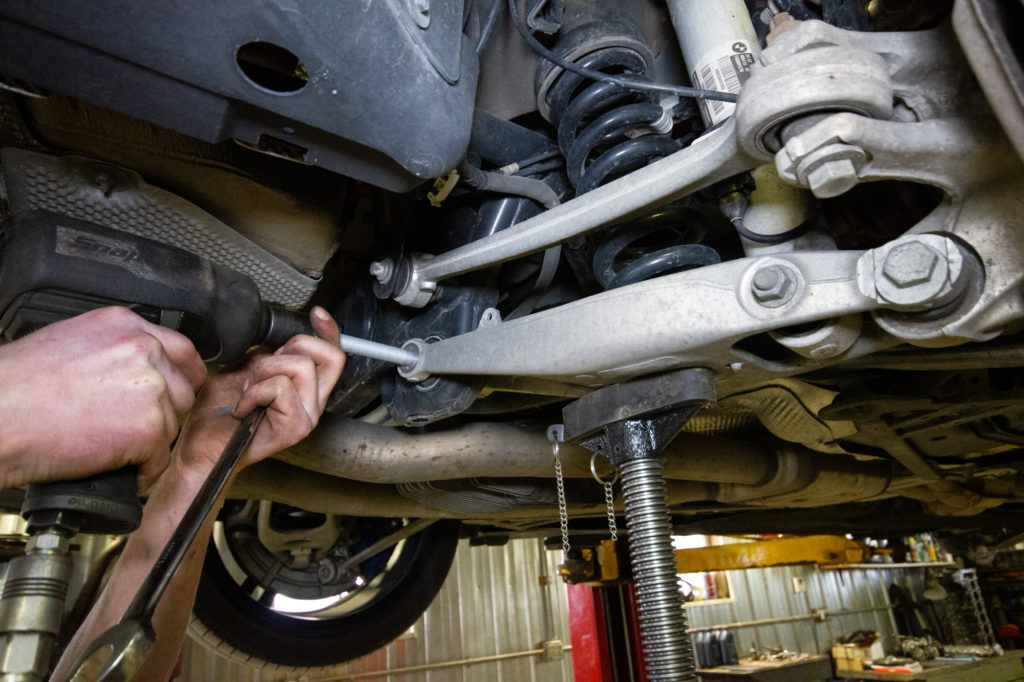 Use a 21mm socket and the impact wrench to remove the inner spring arm bolt, hold the nut on the backside with a 21mm wrench if needed. On the driver's side, there is another headlight-leveling sensor that needs to be removed. To do that, remove the nut with a 10mm socket while holding the joint with a 9mm wrench.  With the bolt removed, lower the jack to naturally decompress the spring, then pull the spring arm down to remove the OEM spring. Before installing your new springs, pay attention to the instructions for your lowering springs. In my case, EMD lowering springs include a spacer that can be inserted on top of the upper spring cup for a less aggressive drop. 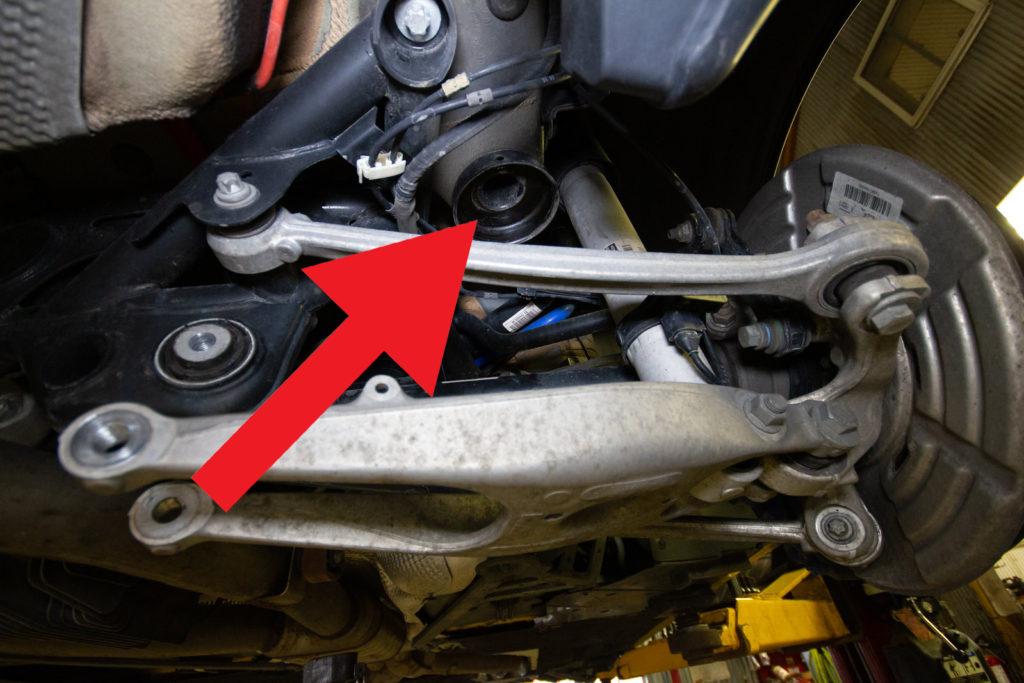 To install spacers, use a pry tool to remove the metal upper spring cup. Insert the spacer on top of the cup and re-install the cup into the chassis of the car. Other lowering spring kits like Macht Schnell include two spacers for each spring, one that goes on top of the cup and another that goes inside of the cup. Not all lowering spring kits include spacers, so pay attention to what is included with your lowering springs. 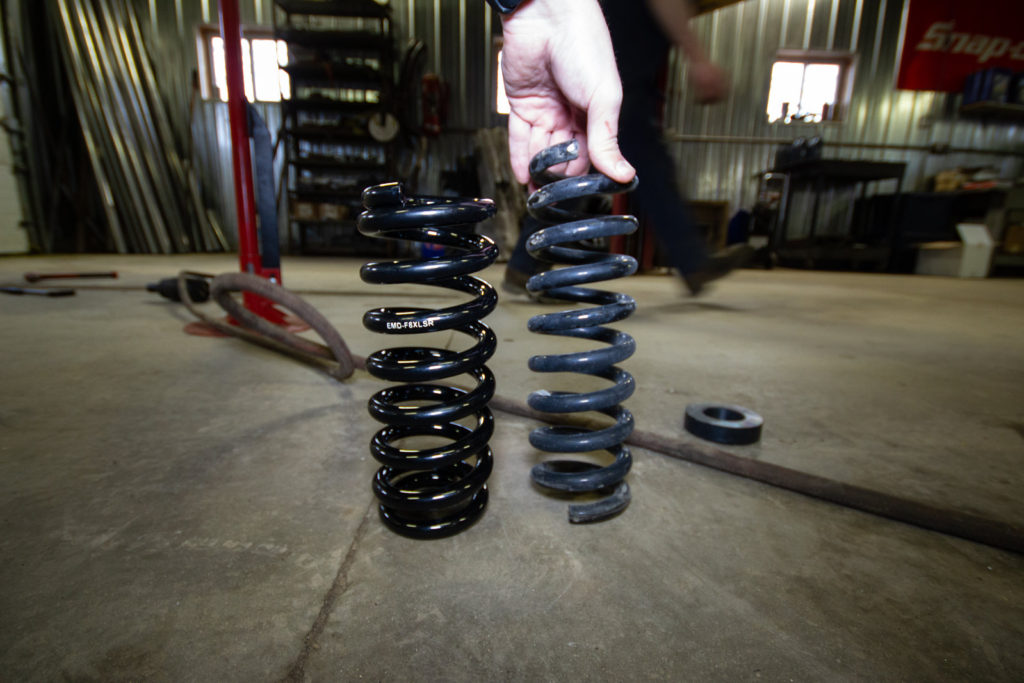 Install rear lowering springs Install the necessary spacers (if applicable), then replace the stock springs with your new lowering springs. Re-use the rubber spring isolators from the top and bottom of your stock springs. After transferring them over, insert your new spring into the spring cup and seat it in the bottom of the spring arm. 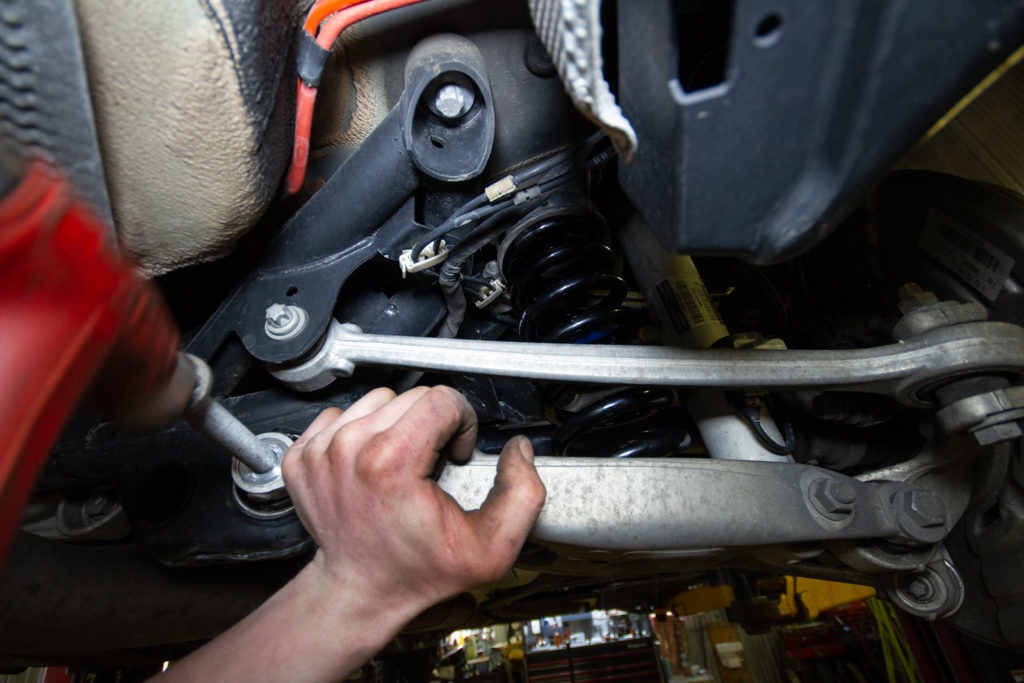 Use the jack to lift the spring arm until you can re-insert the 21mm bolt into the spring arm. Once the bolt and nut are hand-tight, use the jack to compress the suspension. Once compressed, use a torque wrench to tighten the bolt to 120 ft/lbs. Re-connect the headlight-leveling sensor on the driver's side. 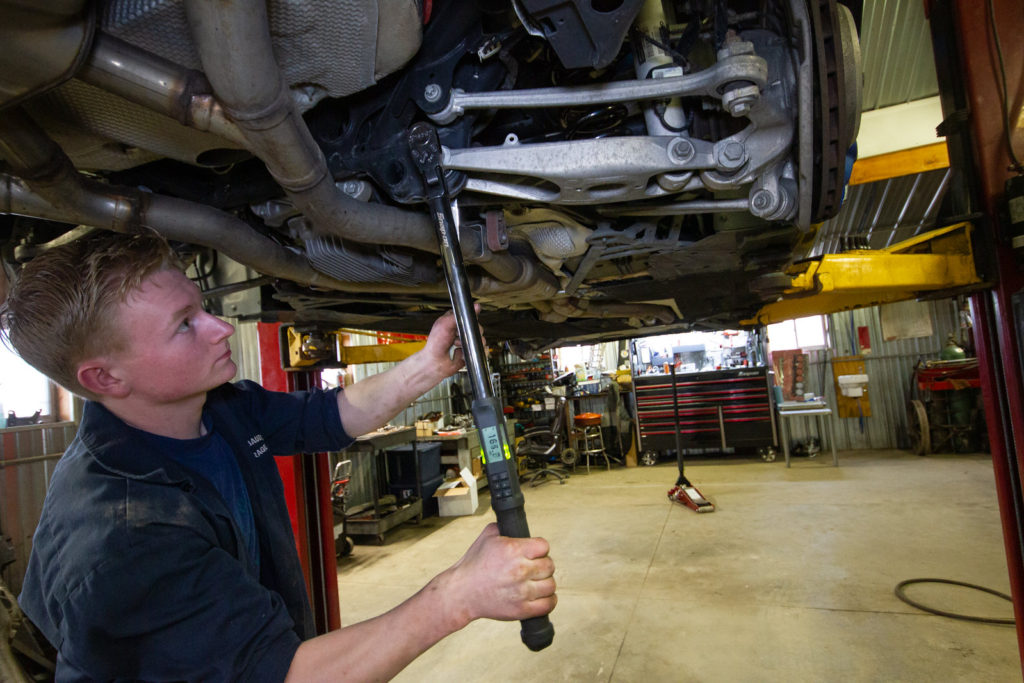 Just like you did after completing the front, inspect the whole are. Make sure the spring is seated properly and all nuts are tight. Repeat the same process on the other rear side. 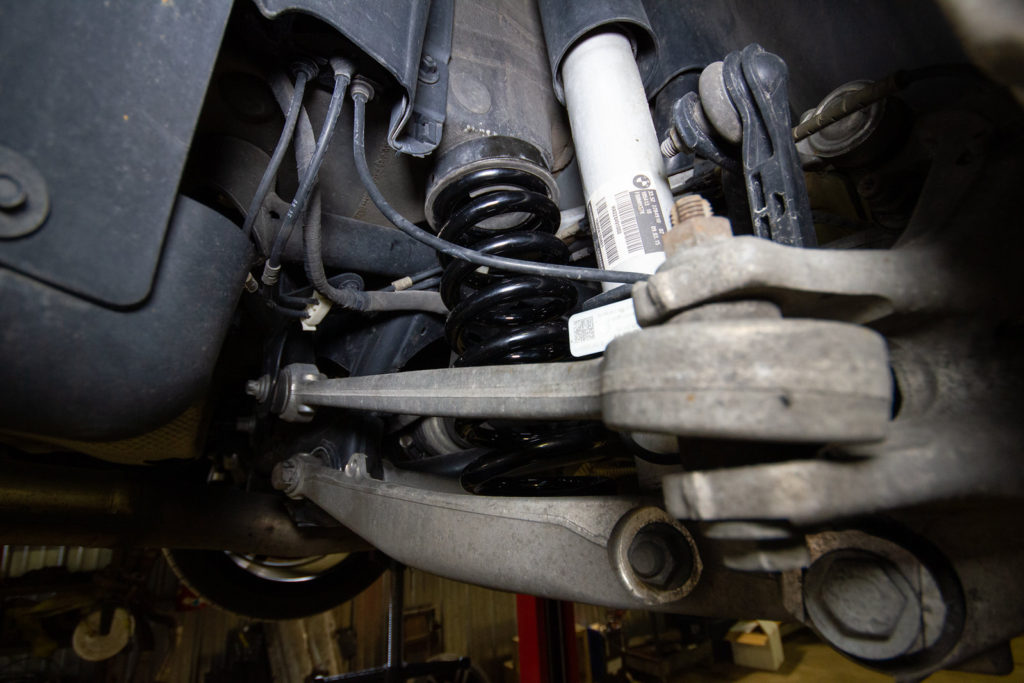 Re-install your wheels and tighten lug bolts to 105 ft/lbs with the 17mm wheel-saver socket and torque wrench. Lower the car back onto the ground and admire your freshly installed lowering springs! As with any suspension adjustment or modification, a 4-wheel alignment is necessary. If you don't get an alignment, you risk poor handling or uneven tire wear. 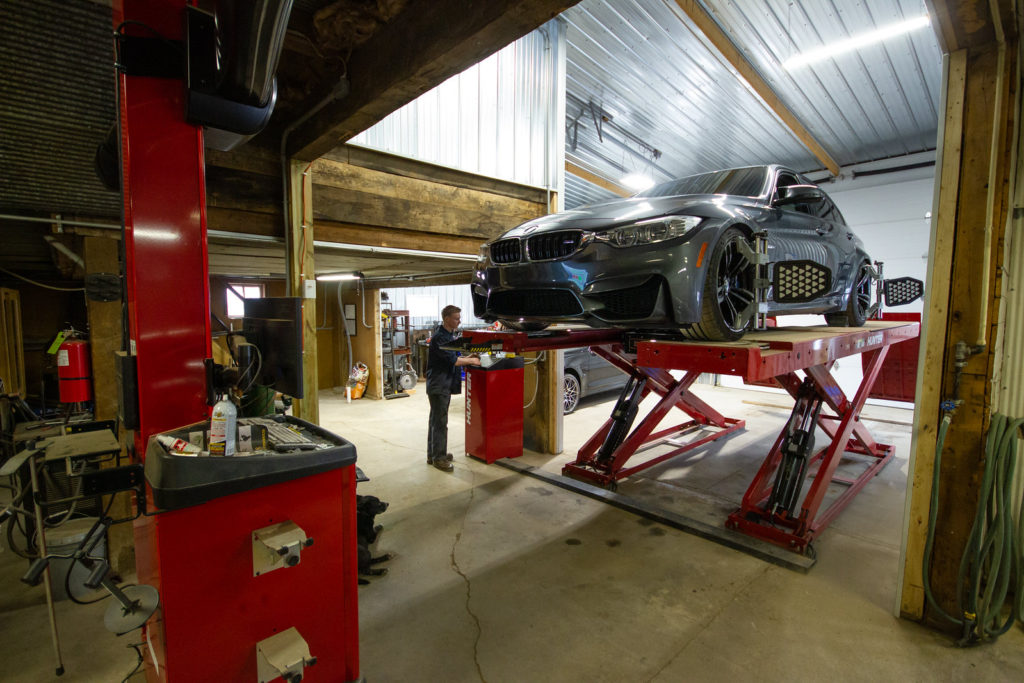 Enjoy a few photos of my 2015 BMW M3 after installing Emmanuele Design lowering springs!    Let me know what you think �� Subscribe to my YouTube channel Follow me on Instagram
__________________
750whp 135i Build | Budget 335i Build | F80 M3 Build
🎬 YouTube channel (35K+ subs): youtube.com/jakespence135 📷 Follow me on Instagram: instagram.com/jakespence 🏁 Shop BMW merchandise: bimmerstreet.com Last edited by suspenceful; 05-28-2020 at 04:38 PM.. |
|
Appreciate
10
SherM4n632.00 Tommi_Mav65.50 audioMeth224.50 F80DXB11.50 UBR300079.50 sly1types443.50 GreenGoblin53.00 kindafrosty89.50 Boznien257.00 NWH8331.50 |
| 04-02-2020, 09:26 PM | #3 |
|
Captain
 266
Rep 769
Posts |
Thank you for the great write up! Can you please expand on what do you mean by "The best"? The reason why im asking is because i was about to get Swift Spec R springs but starting to reconsider my choice. My main question is how would these perform on track and how do they compare to Swift in track conditions?
|
|
Appreciate
0
|
| 04-03-2020, 11:19 AM | #4 | ||
|
Major
1047
Rep 1,264
Posts |
Quote:
 Quote:
I have not driven this car on the track yet and haven't pushed it to it's aboslute limits in corners. But if that is your goal, I don't think a spring-only option is for you. You should be looking at a set of KW coilovers or their HAS kit at minimum if you're on a budget. This is all just my opinion, but I'm happy to help answer any other questions you have!
__________________
750whp 135i Build | Budget 335i Build | F80 M3 Build
🎬 YouTube channel (35K+ subs): youtube.com/jakespence135 📷 Follow me on Instagram: instagram.com/jakespence 🏁 Shop BMW merchandise: bimmerstreet.com |
||
|
Appreciate
0
|
| 04-03-2020, 03:31 PM | #5 | |||
|
Captain
266
Rep 769
Posts |
Quote:
|
|||
|
Appreciate
0
|
| 04-03-2020, 04:38 PM | #6 | |
|
Major
1047
Rep 1,264
Posts |
Quote:
Your turning efficiency won't be affected much by either spring. Swift will be stiffer than EMD. EMD will be stiffer than stock. Depends how stiff/soft you want your suspension to be over bumps and elevation changes on the track. Do you want to absorb suspension compression? Encourage weight transfer? Or do you want something that rides like it's on rails? Front spring rates:
__________________
750whp 135i Build | Budget 335i Build | F80 M3 Build
🎬 YouTube channel (35K+ subs): youtube.com/jakespence135 📷 Follow me on Instagram: instagram.com/jakespence 🏁 Shop BMW merchandise: bimmerstreet.com |
|
|
Appreciate
1
sly1types443.50 |
| 04-03-2020, 07:45 PM | #7 | ||
|
Captain
266
Rep 769
Posts |
Quote:
|
||
|
Appreciate
1
suspenceful1046.50 |
| 04-04-2020, 04:56 AM | #8 | |
|
Major General
 
13756
Rep 8,227
Posts |
Quote:
I'd skip all these rather no-name brands and go for M Performance HAS if you got EDC.
__________________
 Last edited by swagon; 04-04-2020 at 05:02 AM.. |
|
|
Appreciate
0
|
| 04-04-2020, 10:26 AM | #9 |
|
Private First Class
 
66
Rep 133
Posts
Drives: F32 435dx
Join Date: Mar 2020
Location: Greece
|
great DIY post, thank you!!!!
|
|
Appreciate
1
suspenceful1046.50 |
| 04-06-2020, 10:40 AM | #10 | |
|
Major
1047
Rep 1,264
Posts |
Quote:
Maybe that guy bought the car with EMD springs, or they're improperly installed? Not sure, anything is possible. But again, I have no iron in the fire with any of these companies and am just reporting on my experience. No doubt, KW HAS and M Performance HAS are both great options.
__________________
750whp 135i Build | Budget 335i Build | F80 M3 Build
🎬 YouTube channel (35K+ subs): youtube.com/jakespence135 📷 Follow me on Instagram: instagram.com/jakespence 🏁 Shop BMW merchandise: bimmerstreet.com |
|
|
Appreciate
0
|
| 04-19-2020, 06:52 AM | #11 |
|
Major
169
Rep 1,038
Posts |
Why don't the mp has cause the same stress on shock like other lowering springs like eibach?
If they are lowered the same amount wouldn't they be the same effect? Also how do the modified bump stops help? |
|
Appreciate
0
|
| 04-22-2020, 10:58 AM | #12 |
|
Second Lieutenant
214
Rep 263
Posts |
Did this job last weekend...was as easy as it looks and only took a couple hours.
Only thing I would add is that you need to be careful to ensure the the upper end of the dustboot remains aligned when reassembling. Despite being very careful, I somehow missed that the boot on the driver side misaligned which caused a groaning sound as soon as I backed out of the driveway. I had to disassemble and redo the drivers side to fix it -- fortunately, the boot did not tear. |
|
Appreciate
1
suspenceful1046.50 |
| 04-24-2020, 10:33 AM | #14 | |
|
Major General
3411
Rep 6,799
Posts |
Quote:
My instruction sheet for my Bilstein suspension state to not use an impact. |
|
|
Appreciate
0
|
| 04-25-2020, 06:32 PM | #15 | |
|
BTC maxi
225
Rep 1,125
Posts |
Quote:
|
|
|
Appreciate
0
|
| 05-23-2020, 06:06 PM | #16 |
|
IG: @panda_exprs
117
Rep 138
Posts |
Thanks very much for this DIY!
Minor typo... in the text, the size of the star bit needed to hold the swaybar endlink from spinning is stated as T40 when it's actually T30... it's correct in your listing tools:  |
|
Appreciate
0
|
| 05-28-2020, 04:38 PM | #17 | |
|
Major
1047
Rep 1,264
Posts |
Quote:
__________________
750whp 135i Build | Budget 335i Build | F80 M3 Build
🎬 YouTube channel (35K+ subs): youtube.com/jakespence135 📷 Follow me on Instagram: instagram.com/jakespence 🏁 Shop BMW merchandise: bimmerstreet.com |
|
|
Appreciate
0
|
| 05-29-2020, 03:18 AM | #18 | |
|
Brigadier General
1851
Rep 4,203
Posts |
Quote:
|
|
|
Appreciate
0
|
| 06-08-2020, 01:04 PM | #19 | ||
|
BTC maxi
225
Rep 1,125
Posts |
Quote:
it can, i removed my rear struts/shocks by removing the lower strut bolt and nut and the 3 etorx at the top. |
||
|
Appreciate
0
|
| 07-26-2020, 08:43 AM | #20 |
|
Captain
444
Rep 964
Posts |
Hey suspenceful do you know if the spring arm bolt torque is 74ftlbs or 120ftlbs?
Great write up! Thanks
__________________
F80 M3-DCT MaxPSI CH, BM3 with F80 Paul E85 and Custom Rom track tune MCS 2Way Remotes
Signature SV104 E46 M3 F85 X5M https://www.instagram.com/fastmacm3/ |
|
Appreciate
0
|
| 11-01-2020, 12:27 PM | #22 |
|
Lieutenant
502
Rep 571
Posts |
can anyone help me. I'm using an 1/2 impact gun with 18mm 12point socket to undo the center strut bolt, but can't loosen the nut and I feel like it's just spinning. What am I missing!?

__________________
"If you have everything under control, you're not moving fast enough"
|
|
Appreciate
0
|
Post Reply |
| Bookmarks |
|
|


