

|
|||||||
Post Reply |
|
|
Thread Tools | Search this Thread |
| 05-16-2018, 09:55 PM | #1 |
|
Enlisted Member
 45
Rep 48
Posts |
Active Autowerke Valved F8X 3.5 Full Exhaust System - Review and Installation
Introduction:
The purpose of this post is to provide DIY step-by-step instructions for installing the Active Autowerke F8X M3/M4 Signature Valved Exhaust System. This post will also include the thought process I went through before choosing the AA system, initial thoughts on the system before and after installing, and installation experience. This post is intended for members who are interested in a new exhaust system for their F8X, members who are interested in the thoughts of the AA Signature 3.5” System from an actual DIY perspective, members looking to install the system themselves, or anyone who is up for some casual lunchtime reading. If you are ready to install and are only here for the DIY portion of this post, jump to the Installation section to begin your install. Background: To give you a better idea of why I believe the AA system was the right choice for me, I will share a brief background on the thought process I went through before making the purchase. Although I have over 12 years of BMW DIY experience, the F80 is my first ///M car. This was also my first attempt at installing a full exhaust system on any car and sharing a write-up/review. I am almost certain there are members out there who are on their 6th M-car and 8th exhaust system and in the market for the 9th, so some of my comments and thoughts may be trivial to the majority of this enthusiastic community. However, trust me, you are in the right place if you are a serious exhaust freak and are interested in learning just a bit more! The Decision: I have been in the market for a new exhaust system ever since I got the car almost 2 years ago, not because I had a problem with the stock exhaust (like some do), but rather I thought it was the perfect car to experiment with an exhaust system. Don’t get me wrong, I actually really enjoy the stock exhaust note, it does have the notorious ‘farting’ sounds at high rpm as many refer to it (and apparently have strong hatred towards), but I say it does have enough grunt to it when you get on it to keep me smiling. I wouldn’t go as far to argue an apples to apples comparison with something like the E92 stock for stock, but that topic has been open for discussion in other various threads; thus, I will leave it at that as this is not another exhaust debate thread. I had done a fair amount of research prior to making this decision, so let me take you through some of the thought process I went through before arriving at the AA system. The ideal exhaust system I had in mind to replace the stock system was one that was a direct bolt-on solution with no cutting, drilling, or any other irreversible action. Why? I preferred to retain the ability to put the car back to stock unscathed. You might be thinking, cutting is a reversible solution, you could easily take the car to a local shop and have joints welded back up and returned to a factory configuration. While this is true, I just did not to deal with an exhaust shop to get me back to stock; further, I am not a welder. Secondly, the ideal system was a ‘valved’ exhaust system. I preferred to maintain control over the exhaust just how BMW intended, without any additional aftermarket products (e.g. valve controller, tune, etc.). Third, the ideal system was a full system, no muffler only sections, no midpipe only, etc. You get it, I had my preferences lined up and was definitely not in a rush to hop on the classified section and start chopping exhausts on and off the car. In the end it came down to the following in no order: BMW MPE system (yes, I did realize that this system requires cutting as it’s not a ‘full’ system as I described, but since it is arguably a factory part, I was more inclined to ‘cut’ for a BMW factory system than an aftermarket-BMW exceptions!), AWE Switchpath, Akrapovic Evolution full system. I had heard the MPE and AWE in person, both I really liked. At the time, the Akra was hyped up with few complaints so I wasn’t opposed to taking a risk. The Akra then went off the market temporarily due to some emission regulations (YMMV), so I decided to not mess with figuring out the current situation on regulations and go with a system intended for street use. I later ended up reading numerous posts about MPE cracking issues, and even though it is a warranted item, I really didn’t want to deal with the warranty hassle if it came down to it. This is when the MPE fell off my list. At the time, I was not interested in putting a tune on the car or installing catless downpipes, so these supplemental exhaust mods were not a deciding factor in my final system choice. I was about to pull the trigger on the AWE Switchpath until . It was only up to the last few days when until AA announced the release for an upcoming ‘new valved full system’. I reached out to Andrew@AA, and he kindly gave me a rundown on the ‘prototype’ system and what I could expect. I quickly became interested due to the unique 3.5” single pipe design and wanted to know all the info available at the time. I was also aware of with the strong positive reputation and presence that AA carries with its proven midpipe. Andrew@AA had the prototype system fitted on his F80 so we had discussed in great lengths his impressions. I kept in touch with Andrew through the final stages of development so I thought I would stay tuned for the product release before I made up my mind. Once the system was released, Andrew was able to get a system put aside for me while I mulled over whether or not it was going to be the one. After some further discussions and settling time, I decided to take the risk: go for a completely new exhaust system that I had never heard in person and attempt the install myself. Awesome! Some may wonder why did I decide against the AWE? To be honest, I didn’t have a single problem with the AWE system. At the time, I was excited to try a ‘new’ system and be one of the first to experience it. Further, I felt there was already a significant presence of the particular AWE system on the F8X chassis so why not try something different. I knew that the AWE system would be there as a safe fallback if something didn’t work out. Initial Impressions: The exhaust system arrived in 2 large boxes. The system consists of 3 sections: section 1 goes from the downpipes to the midpipe, section 2 is the other portion of the midpipe to the rear section, section 3 is the rear muffler section. Box 1 includes section 1 and section 2 (long pipe sections) and Box 2 includes section 3, muffler tips, and all installation hardware. The first thing I noticed, was, “wow, the piping is huge” (relative to stock). Installation: I will start this section by listing the tools and equipment that I used (these are not necessarily the best but merely what I had available and chose to use at the time of installation – more on this in the final section). Tools and Equipment: Rhino Ramps (1 set) 3/8” drive Torque wrench 3/8 “drive ratchet E-10 Torx socket 6mm hex bit 8mm socket 11mm socket 13mm socket 13mm deep well socket 15mm socket 15mm deep well socket 13mm box wrench Short socket extension (~3in) Long socket extension (~10in) Universal joint ratchet extension Silicone lubricating compound (Sli Glyde) Flashlights LED shop lights (fits under car) Floor jack Cardboard (as large as possible) 1 Assistant – critical for a few steps of the DIY, as noted. Install difficulty: 5/10 Install time: 8 hrs (this includes capturing photos for this write up) DISCLAIMER: This DIY set of instructions is intended to share the steps I took to install the exhaust system. I am not a professional BMW technician and am not liable for your safety or your car and the work performed. Please exercise caution when referencing these steps as it is only a guide. [Step 0: If this will be your first attempt at a full exhaust install or you want to be better prepared for the install and are not in a rush to start the install, I recommend reviewing the Post Install section of this post to get an idea of some of the suggestions and recommendations I thought of after the install based on what I experienced. Some may be beneficial to your install depending on your install condition.] Step 1: Back the car onto the rhino ramps to elevate the rear of the car. Lay down large pieces of cardboard on the ground. This makes it easier to spot tools and nuts/bolts that you remove from the car also makes it a bit more comfortable to work on the car while you are on your back. Additionally, it acts as a protective layer for the exhaust components to rest on while removing and installing various parts. Step 2: Inspect the underside of the car to familiarize yourself with all the mounting points of the exhaust. Knowing the sizes and location of each unmounting bolt/nut will be valuable when you are uninstalling the stock system. This is also a good time to test fit the sockets/extensions you have to ensure you have the correct sizes, adequate extension and access. If you need to run to the store to grab the correct socket or extension, now is a good time. In case you have never peeked at the underneath of your beast here is an overview of what we are working with. 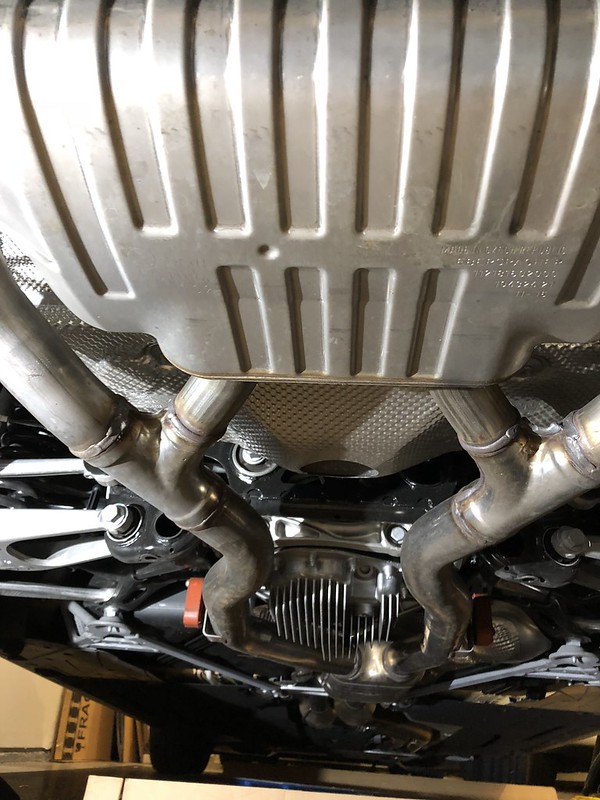 Step 3) Loosen and remove the 6 hex bolts holding the reinforcement plate to the vehicle. The plate is located roughly midpoint of the stock system.  Step 4) Remove the reinforcement plate from the vehicle and place aside (note: this plate will not be reused, the bolts will be reused) 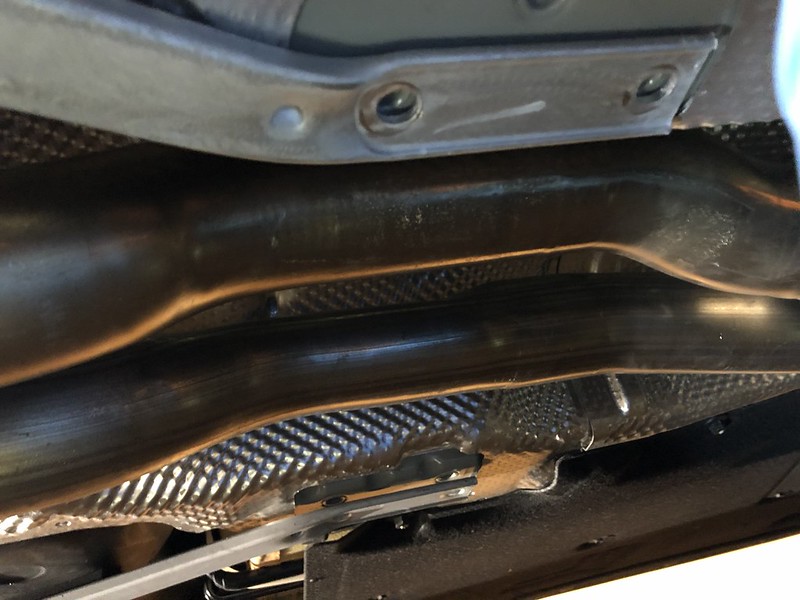 Step 5) Loosen (but do not remove) all mounting bolts and nuts that are on the stock system. This is to prepare the system for removal. (Note: unlike the new AA system, the stock system is 1 continuous piece over 11 feet long, so there are no connection points of the piping to be aware of for removal purposes. If you are installing this somewhere other than home, be prepared to arrange a ride for your stock system as it will not fit in any normal sized car (including the f8X interior- it is long!) In general, the entire stock system is suspended/secured at the following mounting points: 4 - 11mm nuts on the downpipes 2 – E10 bolts on the gear box mount 8mm hex screw + 13 mm nut on passenger side (near differential) 13mm nut on drivers side (near differential) 2 x 2 (driver + pass rear) – 13mm nuts Step 6) Once all bolts, nuts, screws are loose, the system should be visually ‘sagging’ at this point, most easily indicated by the alignment of the exhaust tips. Position your floor jack to the rear of the car and raise the jack to support the underneath of the muffler section of the stock system. Ensure you are only raising the jack the minimum amount for the jack to barely make contact with the muffler, but do not raise the jack up high enough that the jack starts to raise the muffler/system any higher than it is already hanging. Warning: This can cause damage, so be cautious of the contact between the jack and the muffler. 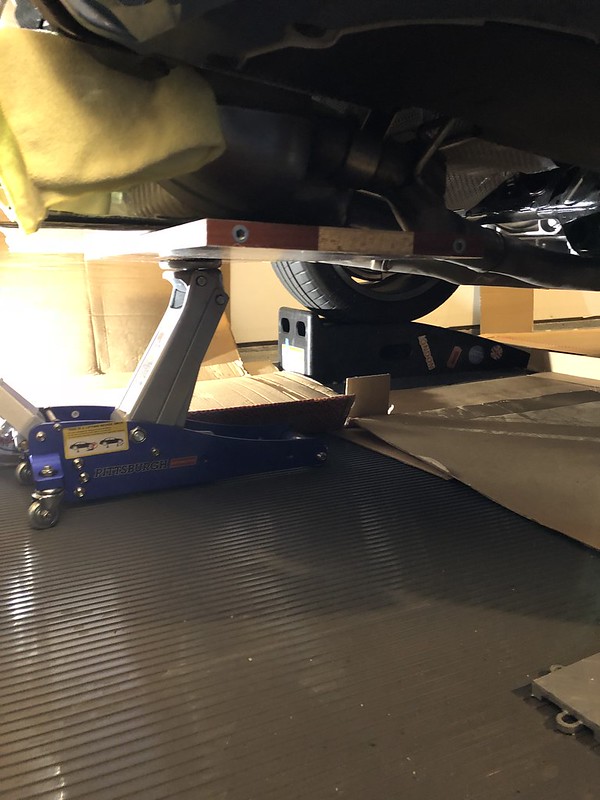 Step 7) With the jack supporting the stock system from the muffler, carefully start removing the bolts, nuts, and screws holding the system to the car starting from the rear of the vehicle working forward. i.e. leave the nuts on the downpipes till very last! Keep an eye on the jack and the contact it is making with the muffler between removal of each bolt. If the system has shifted and is no longer effectively supporting the muffler evenly, adjust the jack position. This is where an assistant is helpful (not critical yet) to watch/stabilize the muffler and jack to ensure the exhaust has not shifted during the removal of the bolts, nuts, screws. Step 8) Once you have removed all bolts, nuts and screws except the 4 nuts on the downpipes, it is time to get an assistant to help with the final removal of the system from the car. This is critical due to risk of safety and damage to the car. Your assistant needs to be competent in safely operating the floor jack in use. Advise your assistant that they will be controlling the jack’s position and height as you instrument the removal of system from underneath the vehicle at the downpipe attachment point. Step 9) With your assistant piloting the jack, remove all 4 nuts attaching the system to the downpipes. Note, the system will not come crashing down as it is “hung” on the 4 studs of the car (downpipes). It will require light to moderate force/jiggling to free it from all 4 studs (YMMV). Once you can visually see both pipes freely moving about the studs and starting to work its way down the studs, instruct your assistant to slowly roll the jack supporting the muffler away from the car. If the jack is moving but the exhaust is not, stop immediately and ensure there is adequate support and force generated between the jack and the muffler to move the system with the jack. If you are sure there is good contact with the muffler and the jack, there is a chance the connection at the downpipes is still not free or you have missed a bolt or nut at a different mounting location. Double check all exhaust attachment points are removed before, applying additional force to free the system from the downpipes. Step 10) Once you spot the exhaust flange at the downpipe begin to slide down the studs of the downpipes, tell your assistant to slow down with moving the jack away from the car and prepare yourself to support the system at the downpipe flange. Once it nears the end of the studs, it can easily slip off and come crashing down. Keep a hand on it and do not lay directly under it! Step 11) It should be obvious when the system is separated from the downpipes. Your assistant can stop the movement of walking the jack away from the car. Instruct them to slowly lower the jack in place while you are supporting the front of the system as the rear of the system will be much higher off the ground than the front. The rear muffler must be lowered via the jack before resting the pipes on the ground as there is tight clearance and the muffler needs to be lowered for added clearance in the rear to avoid damage/interference with the tips/high spots on the muffler with the car. i.e. yes, support the flange end of the exhaust near the height it came off the car, keeping it off the ground until your assistant can lower the muffler closer to the ground. Step 12) Once the jack is lowered, you are free to rest the system on the ground. Climb out from under the front section of the car, and carefully dismount the muffler off the jack to the floor and carry the system away from the car to make space around the car for the new system. 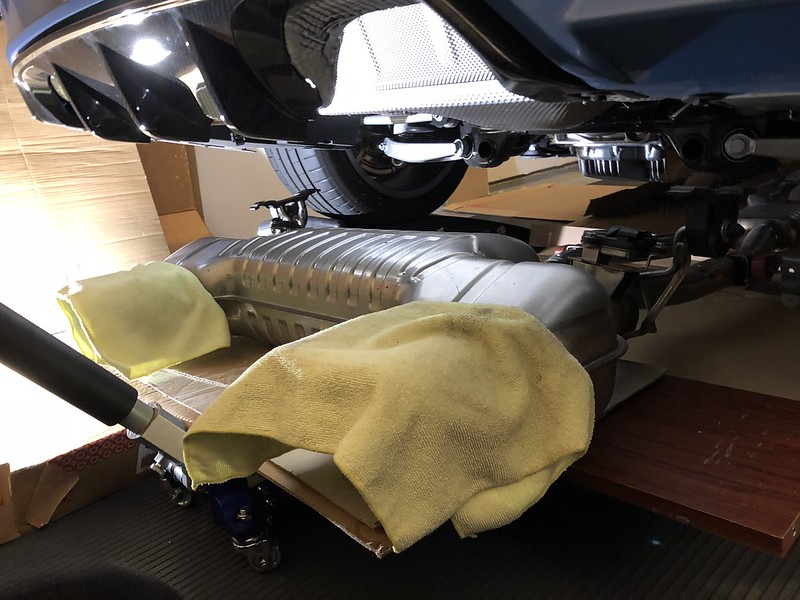 Step 13) Prepare the new system. Unbox all pieces of the new AA system and lay it out systematically. Identify section 1, section 2, and section 3 (rear muffler). Get acquainted with which mount/hanger goes where, where all the rubber mounts are installed and which mounting hardware is used or if the stock nuts/bolts are reused. This will help lower the chance of installing something in the wrong place. 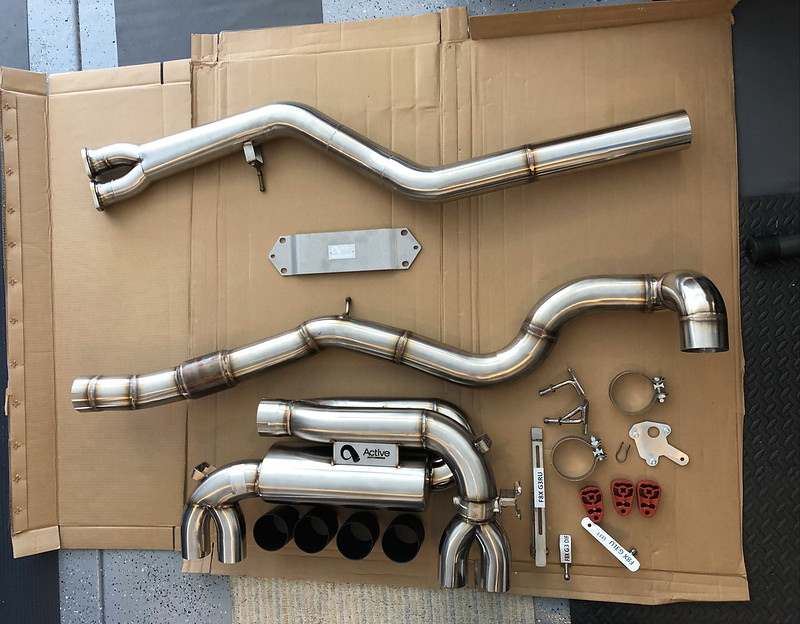 Step 14) Remove the grey/gearbox rubber mount + hanger from the stock system and install (reuse) it on to Section 1 of the new AA system. Pre-mount the provided red exhaust mount and differential hanger (provided) to Section 2. This will prepare Section 2 for install as you don’t want to be mounting rubber mounts under the car, trust me. Step 15) First install Section 1. It attaches to the downpipes in reverse of the stock system. Line up the 4 studs on the downpipe with the flange on section 1. Hang section 1 on the studs and tighten, but do not torque the 4 nuts at this time. Tighten, but do not torque the 2-E10 bolts at the gearbox mount. Ensure the flange of the AA pipe mounts evenly up to the downpipes with no obvious gaps. Look from the passenger side for a clear view of the downpipe interface. 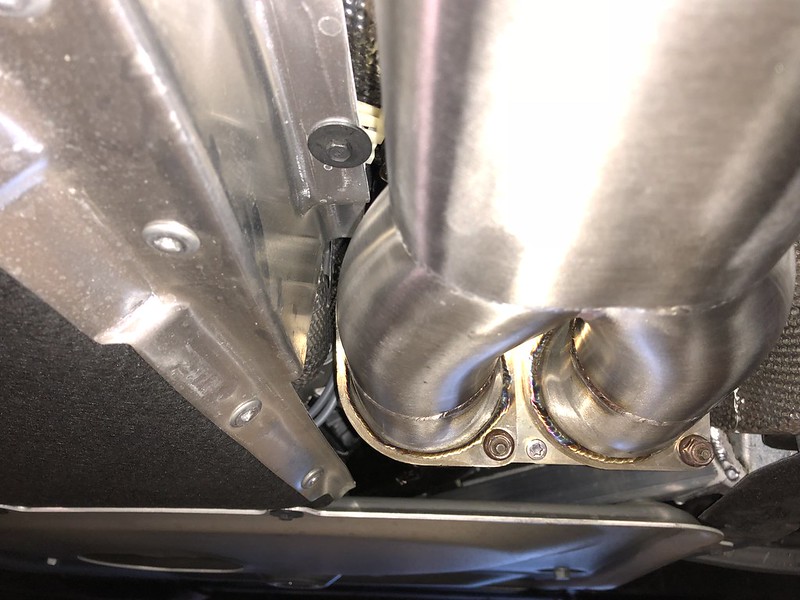 Step 16) Install the supplied new reinforcement plate by reinstalling the 6mm hex screws. These fasteners can be torqued up as there is no adjustment here that would change the remainder of the install. I torqued these up to ~15 ft-lb. Section 1 will rest on this reinforcement place until Section 2 is joined. Step 17) Install Section 2. Section 2 attaches and secures to Section 1 via the Accuseal clamps (supplied) and the car via the differential hanger mount (passenger side only). The differential hanger and mount should already be installed (from Step 14) to ease install of Section 2 to the car. Slip on the loose clamp to Section 2 prior to going under the car to fit the 2 sections together. Once under the car, match up the pipes. Section 2 fits inside the end of Section 1 just passed the newly installed reinforcement plate. Don’t worry about the loose clamp sliding up and down the pipes at this time. However, do note the direction I have installed the clamp. It made the most sense to me. 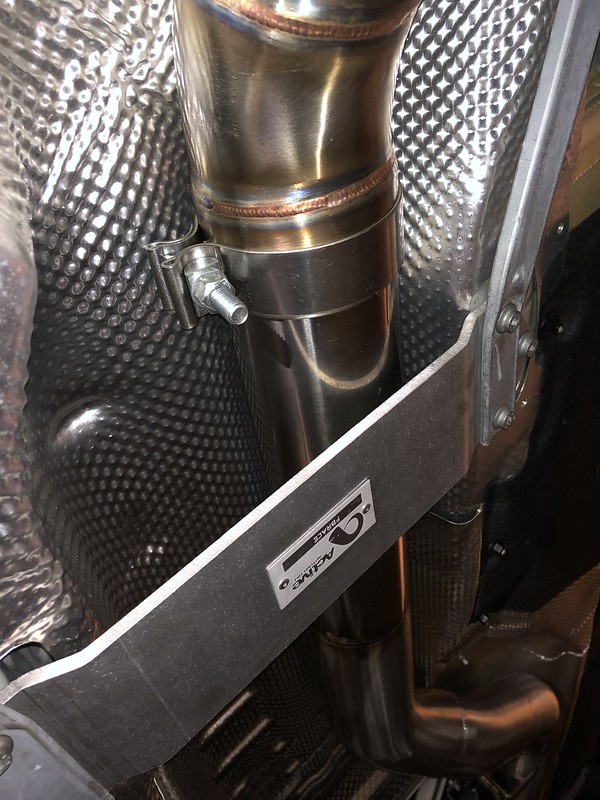 Step 18) While supporting Section 2, get back to the differential hanger and install (but don’t tighten) the 1- 13 mm nut on the passenger side, near the differential. Only tighten it enough to safely suspend the system at this time. 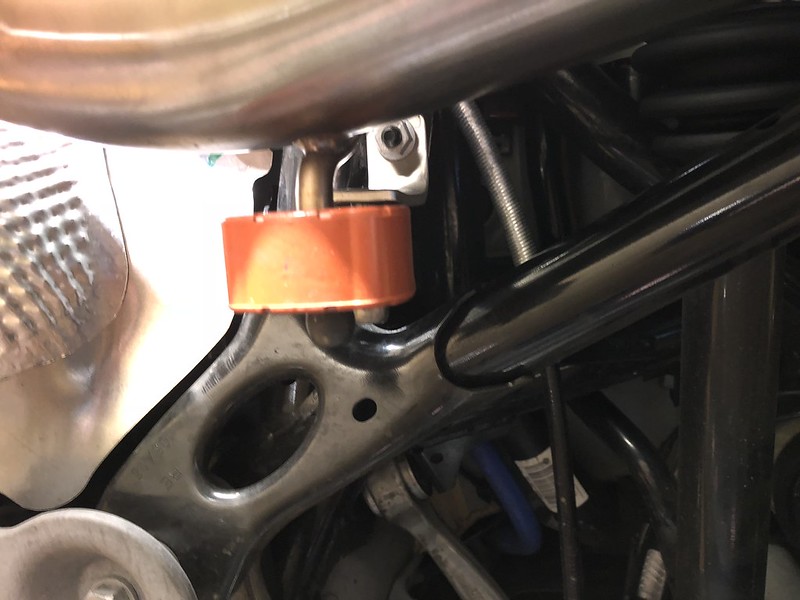 Step 19) Once Section 2 is suspended. Go back and snug up, but don’t tighten the clamp at the Section 1 to Section 2 joint with a 15mm socket. Tighten it just enough that the clamp can hold its own weight in the position and orientation and you can apply minimal force to rotate or slide the clamp. i.e. make sure the clamp doesn’t just slide down away from the joint. 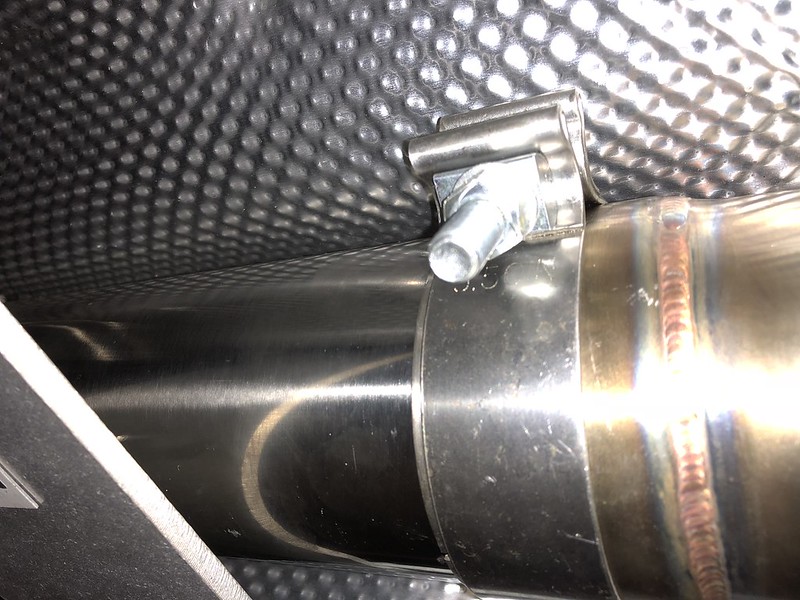 Step 20) By now you’ll have a pipe that enters the empty muffler area of the undercarriage. Prepare the muffler section for install. Remove 1-valve actuator from the stock system for reuse. 3 – 10mm bolts. Install the valve actuator onto the muffler section reusing the stock bolts and matching up the actuator to the muffler valve. The valve mounting bolts are small, I torqued them ~8 ft-lb. Install the valve spring clip as shown in the photo.  Step 20a) Press on the supplied rubber exhaust mounts to the supplied brackets. I wasn’t able to find a trick to installing these without great force and effort. Use a silicone based lubricating compound, ‘Sli glye’ by Napa to aid in getting the rubber mounts properly positioned on each of the exhaust hangers. Install the supplied exhaust hangers and rubber mounts to the left and right of the muffler section with the supplied exhaust bolts (4-13mm bolts, 2 per side). They are labeled - RU=right=passenger, LU=left=driver. Don’t torque up the 4 hanger bolts yet; the hangers are slotted and should easily slide for install adjustment. Lastly, slip the loose exhaust clamp on the inlet pipe of the exhaust section, note the direction. Note: There are 2 factory valve actuators, the new AA system only uses 1. They are the same actuators so it doesn’t matter which one you use. Note: I have the exhaust tips shown in the photo, but I was only test fitting them, I removed them prior to install, which I highly suggest to avoid unnecessary damage. 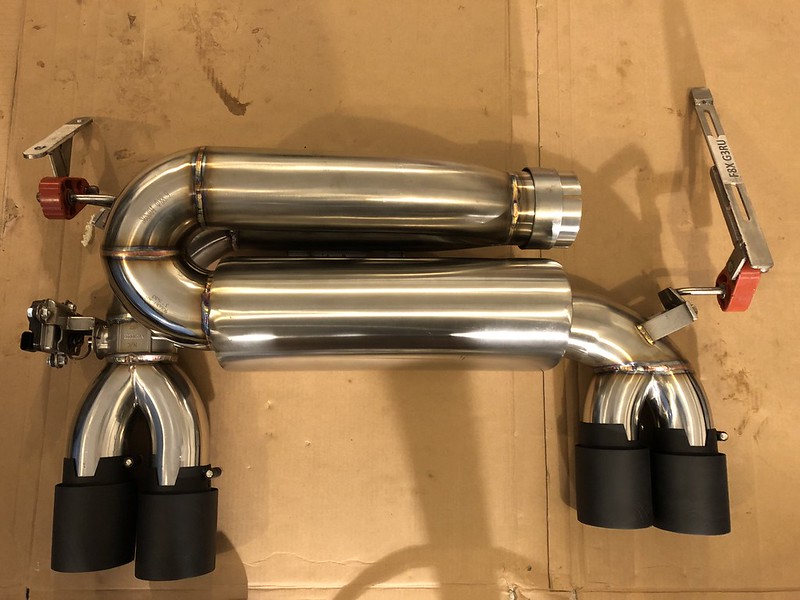 Step 21) Install the muffler section to the car. The muffler section isn’t exactly heavy, but it does require some agility to raise the muffler section up to the car while laying on your back. The muffler section doesn’t exactly need to be raised directly up to the car as you’ll notice the design of the Section 2 pipe snakes around at a 90 degree elbow on the passenger side to join up with the muffler. The muffler is fitted by matching up the pipe of Section 2 to the inlet pipe of the muffler by sliding the muffler section into the Section 2 pipe. Some tilting of the muffler section is required to allow the muffler to mate with the Section 2 without interfering with the car. The key is to match the pipes up first and then match up the 2 hanger brackets to the car’s studs and engage enough threads on the mounting nuts to suspend the muffler loosely. If your assistant is available, it would be helpful to ask them to have the mounting nuts ready and to help guide the hanger brackets onto the car studs and loosely start threading the nuts once you’ve matched the Section 2 to muffler joint. This step does require coordination and full attention as there are multiple interfaces that must be aligned and matched. 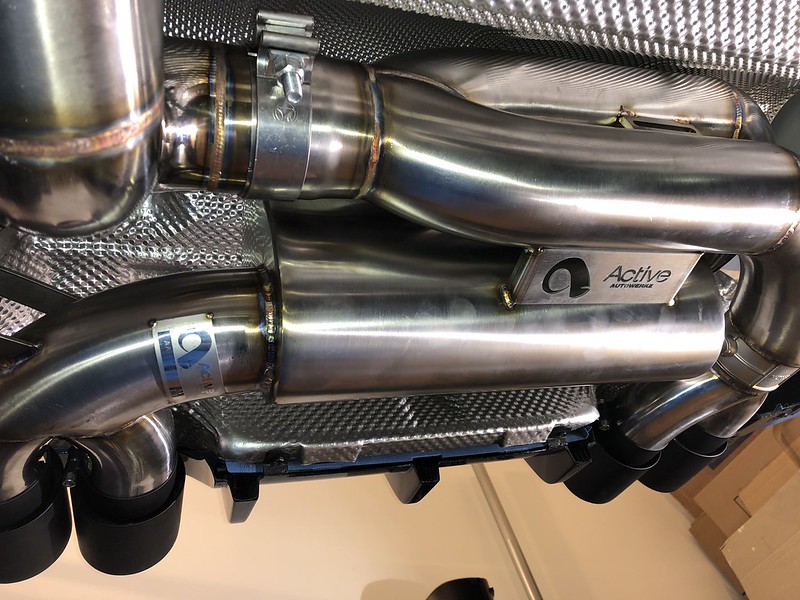 Step 22) The exhaust section is now suspended loosely and will appear to be sagging away from the car. This is normal. Begin to tighten up all the nuts and bolts that are used to align the muffler. Tighten the bracket nuts (4 nuts) on both sides of the car so the brackets are lightly seated against the car, but do not torque. Tighten, but do not torque, the 4- 13mm hanger bolts on the muffler section enough to where the muffler can be suspended on its own weight. Tighten, but do not torque the 15mm exhaust clamp. Support the muffler to an angle where the exhaust outlet pipes are pointing approximately level and tighten enough so the muffler can support its own weight. Note: the exhaust clamp is the primary adjustment point for the angle at which the muffler sits, i.e. rotation about the Section 2 pipe. 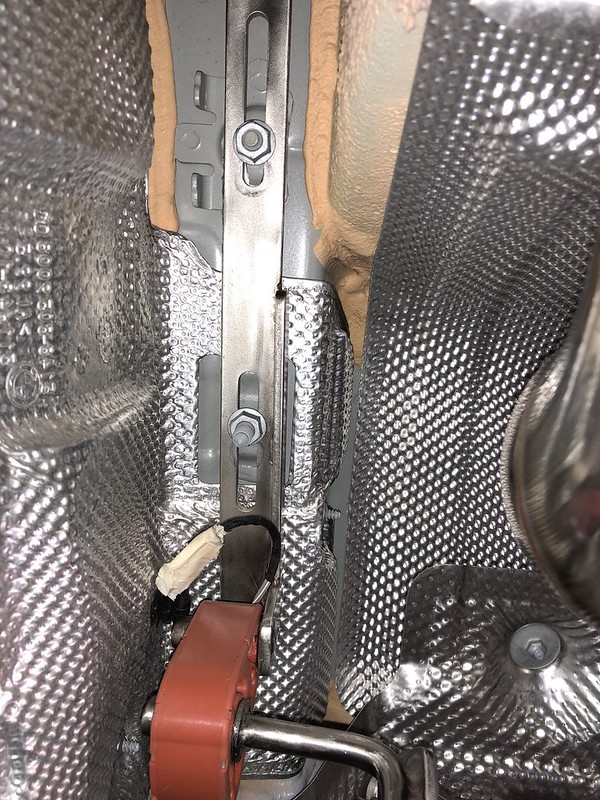  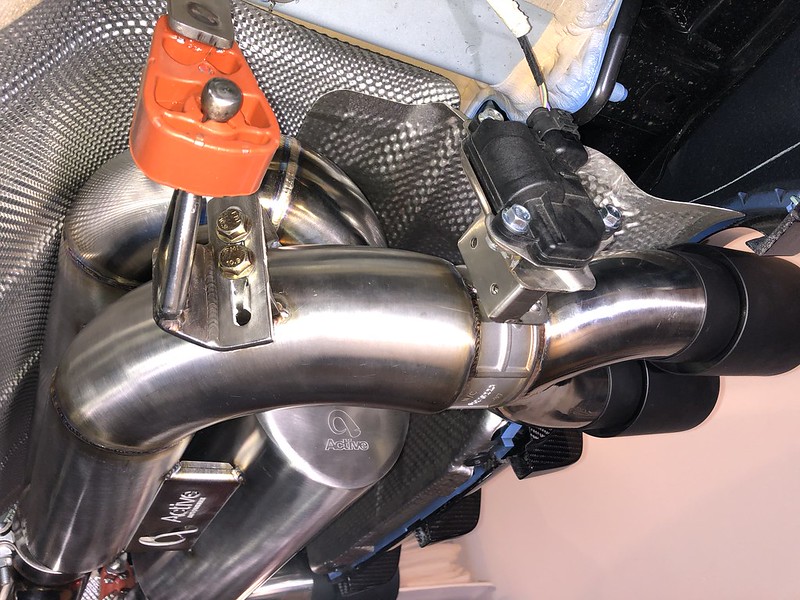 Step 23) This is where final adjustment begins. I had the exhaust tips nearby to test fit the alignment while all the bolts and nuts were snugged but not torqued. I was able to compare left vs. right tips, distances from tips to the car in various areas around the diffuser to get the muffler aligned. This can be tricky and takes time and patience depending on your level of criticality. I don’t have direct guidance for this portion of the install, and it was purely trial and error. After tightening and loosening various combinations of bolts and nuts, you will quickly identify which bolt and nuts allow shift or adjustment for a particular gap or interference you are trying to correct. Take your time here as you don’t want to be one of those cars on the road you are following and notice one of their tips is higher than the other. For me, this takes all the satisfaction of an aftermarket solution away, focus on fit and finish. Step 24) Once you get close to aligning your muffler to your liking, start by torqueing up the mounting bolts, nuts, clamps starting farthest away from the muffler. Start at the downpipe flange nuts and work your way to the rear of the car. The reason I used this method is ensure that I am not torqueing up the system and introducing twist or unnecessary pressure on any portion of the system that you may encounter by torqueing up at random. This may introduce unintentional mismatch, gap, or alignment issues. Further, for accounting purposes, it’s best to have a systematic approach for torqueing everything up since the entire install we have been ‘tightening but not torqueing’ to allow for maximum slack in the system. Step 25) Torqueing up the system. Here is an overview of all the attachment points, nuts, and bolts, and screws that were installed and need to be torqued up. I’ve stated the approx. torque I applied, some measured, some roughly approximated by hand. Starting with the front of the car to the rear: 4 - downpipe flange nuts ~15 ft-lb 2- Gearbox mounting bolt ~15 ft-lb Section 1 to section 2 clamp ~50+ ft-lb Differential mounting nut ~15 ft-lb Section 2 to muffler section clamp ~50+ ft-lb 4- muffler bracket bolts ~35 ft-lb 4- muffler hanger bracket nuts ~25 ft-lb 4- Muffler tips ~20 ft-lb Step 26) Once all the bolts are torqued up appropriately, double check the muffler and tip alignment to ensure nothing has shifted during final torque up. Make any final tweaks necessary with the muffler alignment. Double check that you haven’t missed any final torques on any fasteners. Double check you don’t have any remaining bolts, nuts, screws on the floor that you missed. Step 27) Lastly, plug in the electrical connection to the valve actuator on the driver’s side until you hear/feel the click of the connector securing. Install the tips and torque with 6 mm hex. I chose to torque to ~20 ft-lb. I slowly increased torque while checking every couple ft-lb to see how secure the tip were. ~20 ft-lb was the sweet spot where the tips felt solid and did not rotate with generous force. 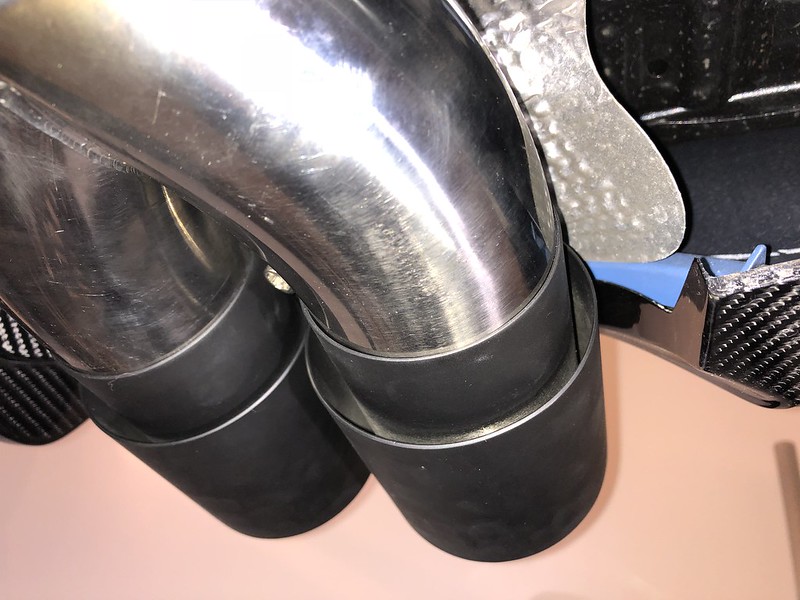 Step 28) Clear the area of any loose tools and prepare for a cold, first start. Step 29) Start the car and observe. Optional: Setup a camera to document the first start with the new system. Make sure no check engine lights or indications of an exhaust leak. Some ejection of debris, strange odors and weird color smoke is what I considered normal in my first start. Step 30) If you’ve made it this far, you can deem yourself a champion and prepare for your first drive. Get the car off the ramps. Enjoy! 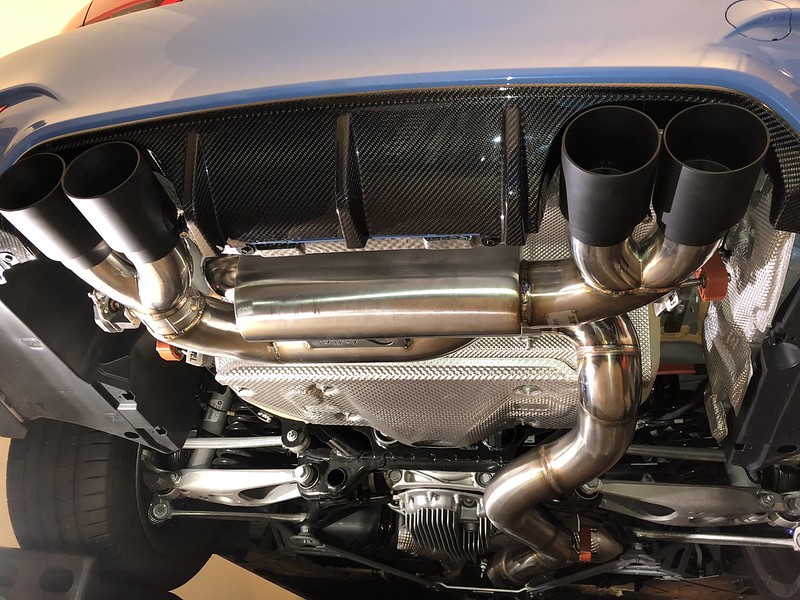 Post Install Impressions: Comments/Suggestions/Recommendations: • I suggest getting all 4 corners of the car off the ground either on 4 jack stands or 4 rhino ramps or ideally a lift. I am on stock suspension and it was an extremely tight fit up in the front of the car reaching the downpipe flange mounting nuts. No issues in the rear, however, if you aren’t comfortable with the car rubbing against your face while working on the front of the vehicle, I strongly suggest not doing this job with only the rear on ramps. If I did this again, I would get a 2nd set of ramps for the front of the car or borrow a friend’s lift. • A powered ratchet similar to the Milwaukee cordless ratchets would be greatly beneficial for getting threads engaged efficiently with 1 hand. If you have one, keep it handy. • Exhaust clamps need to be torqued much tighter than you’d expect. I had initially torqued them to ~35 ft-lb and noticed some slight shifting of the system after driving. I had to go back and readjust the system and increased torque clamps up to ~50 ft-lb. If you can get more torque on them, I would highly recommend torqueing beyond 50 ft-lb for added security. If you notice any shifting of the system, it is likely due to your clamps being too loose. • Upon removal of the stock system, ensure the factory exhaust gaskets (seals) remain on the downpipes. These are fragile graphite type gaskets and need to be retained and used on the new system. During the removal of my factory system, one of the seals came off with the system unknowingly. It took me a while to realize I had installed the system without one of the seals and it was added effort to get the seal installed properly. Do yourself a favor and ensure your seals stay on the downpipe of the car undamaged. • Ensure you have long extensions. I used ~10 in which got me by, but I would say longer is better in this case. • If you have a rear diffuser you care about, stock/aftermarket/CF, I suggest removing the diffuser prior to beginning installation. This will give added clearance and avoid contact/damage to the diffuser. There were a few times I made contact with the CF diffuser and muffler, and I cringed. • I suggest using a combination of sheets of cardboard or a piece of finished wood to go between the stock muffler and the floor jack during the operation described in Step 6). • I suggest wrapping a towel around the stock exhaust tips to prevent damage to the tips and diffuser when/if they come in contact while dropping the stock system. • The new reinforcement plate installed in Step 16 causes section 1 to rest on the plate ever so slightly to cause noticeable scratching on the Section 1 pipe. I’d recommend sliding a towel or a slim piece of wood between Section 1 and the reinforcement plate until you install Section 2 and Section 1 is no longer riding on the reinforcement plate. • This system has added subtle but noticeable burbles, cracks and pops to a stock non-zcp setup. I am interested in how this system might behave with a tune, such as BM3. • I would conservatively say this system is ~40% louder than the stock system, however, the most noticeable difference is the deepness of the growl (startup/idle/WOT). The exhaust note is much, much deeper than stock. • I’ve learned that youtube/videos don’t represent exhaust systems in the slightest bit. I’ve made a few exhaust clips and it sounds nothing like in person. I suggest you hear systems in person, or install at risk with an open mind (similar to how I approached). If you are shopping for a system via youtube, you are in for a surprise, for the better or worse. Final Thoughts: I’ve struggled to find a proper DIY for installing a full exhaust system, let alone, simply removing the stock system. I’ve attempted to fill the void and hopefully benefit others who may be itching to touch these cars with a wrench. Special thanks to the team @activeautowerke (Andrew, David, Craig) for the great support and response before, during, and after the install; I asked lots of ‘dumb’ questions along the way and they kindly responded. I hope this post adds value to others who are shopping for a new system, eager to attempt the install (DIY), or reflecting on the install of the new Active Autowerke 3.5” Valve system for the F8X platform. Again, my intent is not to create an aftermarket exhaust comparison thread, but rather a post to share my experience with the Active Autowerke 3.5” Valved system. I will try and get a sound clip posted in the near future, but I can almost guarantee it will not accurately represent the product. Try your best to find the opportunity to hear it in person! Closing: I’ll summarize this and say that based on my search exhaust systems are very subjective; I won’t be that person posting that their setup is the best setup on the market and that it is much better or louder than XYZ system. However, I will say that the AA system has been performing to my taste given my initial limitations and preferences discussed prior. For a setup with stock DPs, no tune, etc. this system is Loud. It is a very deep tone, nearly rasp-free at any rpm (yes, much less rasp than the stock system). At highway cruise it is just as quiet as stock, but you are easily reminded at any subtle throttle input/load that it is no stock system. As with all systems, including stock, you can get it to drone at some speed/rpm combination if you try, and this system is no exception. The important point here is there is no drone at highway cruise, which was my original concern. As I eluded to in the comments section, the burbles/cracks and snaps on upshifts/downshifts that were acquired with the install was a pleasant surprise I did not expect. They are subtle and aren’t the backfiring, popping effects that you might get from a tune while coasting under 5 mph, but they are there for sure which adds nice character. Similar to the stock system (and many other aftermarket setups) cold start valve rattle is a known issue. Other exhaust products have been out long enough to incorporate design revisions to remedy this issue. I believe AA will be addressing this issue as a future design improvement. Lastly, if you are seriously interested in this system and feel as critical about choosing a system as I described myself, I strongly recommend hearing it in person installed on the same/similar setup to yours. Cheers! Questions/comments/feedback/requests, feel free to PM me or post directly. Thanks for reading! 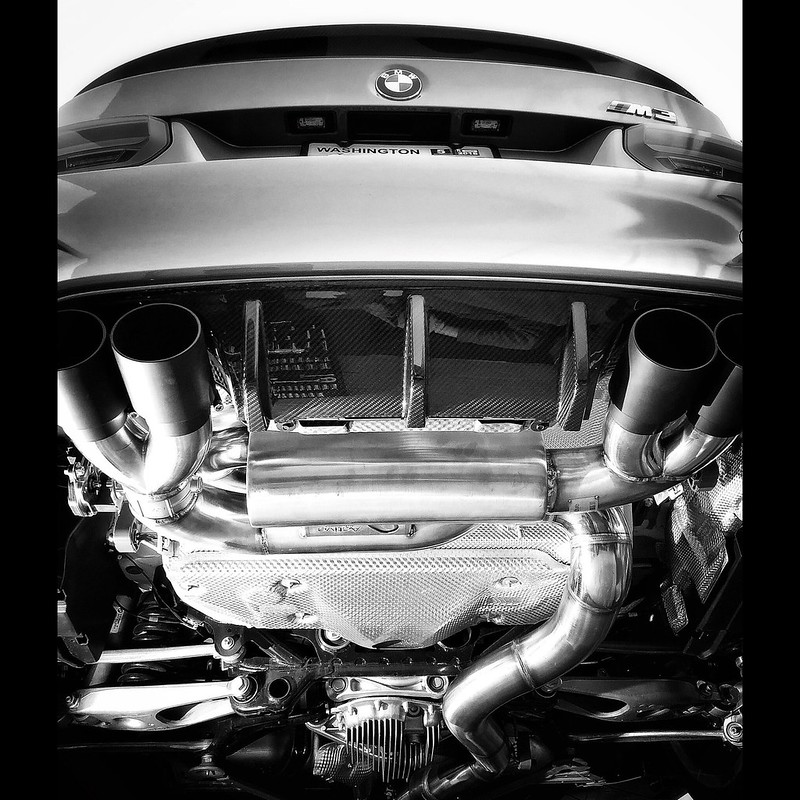 Active Autowerke F8X M3/M4 Signature Valved Exhaust System Last edited by BimmItUp; 05-17-2018 at 09:51 AM.. |
|
Appreciate
14
THEROK1267.50 David@ActiveAutowerke813.00 G35POPPEDMYCHERRY4998.50 Wildhog1.50 SflBimmer84841468.50 Aubie4Pres106.00 M-Pilot4859.00 dpgfunk332.50 ellipsis2121617.50 stealth70mde375.50 PshhhhhMW554.00 philude25.50 AYF8080.50 jc05e46m3847.50 |
| 05-16-2018, 10:59 PM | #2 |
|
Lieutenant
 210
Rep 400
Posts |
Epic post
|
|
Appreciate
1
ellipsis2121617.50 |
| 05-17-2018, 08:51 AM | #6 |
|
Major
 
323
Rep 1,080
Posts |
Good sir, I'm all my years of reading DIY posts, yours truly is one of the best and I'm my opinion is a great selling factor even to AA for how complete your instructions are.
Congrats
__________________
 |
|
Appreciate
0
|
| 05-17-2018, 09:02 AM | #7 | |
|
New Member
2
Rep 7
Posts |
Quote:
|
|
|
Appreciate
0
|
| 05-17-2018, 09:34 AM | #10 | |
|
BimmerPost Supporting Vendor
813
Rep 526
Posts  |
Quote:
|
|
|
Appreciate
0
|
| 05-17-2018, 10:43 AM | #12 |
|
First Lieutenant
179
Rep 348
Posts |
This is the exact system I've been looking into for all the same reasons you've had. And, despite my car being an M4, it has the same specs are yours (non-CP and no aftermarket DPs or tune, which is how it'll remain).
I'm not looking for a loud car this time around (daily drove a Hellcat for 2 years, that's loud, an M3/4 isn't, trust me) but I definitely want a cleaner, deeper sound. Wish you were in Houston so I could hear how your car sounds. Really appreciate the write up. Thanks! |
|
Appreciate
0
|
| 05-17-2018, 12:16 PM | #13 |
|
Captain
82
Rep 623
Posts |
Great DIY/write up!
I have the same exhaust and it definitely sounds a lot better in person than in the videos on youtube. I was surprised how deep the exhaust sounded when I first took it for a spin.
__________________
2018 F80 M3
Instagram: @steven_f80 |
|
Appreciate
0
|
| 05-17-2018, 12:40 PM | #14 |
|
Major

1268
Rep 1,287
Posts |
Based on AA's youtube video, their exhaust tip seems to protrude quite far out which is a show stopper for me. How much adjustability is there to have the tips sit tighter and closer to the diffuser? Any shots of your setup from the top looking down, side and just straight from the back? Thank you!!!
Side note, it's tougher to take an aftermarket vendor seriously when they post up comments like this: "The stock S55 midpipe is a dual pipe system from each turbo that leads to the rear muffler. The resulting sound is far from pleasant, and without any real scavenging effect the turbo lag is fairly pronounced."
__________________
Dry sump flat six
Last edited by THEROK; 05-17-2018 at 01:00 PM.. |
|
Appreciate
0
|
| 05-17-2018, 01:09 PM | #15 | |
|
BimmerPost Supporting Vendor
813
Rep 526
Posts |
Quote:
 Which part of that statement do you not agree with? |
|
|
Appreciate
0
|
| 05-17-2018, 02:58 PM | #16 | |
|
Enlisted Member
45
Rep 48
Posts |
I have my tips set very close to stock protrusion. There is still adjustability to protrude less (inverted). I too am not a fan of setups where people run the tips stuck inches off the back of the diffuser/bumper. I'll have some shots you requested up shortly.
 Quote:
|
|
|
Appreciate
1
THEROK1267.50 |
| 05-17-2018, 04:01 PM | #18 | |
|
Brigadier General
 
1469
Rep 3,157
Posts |
Quote:
|
|
|
Appreciate
0
|
| 05-17-2018, 04:37 PM | #19 | |
|
Enlisted Member
45
Rep 48
Posts |
Thanks!
Always happy to help the community in any way I can.  Quote:
|
|
|
Appreciate
0
|
| 05-17-2018, 04:41 PM | #20 | |
|
ECUTek Master Tuner
10442
Rep 1,729
Posts
Drives: F80 M3 YMB
Join Date: Jul 2017
Location: Colorado Springs
|
Awesome write up! Just need videos!
__________________
Quote:
|
|
|
Appreciate
0
|
| 05-17-2018, 07:12 PM | #21 |
|
Private
 6
Rep 64
Posts |
My complaint on the exhaust is cold start rattle with valve closed is the most embarrassing thing ever in a crowd. That and the inside of one tip the color wore off??
Besides that it sounds amazing and looks awesome! |
|
Appreciate
0
|
| 05-19-2018, 12:39 AM | #22 | |
|
First Lieutenant
20
Rep 341
Posts |
Quote:
|
|
|
Appreciate
0
|
Post Reply |
| Bookmarks |
| Tags |
| activeautowerke, exhaust active autowerke |
|
|


