

| 12-08-2021, 02:54 PM | #1 |
|
▆ ✚✚ ▆▆▆▆▆▆
6579
Rep 5,304
Posts |
GT4 Splitter on OEM bumper - YES
---------- THE RESULT ----------
Okay, here is the end result of this grand experiment. Clearance is a lot better than I thought. And with the air cups installed, I can go to stock height at the push of a button. I'm very happy with the look.  Special thank you to: Frode D Signature Wheel BMW Keebin ninekrpm    ---------- ORIGINAL POST ---------- For a seamless install, the GT4 splitter requires that you get a new GT4 bumper, GT4 canards, GT4 upper brake ducts -- which is a hefty investment. Every one I've talked to about the splitter, 3 years ago till now, has told me that it's not possible or is extremely difficult to run the GT4 splitter on the OEM bumper. But I just wanted to run the splitter and add on the rest of the accessories as an option later on. Well, I did it. It just took some cardboard to make a template and a Dremel. That's literally it. The installation itself takes a bit of trimming when mounting to the chassis, so trimming the bumper cover itself isn't too far off from the skills required to install the splitter in the first place. Even the mounting holes will be easy to locate since you have full access to the rivnuts through the back of the splitter. Here are some pics of the "test bumper" that I trimmed up to mate it to the splitter. This GT4 splitter is the APM version and the fitment is spot on.    Here's the reference photo that Keebin provided me of a genuine GT4 bumper so I can get an idea of what needed to be cut. Thanks Keebin!  So, if any of you are on the fence about getting this splitter, I hope this helped you save some money -- even though the splitter itself is still expensive af. Last edited by x.shell; 01-03-2022 at 02:40 PM.. |
|
Appreciate
14
|
| 12-08-2021, 03:58 PM | #3 |
|
///M Powered for Life
11469
Rep 10,328
Posts |
beautiful! thank you!
|
|
Appreciate
0
|
| 12-08-2021, 07:15 PM | #4 |
|
New Member
15
Rep 21
Posts |
Was just about to purchase a GT4 bumper so that's pretty helpful. Still might go ahead and do it though to avoid cutting up my original one in case I decide to go back to stock.
Did you already get it mounted up on to the crash brace/chassis? |
|
Appreciate
0
|
| 12-08-2021, 07:18 PM | #5 |
|
Captain
 432
Rep 937
Posts |
Good work!
__________________
F80 M3-DCT MaxPSI CH, BM3 with F80 Paul E85 and Custom Rom track tune MCS 2Way Remotes
Signature SV104 E46 M3 F85 X5M https://www.instagram.com/fastmacm3/ |
|
Appreciate
0
|
| 12-08-2021, 08:11 PM | #6 | |
|
▆ ✚✚ ▆▆▆▆▆▆
6579
Rep 5,304
Posts |
Quote:
I have not mounted it to the chassis yet, but it doesn't seem like a very difficult process. Most of my previous lips, I've always had to fabricate some sort of mounting solutions/reinforcements. But the GT4 splitter comes with all the mounting brackets and hardware which I am extremely happy about. I probably won't have time until Christmas break. |
|
|
Appreciate
1
///F8015.00 |
| 12-10-2021, 04:39 PM | #9 |
|
▆ ✚✚ ▆▆▆▆▆▆
6579
Rep 5,304
Posts |
A couple things about the APM GT4 replica splitter.
One of the key differences between the BMW Motorsport splitter and the APM splitter is how the bumper is fastened to the splitter. The OEM uses a "cage nut" type backing that is riveted where the mounting holes are located. APM opts to use rivnuts to simplify it. The OEM solution is definitely prettier and arguably better but it kinda overcomplicates the manufacturing process and also makes sourcing all the OEM fastners and hardware pretty difficult. And of course BMW's beautiful over engineering definitely adds to the astronomical price of the OEM splitter, which I can live without it.  But seriously, check out the fitment of this splitter. There are no fasteners installed yet. The bumper cover just slides into place. Jeez, I've never had a carbon fiber lip fit so well before.  AND finally.... here's one slight error with the APM splitter. Their manufacturer used M5 rivuts instead of M6 on the bumper/splitter mounting screws but they sent me M6 bolts in their prepackaged hardware set. Alexander at APM has always been very prompt in replying and this was not any different. APM's communication is always consistent. They immediately sent me the M5 bolts and they're reviewing how this happened in their manufacturing. I imagine the whole batch that my splitter was included in has this "anomaly". It's not a big deal at all, but I thought I should mention it. That being said, I had already drilled out all the M5 rivnuts and installed M6 stainless steel rivnuts in it's place -- I prefer M6 rivnuts and bolts as I use it on almost everything car related. In terms of the finish, obviously the APM splitter is a 2x2 twill weave with a high gloss finish. While the OEM version has various weaves with a raw carbon type look. Honestly, I don't really like high gloss finishes on huge flat surfaces as it magnifies any imperfections in the part and in the reflections. So most likely, I am going to refinish the splitter in a satin or matte finish before it's installed. I'll update more as I slowly progress in this install. . Last edited by x.shell; 12-14-2021 at 09:43 PM.. |
| 12-14-2021, 09:43 PM | #10 |
|
▆ ✚✚ ▆▆▆▆▆▆
6579
Rep 5,304
Posts |
So how do you find the holes you're supposed to drill in order to mount the bumper to the splitter?
You first line up your bumper and splitter. Then you take a regular nail and bend it 90 degrees in the middle. Then you heat it up with FIRE (scented candle is optional)! I used a needle nose plier. Then you go behind the splitter and just push it upwards through the rivnut! Be careful not to drop the heated nail on the bumper or carpet as it will leave a mark! Easy!    In all honesty, you don't really need to drill these holes for the splitter. They do nothing to keep the splitter in place as it is chassis mounted. These fasteners are there to just lock the bumper down. But if you prefer to keep the "clean" look and not have the holes, you can find an alternative way to fasten the bumper to splitter. I personally like the look of the fasteners, so I'm gonna drill it. . |
|
Appreciate
3
|
| 12-15-2021, 11:37 AM | #12 | |
|
Major
 1106
Rep 1,301
Posts |
Quote:
|
|
|
Appreciate
0
|
| 12-23-2021, 12:24 AM | #13 |
|
▆ ✚✚ ▆▆▆▆▆▆
6579
Rep 5,304
Posts |
Took some steel wool to the clear coat which resulted in getting the high gloss down to a nice satin finish. Much better IMO. I have some 2K Satin Clear Spray Cans coming.
Finally gonna get this thing installed over the Christmas break. 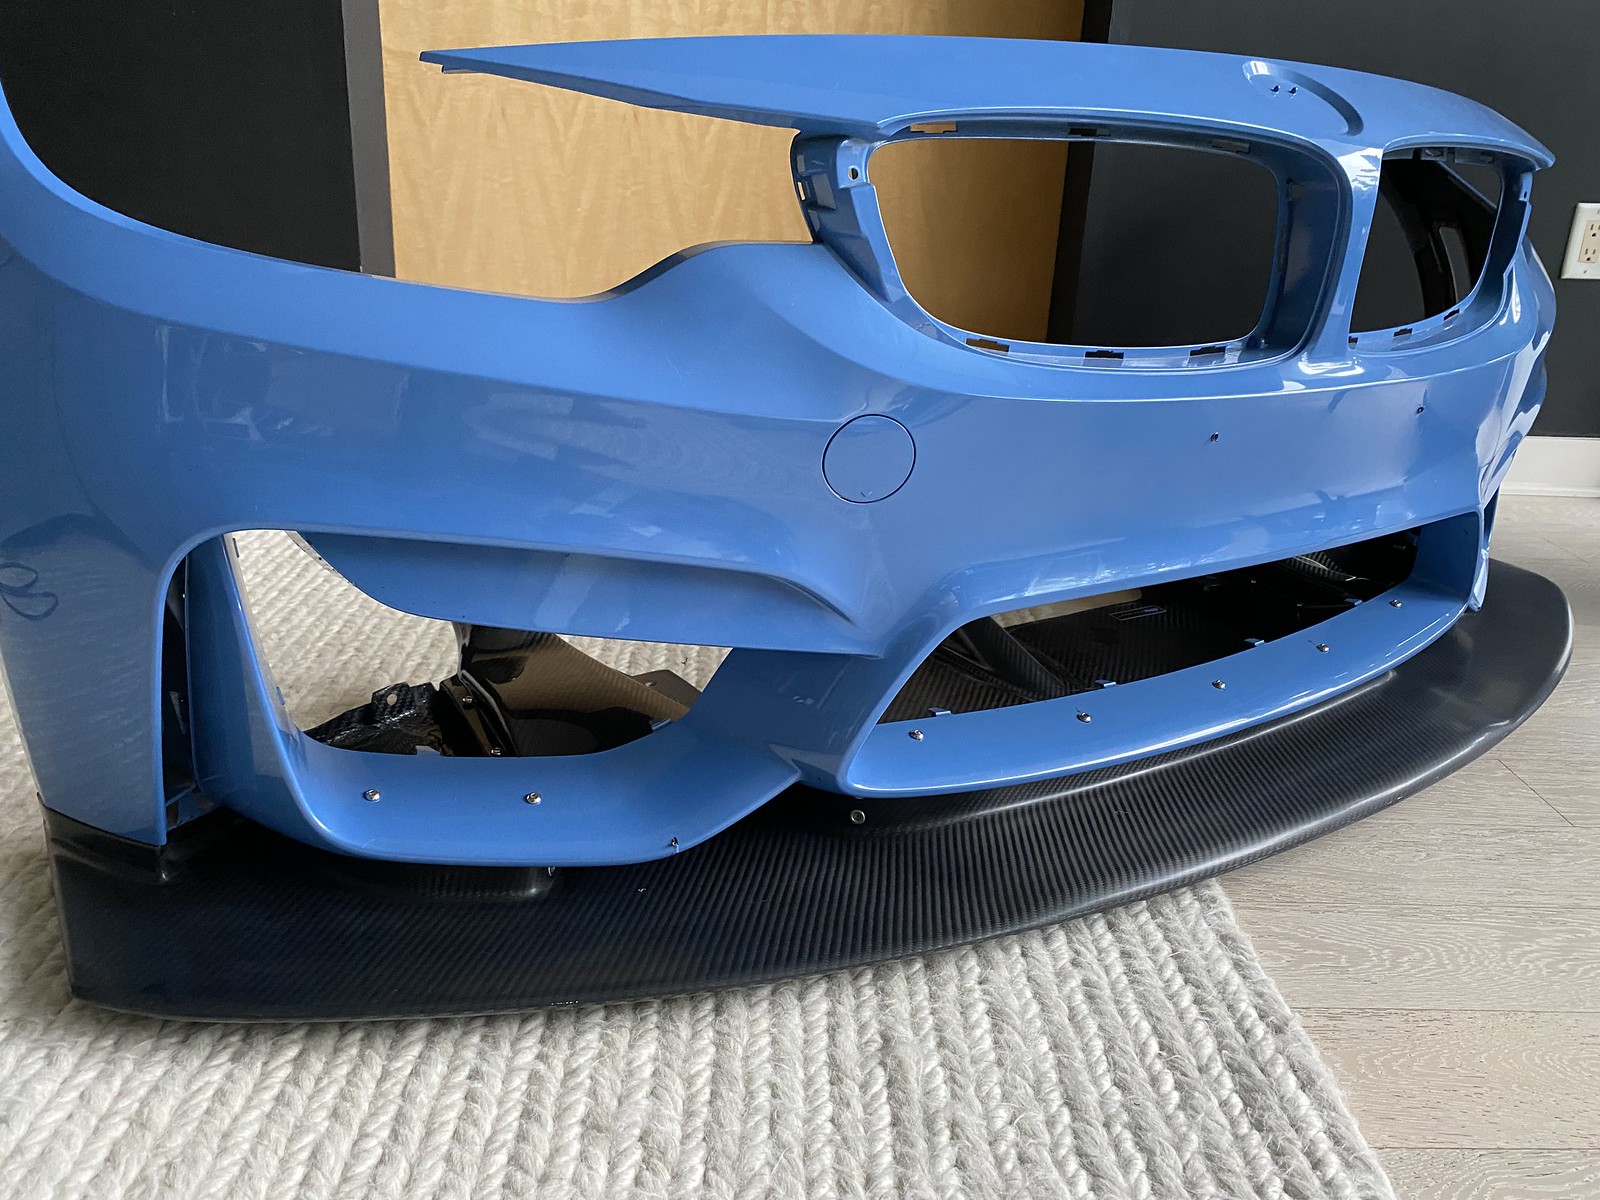 Last edited by x.shell; 12-23-2021 at 01:23 PM.. |
|
Appreciate
1
D_SheerDrivingPleasure1088.00 |
| 01-01-2022, 03:56 AM | #14 |
|
▆ ✚✚ ▆▆▆▆▆▆
6579
Rep 5,304
Posts |
2022 and here's the splitter mounted! Bumper goes on tomorrow. Special thanks to ninekrpm for helping me on with some last minute questions!
 |
|
Appreciate
2
D_SheerDrivingPleasure1088.00 jmg18658.50 |
| 01-01-2022, 09:45 AM | #15 | |
|
Captain
432
Rep 937
Posts |
Quote:
__________________
F80 M3-DCT MaxPSI CH, BM3 with F80 Paul E85 and Custom Rom track tune MCS 2Way Remotes
Signature SV104 E46 M3 F85 X5M https://www.instagram.com/fastmacm3/ |
|
|
Appreciate
0
|
| 01-03-2022, 01:51 AM | #16 | |
|
▆ ✚✚ ▆▆▆▆▆▆
6579
Rep 5,304
Posts |
Quote:
There was a point when I did route the hosing from the upper ducts just to see about clearance. I ran it without the forward fender liners for a while. After a while, I decided I didn't want to cut through the fender liners to make it work not to mention all the debris that ended up in my wheels. For this GT4 splitter, I actually removed the lower brake ducts too. This saved me from, again, cutting the fender liners and trying to fiddle with wheel clearance. I can always bolt them back on in the future. Lower ducts unbolted  I try to do mods that not many people do. Then I post about it to try and help people who may find it useful. Bimmerpost has been such a great resource for me in figuring out mods so I try to give back by posting about specific things that you can't find that much information about. I figure this GT4 splitter install on an OEM bumper might be of some interest to some people in this specific track forum. Regarding the brake duct sizing The lower brake ducts use a 3 inch hose. You can use a 2.25 inch hose for the upper brake duct if you squeeze the connection end to an oval shape.  |
|
| 01-03-2022, 02:44 AM | #18 |
|
Lieutenant General
 18659
Rep 14,107
Posts
Drives: G82 M4C X-Drive
Join Date: Mar 2013
Location: Orange County, CA
|
That looks really great! Did you have to do any adjustments to the angle of attack to make sure it's not inducing any lift? Shims?
__________________
 2022 G82///M4 Competition X-Drive - KW-HAS, EBC Bluestuff, Millway Race Camber Plates, Cup2 Connect*, PSI High Flow Midpipe, Lightweight Front Lip, M Perf Flow Through Wing Previous 2018 F80 ///M3 CS 2016 F80 ///M3 IG: Raging_G82 |
|
Appreciate
0
|
| 01-03-2022, 10:25 AM | #20 | |
|
▆ ✚✚ ▆▆▆▆▆▆
6579
Rep 5,304
Posts |
Quote:
In terms of generating lift, seriously doubt it. I hate it when other people say this, but I'm actually going to trust the BMW Motorsport division on this one. The under side of the splitter is radius'd with a contour that kinda releases at the trailing edge — albeit the transition is kinda sudden. And it has some soft contoured channels. For the serious aero nerd, this splitter really should be paired with an underbelly that goes the entire length of the car and exits with an aggressive diffuser because the trailing edge cut off will probably create some turbulence in the middle section as the low pressure releases. But still, the net benefit will probably be more grip than not. The actual GT4 cars really view traction/grip holistically. The aero is pretty simple in its design/duty and is really there to work with the rear of the car's suspension, tires, weight reduction, and chassis rigidity — all within the regulations of the GT4 class. Sure there are ways to maximize returns on aerodynamic parts away from regulations, but I have no desire to make my car look like a time attack car nor am I driving to the grocery store like one. But seriously, I am no professional in aerodynamic design. All the things I've learned was from keeping up with F1, Time Attack and reading things on the internet — which is surprisingly informative due to the unapproachability of the topic. So please don't judge me on this — this splitter is just for show (right now).  |
|
|
Appreciate
4
|
| 01-03-2022, 12:41 PM | #21 |
|
▆ ✚✚ ▆▆▆▆▆▆
6579
Rep 5,304
Posts |
Okay, here is the end result of this grand experiment. Clearance is a lot better than I thought. And with the air cups installed, I can go to stock height at the push of a button. I'm very happy with the look.
|
| 01-03-2022, 12:56 PM | #22 |
|
Captain

536
Rep 713
Posts |
great job on retrofitting to he oem bumper.
you should mark bumper to the GT4 splitter and offer the pre-cut stencil for a small fee.
__________________
----------------------------------------------------------------
2015 M3 - GT4 replica Ongoing build thread https://f80.bimmerpost.com/forums/sh....php?t=1802471 For Pics / Video's visit Instagram https://www.instagram.com/ninekrpm1/ |
|
Appreciate
0
|
Post Reply |
| Bookmarks |
|
|


