

| 12-26-2020, 06:53 PM | #1 |
|
New Member
15
Rep 7
Posts |
DIY Blacked out headlight / Angel Eye Retrofit
So I could not find many write ups on how to black out the F80 headlights, the few i found were not very detailed and i couldent find any that spoke about changing the Halo/Angel eyes so i decided to write one myself. I have never done a headlight retrofit before, but id say im pretty mechanicaly inclined, so I figure I would give it a shot. Now this is a DETAILED write up, so its freakin long. And I understand that everyone has their own views about blacking out their headlights. There are people that love it/appreciate the work that goes into doing such thing....then there are the people that say things like , oh it doesn’t look good that dark, oh I would never open up my headlights, i make seven figures a year, why not just buy the 2018+ headlights, etc i think you get my point. Now if you are one of those guys then I’m not sure why you’re here, instead maybe go google something like “how to make tie-dye shirts with my wife” and read that DIY instead. but if you’re here to do the DIY then without further ado… How to black out F80 headlights! My headlights are US spec Xenon headlights with the self leveling and does that moving shit when i turn.
First take off your bumper, there are plenty of videos on YouTube on how to do that, then take off your headlights, again plenty of YouTube videos on that. One thing I would say for taking out the headlights, I found it to be a lot easier to just take out the inner wheel well trim completly, It’s only four more 8 mm screws, and I think it’s better than having to takeoff the wheels to the car. Also when taking out the headlights, the two lower bolts located inside the wheel well area are red Loctited in. I highly recommend you put a soldering gun to the bolts and heat them up good before attempting to take them off. If the nut holding the bolt starts to spin, you will be left with either breaking the tab, or for the closest one to the outside of the car you can fit a wrench in there sometimes to hold the nut to get the bolt off. but once the headlights are out, go ahead and disassemble the electronics in the headlight. I took off all the clips and main components. i used a flatt head screw driver, T 25 and T 20 torques bit to disassemble the headlights. See picture for further detail. I was not sure exactly how much to take out, so I took out everything that I thought shouldent get too hot.      I preheated the oven at 245°, put the headlight in for 15 minutes and took it out. after the first 15 minute bake, I used a small screwdriver to pry in between the black housing and the clear lens, i kind of just took off the layer of sealant on the Top half of the headlight. After the second bake I did the same thing with the bottom half of the headlight. After the third bake I used a screwdriver to pry up and away the black housing from the clear lens and used a L-shaped pick tool to go inside the clear lens and dragged? (is that a word?) it across the inside of the lens, seperating the perma seal. I think if you used a torch or something to heat up the pick tool it would make things even easier. Also don’t be scared to pry, after the third bake the perma seal kind of realizes that it’s your bitch and just gives up and pulls away easy. I honestly thought the whole baking thing was going to be a lot harder after all the stuff I read about permaseal but don’t be a bitch and pry that shit off.   next go ahead and get a T 20 bit and take off the 10 screws holding on the main chrome pieces. I feel like it’s best to do the top right screw last, as it is the hardest one to get to but if you take out all the other screws you can take off the chrome piece to get to it, finally takeoff the last two screws holding on the left chrome housing piece thing. see picture for the screw locations. The halo rings are kind of a pain in the ass to get off I used a pick tool and a screwdriver to pry down the plastic from behind and a screwdriver to pry it away from the plastic from the front. * Sidenote, it was at this time I realized that only one lens was real on the headlight… Awkward*   next step is installing the LCI looking angel eyes, for this you just have to find out where you’re going to position the angel eyes, mark where the wires are going to go through the plastic piece, drill a small hole for the wires to go through and you’re good. (obviously I had to cut the wires to fit into the hole, so make sure you know how to solder before you decide to switch the angel eyes) For the larger (real headlight) housing you’re going to have to shave down the bottom of the black ring just a little to get the angel eye to fit properly, once you have the fitment good, go ahead and remove the angel eyes and you are ready for strip down and paint. Side-note* I did not bur off any of the tabs that held on the original halo rings, just in case I wanted to go back to the halo rings later down the line in case these angel eyes looked like shit to me.     Now It’s time to take that ugly ass chrome off the plastic pieces. For this I used “easy off heavy duty oven cleaner”. Spray the aerosol onto the parts, leave on for about 10 minutes then rinse off with water (hot or cold, doesnt matter). it took me about three times to get all the chrome off, I’m not sure if I wasn’t soaking the parts enough, shaking the bottle enough, or not waiting long enough, or maybe thats just how many times it takes, but whatever, it all came off eventually. (p.s. be sure to wear some type of gloves when spraying the pieces, it kind of burns your hands especially if you have cuts on your hand ) Now I know what you’re thinking “ its covid sznn, how am i suppose to get oven cleaner!?” well don’t worry! Lucky for you your local Covid friendly (packed) Walmart most likely has this product in stock! now that all the chrome is off go ahead and give all the pieces a quick scuff with a gray Scotch-Brite, clean it off with some wax and grease remover or rubbing alcohol and you are ready for paint!   Sidenote, while I waited for the easy off to soak into the parts I went ahead and used a razor blade/X-Acto knife and cleaned off all the permaseal from the lens the best I could. If you bought a new lens because your old one was all fucked up, you’re in luck you just saved yourself about an hour! Last edited by kerdos; 12-26-2020 at 09:00 PM.. Reason: photos |
| 12-26-2020, 06:54 PM | #2 |
|
New Member
15
Rep 7
Posts |
since the parts are plastic, you want to get an adhesion promoter to make sure the paint sticks. the parts aren’t going to be getting hit with the containments of the road so you don’t have to go too crazy , just give it one lightish coat, just make sure you get all the edges. I want all the parts gloss black except for one ring so i got some clear coat aswell . make sure all the paint is dry before continuing on to the next coat. i primed the front and back of all the parts first, then two coats of black on the black then flipped it around and did three light coats of color and 2 coats of clear. when i paint, i always paint the edges first, that way you have a much less chance of “running” the paint later when your trying to get the edges, instead you just have to do light coats for paint coverage. let the paint dry for at least a day id say.
  Now that everything is nice and dry go ahead and mount your new halo rings are use JB Weld minuteweld, the clear color. figure out where you need to JB Weld it pull the wires through and stick it on and hold it for about a minute until the JB Weld sets. If you are not adding new rings go ahead and put your old rings back in. before you start putting everything back in its time for the fun part, removing all the old permaseal! it’s really easy it’s just time consuming and a pain in the ass. I used a screwdriver same width as the channel and just went to town  once all the permaseal is off both the lens and the housing , blow them off good (air compressor is reccomended) then go ahead and put back on all the painted pieces. clean the lens well and you are ready to re seal the headlight. I went with Morimoto butyl. place the butyl in the channel of the black housing and continue around the whole perimeter. You can stretch out the butyl need be to make it fit perfectly. once finished, pre heat your oven to 265°F then place HOUSING in for seven minutes. after seven minutes take the housing out of the oven and push on your lens. Use vice grips or a like to secure the lens to the housing. Leave the vice grips or whatever on there until the butyl cools down. for any spots that you feel like may have an air leak you can always either bake again, pull apart and add more butyl, put the butyl in the spots where you feel like it is not sealed enough, and heat the butyl up with a heat gun, or use a tube type headlight sealant for minor spots. once everything has cooled down and you’re happy with the seal, it is time to put the headlight back together. now if you retained the stock halo lights, put the headlight back together in reverse order and congratulations you’re done… With that headlight at least. if you went with the aftermarket angel eyes, now it’s time for more wiring and soldering. I went ahead and decided I’m going to place the black boxes inside the housing since I have all that free space behind the fake headlight. So I drilled four small 5/16 holes which the wires will go through. This way on the outside of the headlight there will only be the two plugs that the aftermarket harness will connect to. * Sidenote, since I’m a little bit crazy throughout the process of the soldering I would check to make sure the LEDs were working by using a 9 V battery*  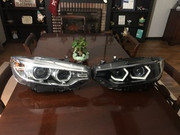 once everything is soldered go ahead and reassemble the headlight in reverse order. If you retained The stock halos then you are done! Reinstal in car and enjoy! if you did the aftermarket Angel eyes now it is time for some wiring. once the headlights are back in the vehicle, go ahead and place the angel eye harness behind the headlights with the main portion of the harness on the passenger side of the car. tuck the harness under the bumper beam cladding and tip tie were applicable so it looks nice and clean. I shrink tubed the red (fade) wire because i will not be using the that function. the red wire connected to the fuse gets connected to the positive terminal post (t50 torx takes it off) and the black wire gets connected to the negative post or really any bolt that goes into the body that has a good ground ( there is one right next to where your air box would be).All that is left now is the white wire. Remove the passenger side cover that covers the positive battery post. under there is a fuse box, open the fuse box up. solder a mini ATC or also known as ATM “add a fuse” to the white wire put a 10 amp fuse into the top slot of it (portion the wire appears to go to) and plug it into the open fuse slot in between the two 5amp fuses, near the 30 amp fuses. Turn ignition on, angel eyes should turn on, kill ignition, angel eyes off. tuck all the wires and ziptie and go ahead and reinstal bumper and such and you are done! * side note i did cut and solder wires to length so there were no bunched wires, i also cut a section of the fuse box so the wire didnt get pinched* Also, i put some sealant around the wires on the top cap where the angel eye plugs are so its nice and weather proof. Also i would either code out the stock halos or i believe you can turn them off in your nav settings. im not sure if youll still have the brow if you do it thru nav, i just coded the halos via bimmercode.       just finished the other headlight and I am reinstalling everything. Some pointers on putting everything back together: are used a wire brush to takeoff the red Loctite that was on the two annoying bolts. If you want put some blue Loctite on them instead. bolt the headlights up, but do not tighten all the way. Leave the inner wheel well plastic off until the bumper is completely on. Do this because your headlight might need minor adjusting to fit properly. Once the bumper is on then go ahead and line up the headlight with the bumper and tighten the top bolt for the headlight first, then you can tighten the rest of the headlight bolts, check allightmemt to bumper and hood and the put the wheel well trim back in. Now I took my sweet ass time doing this because i have another vehicle and it just snowed so i threw the m3 on a tender and worked on the headlight as i had time, this could prob be done in a weekend if you really went at it but , as this being my first time ever doing something like this i was in no hurry. if ya have any questions feel free to pm me and ill try and help with whatever i can!   So just finished the car, second headlight took about a day and a half to complete and i wasnt even rushing, so i think a 3 day weekend you could easily knock this out. here is a before and after pics. Before:   After:      Last edited by kerdos; 01-05-2021 at 06:26 PM.. Reason: photos |
|
Appreciate
6
|
| 01-01-2021, 06:12 PM | #6 |
|
Registered
0
Rep 3
Posts
Drives: 2015 F80
Join Date: Mar 2018
Location: New Jersey
|
Excellent work, can i send you mine? Price?
 Happy New Year Happy New Year |
|
Appreciate
0
|
| 01-01-2021, 09:19 PM | #7 |
|
Major General
 964
Rep 5,033
Posts |
Good for you on attacking these. The permaseal is definitely not fun. I miss the days of E9X headlights(7 minutes at 250) and the lens pretty much comes free like some fall off the bone type of ribs.
|
|
Appreciate
0
|
| 01-02-2021, 12:04 PM | #8 | |
|
New Member
15
Rep 7
Posts |
Quote:
|
|
|
Appreciate
0
|
| 01-03-2021, 01:23 AM | #9 | |
|
Registered
0
Rep 3
Posts
Drives: 2015 F80
Join Date: Mar 2018
Location: New Jersey
|
Quote:
|
|
|
Appreciate
0
|
| 01-03-2021, 12:09 PM | #11 |
|
Bored all the time

382
Rep 2,173
Posts |
That is awesome! I love the way it looks now. Wonder how much different would it be on the LED headlights.
__________________
Current: 2014 991 Turbo RS
Past: 15 GT3, 17 R8 SC, Two 16 M4 GTSs, Two 18 GT350R's, Two 13 RS5s, 13 M3, 10 R8, 15 M4, 09 M3, 04 M3, 09 S5, 02 M3... It all started with an RX-7 (FD). |
|
Appreciate
0
|
Post Reply |
| Bookmarks |
|
|


