

| 06-05-2016, 10:26 PM | #1 |
|
Major
 646
Rep 1,336
Posts |
DIY: Lowering Spring Install
Beautiful day out today, so I decided to DIY my spring install. The only other DIY I've seen had far too many unnecessary steps taken. Thanks to Appeltje for his insight. Start to finish was 3 hours front and rear at a leisurely pace.
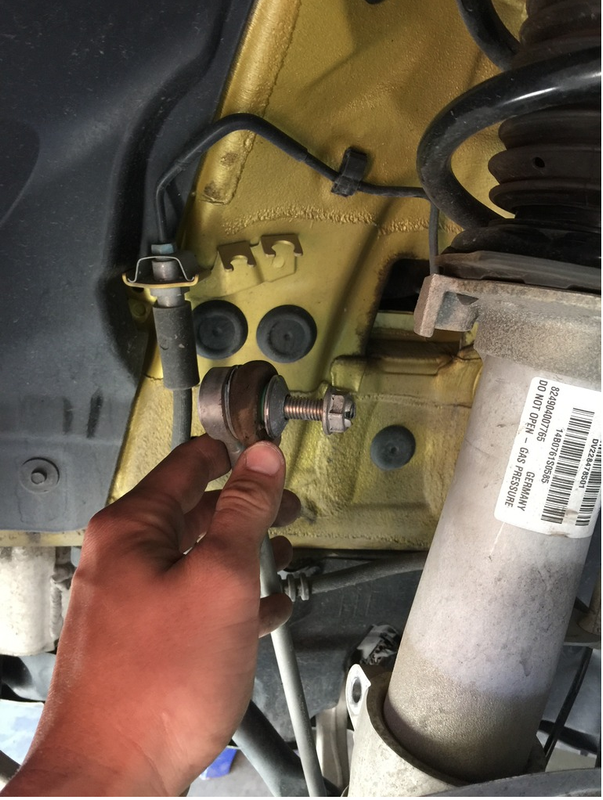
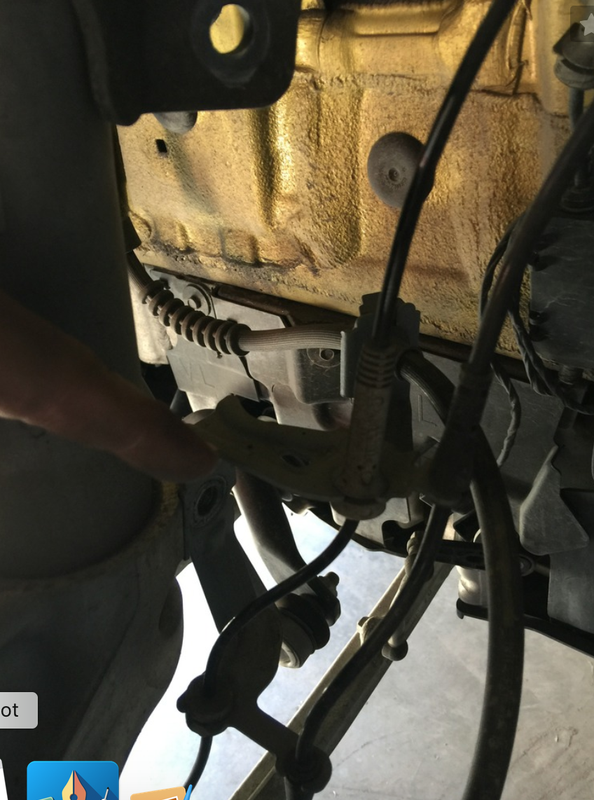
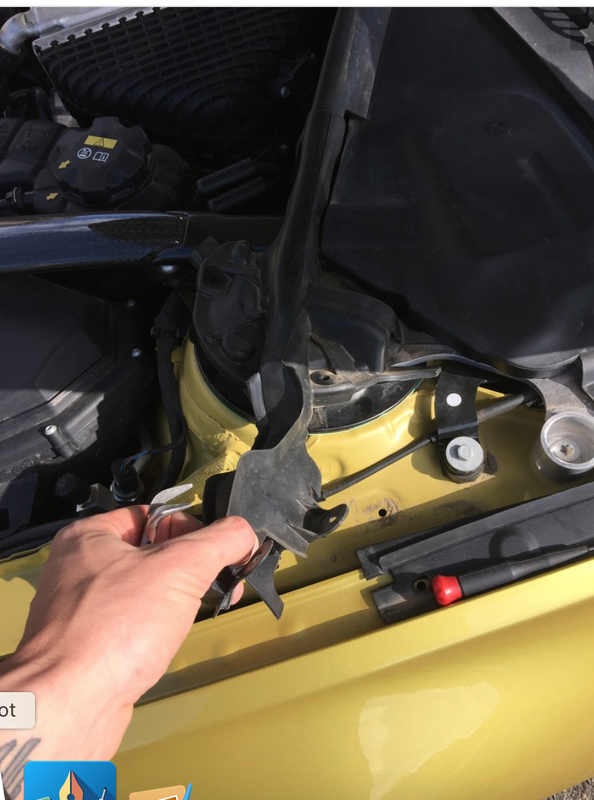
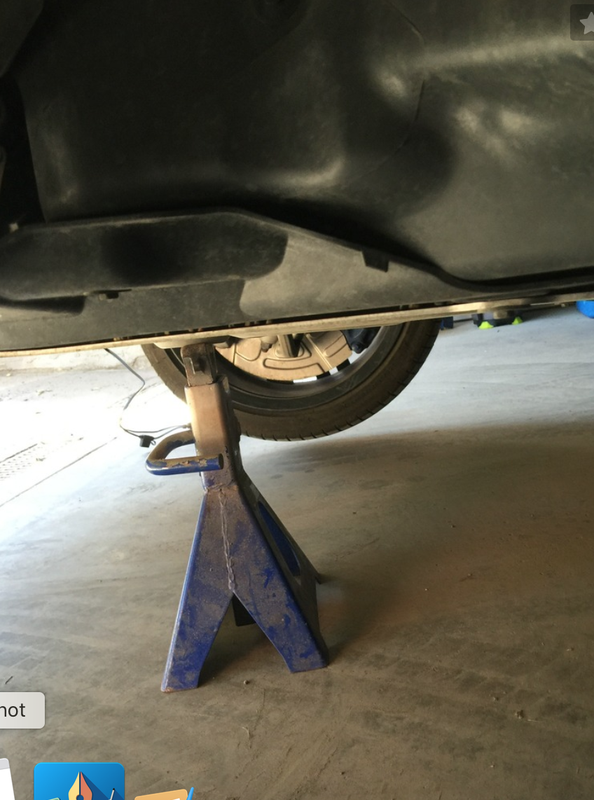
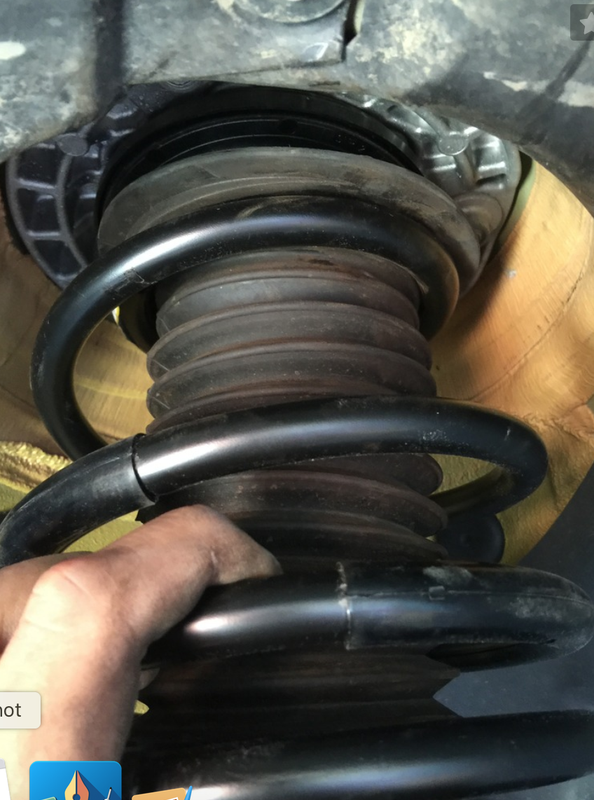
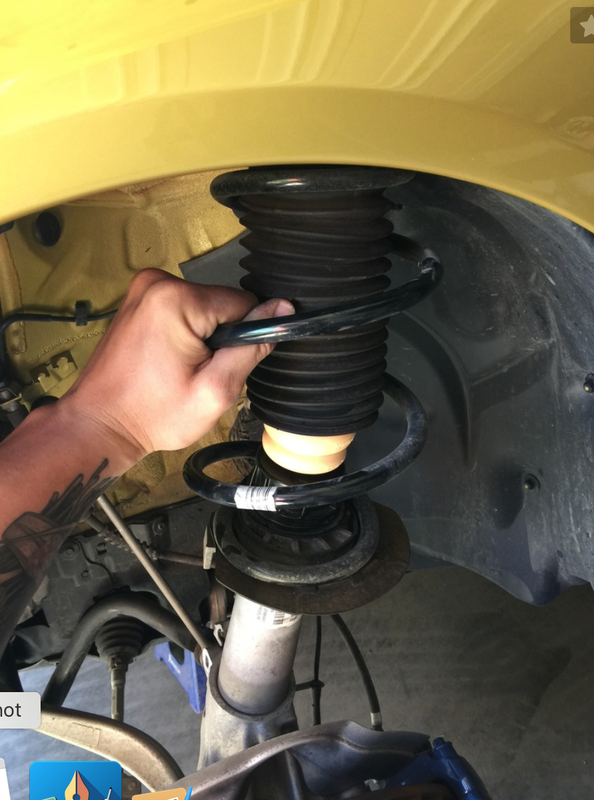
EDC and non-EDC are identical other than an additional sensor on the strut body and the plug at the top spindle. Tools Required: 2 x Floor jacks 1 jack stand Impact wrench (air/electric) Torx T30 16-21mm Sockets and backups 18mm 12 point or universal socket Extensions for sockets Flat screw driver Needle nose pliers FRONT SPRINGS: Step 1: Place car on a flat surface, loosen wheel bolts, place one jack stand under the car (at appropriate lift points) remove front wheel (or both front wheels) NOTE: If you get stuck here, walk away in shame, hang your hat and buy a bus pass. # 2: Remove all tension from front wheels, the front sway bar when under tension is a pain in the ass to remove. Place the jack stand under the front middle lifting point. The convex portion on your skid plate.  #3: Remove the rubber covers ontop of the strut top caps. Lift the center pin with a flat screw driver and then pry the outer ring.  #4: Remove the wheel speed sensor with the T30 torx and make sure its out of the way. Its on the back of the hub assembly. Remove pinch bolt and sensor harness from the strut assembly.  #5: Remove the sway bar link with a 16mm socket and impact  #6: Remove the spindle bolt with a 18mm 12 point or universal socket. You must use an impact wrench at this point or a pass through socket as the strut spindle will spin. NOTE: There is very little compression on the spring, you will not require a spring compressor. NOTE: Make sure every sensor wire is out of the way, and there is no tension on any of the lines or brake hoses.  #7: Support the strut and spring assembly and pull out towards you and out of the wheel well while leaving the bottom of the strut still attached to the hub body.   #8: Remove spring assembly, dust boot, bump stop and rubber top cap. #9: Place new spring on strut body and put the rubber boot, bump stop and top cap back on the spring. Ensure everything is put back on in reverse of removal and that springs are seated correctly in the top and bottom rubber caps.  #9: With second jack, jack the strut spindle back through the top assembly. Ensure the rubber boots and caps are in the proper position. #10: Place the 18mm top cap nut back on the strut spindle. Let all tension off of the strut (remove second jack) and torque the spindle nut to 25ft-lbs first with a impact wrench and then with a torque wrench. Once the strut is in compression the spindle will no longer spin (easily) #11: Replace the wheel sensor bolt, harness brace and pinch bolt (60ft-lbs) the reverse of removal. Last edited by 4everkidd; 06-07-2016 at 03:11 PM.. |
| 06-05-2016, 10:27 PM | #2 |
|
Major
646
Rep 1,336
Posts |
Rear Install:
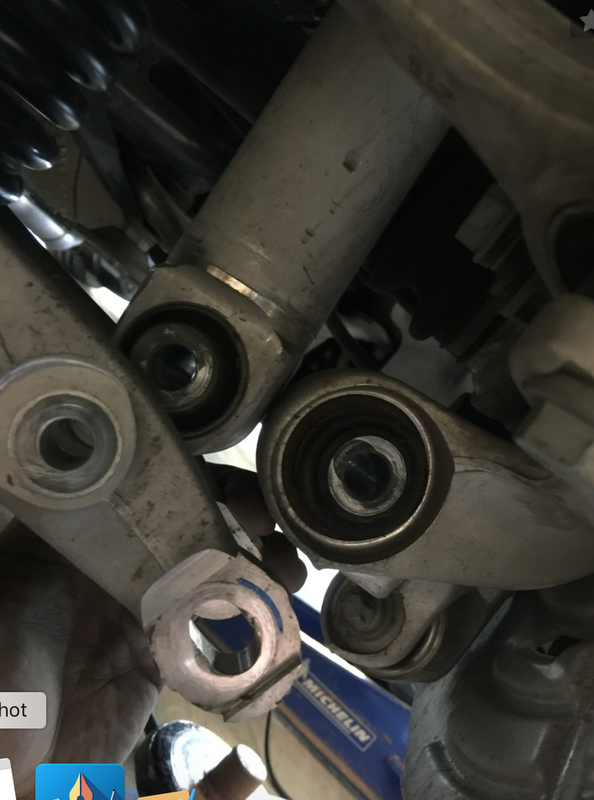
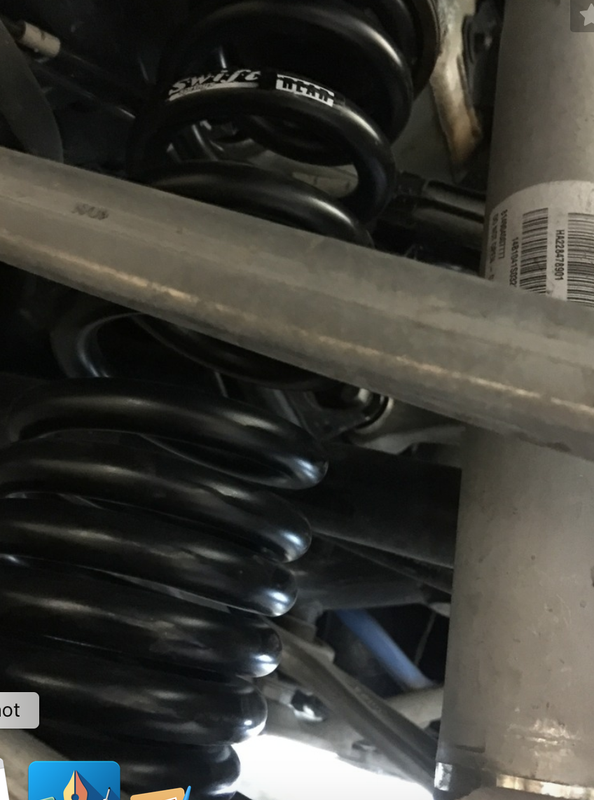
NOTE: If you have an additional set of hands, or you are working on a lift you will not necessarily have to remove the control arm/ hub body bolt Step #1: Loosen rear wheels, place jack under appropriate jacking spots and lift car to appropriate height. Remove wheel #2: Remove 18mm bolt from the bottom of the strut body/lower control arm using impact (not necessary but sooooo much easier)  NOTE: At this point if you have someone helping or are on a lift you may be able to pry down on the lower control arm giving yourself enough room to remove the spring either to the sides of the control arm or through the larger hole in the rear. Have your buddy pry down while you finaggle the spring out. Skip the applicable steps following, and just worry about the strut bolt #3: Using a permanent marker trace around the adjustable nut/washer for the lower control arm to hub on the bolt side. You will notice they look like they are one piece as the bolt is key seated in order to provide adjustment to both sides of the bushing. This will be used as reference for re-assembly however you will still require an alignment (picture after #4 shows where I marked as reference) #4: Remove 21mm nut from lower control arm / hub connection using an impact and extension. Note: Make sure you remove the NUT, not the adjustment bolt.  #5: Place your second jack under the hub assembly and slowly jack until you find neutral, at this point pull the bolt from the lower control arm. #6: Take a look at the stock spring placement and take note of the rubber top and bottom cap placement. Pull down on the lower control arm and wiggle the stock spring out of place. (very easy at this point) #7: Remove the rubber components from the stock spring and install onto your new spring. Make sure the coil ends seat into the appropriate spots on the rubber caps. #8: Install the top of the coil back into the pocket and the lower rubber back into its seat. You will see a little nose on the lower rubber boot which goes through a hole to keep it in place. Turn the spring in the top pocket until the bottom of the spring looks as though it will line up properly with the lower rubber.  #9: This step can be a GIANT pain in the ass if you don't take your time. Place the second jack under the lower control arm where it wont be in your way and where it will lift the control arm straight up #10: Ensure the bottom of the strut is seated in the grooves in the lower control arm. The bolt hole will line up perfectly but do not place the bolt in yet. #11: Lube both sides of bushing on the hub body and the inside of the control arms. Now SLOWLY jack the lower control arm up while adjusting the control arm in order to slide it over the hub body bushing until the bolt holes line up. This can be a giant asshole if it chooses to be. #12: Slide the bolt through the same way you pulled it out and place the key washer on the other side before the nut. Hand tighten. #13: Slide the bolt through the bottom strut / control arm and hand tighten. #14: with the control arm under load (jacked up to approximately neutral) torque the 18mm strut/control arm to 74 ft-lbs #15: Remember those lines you traced? using a 21mm socket turn the bolt (from the bolt side) until the washer is back where it was. Torque to 74ft-lbs (please verify this number) ensuring you have it held from both sides so neither turn freely. #16: Re-peat for the other side. Before  After  Last edited by 4everkidd; 06-08-2016 at 07:04 AM.. |
|
Appreciate
3
M.a.r.k.u.s313.50 TopJimmy5458.50 |
| 06-06-2016, 08:02 AM | #6 | |
|
Major
646
Rep 1,336
Posts |
Quote:
You do not need to remove the entire top cap or ANYTHING else in the engine bay other than the rubber protector. |
|
|
Appreciate
0
|
| 06-08-2016, 10:07 AM | #8 |
|
First Lieutenant
 

67
Rep 331
Posts |
Can you please explain #6 in a bit more detail? You say use a pass through socket but your pic shows a regular socket? How do you keep the spindle beneath it from spinning when you go to loosen? Also, how do you keep it from spinning when tightening? What are the torque specs you used on all of the bolts when you tightened them? Thanks
|
|
Appreciate
0
|
| 06-08-2016, 04:30 PM | #10 |
|
▆ ✚✚ ▆▆▆▆▆▆
6579
Rep 5,304
Posts |
Great DIY and good pics. I find that using box wrenches on the rear bolts is much easier than an impact gun. Once the bolt has come loose, you can literally pull it out with your hands due to the chassis being so rigid.
Also, I find it easier to use the permanent marker to mark all eccentric bolts before loosening them. But any method will work really. (Not an F8X, but you get the picture) |
|
Appreciate
0
|
| 06-08-2016, 08:08 PM | #12 | |
|
Major
646
Rep 1,336
Posts |
Quote:
Torque specs are included at each point; did you miss them? |
|
|
Appreciate
0
|
| 06-08-2016, 11:22 PM | #13 | |
|
First Lieutenant
67
Rep 331
Posts |
Thanks for the clarification, yes I see them now thanks for the great write up.
Quote:
|
|
|
Appreciate
0
|
| 06-08-2016, 11:33 PM | #14 |
|
Lieutenant General

2148
Rep 10,176
Posts |
Awesome DIY. I did a similar one for when the E90 first came out, and it now has 168k views and helped many people. I'm sure this post will help many people. Thanks for taking the time to contribute!!
|
|
Appreciate
0
|
| 06-09-2016, 11:38 AM | #15 | |
|
Major
646
Rep 1,336
Posts |
Quote:
Glad to be a part of such an active community for a change! |
|
|
Appreciate
0
|
| 04-30-2018, 01:26 AM | #18 | |
|
BimmerPost Supporting Vendor
1254
Rep 860
Posts  |
Quote:
__________________
Speed & Tech Motoring
23585 Overland Drive, Unit 178 Sterling, VA 20166 (Headquarters) 23541 Pebble Run Place, Unit 140 Sterling, VA 20166 (Satellite shop) |
|
|
Appreciate
0
|
| 04-30-2018, 11:17 AM | #19 | |||
|
Major
646
Rep 1,336
Posts |
Quote:
Quote:
I can't even get into photobucket to recover my photos without paying for the service. |
|||
|
Appreciate
0
|
| 03-21-2020, 09:27 PM | #20 | |
|
Major
314
Rep 1,453
Posts |
Quote:
__________________
2017 Atlantis Metallic F80 | Silverstone Interior | 6MT | CF Mirror Covers | CF Front Splitters | CF M Diffusor | CF M-Performance Spoiler | RKP IND Side Skirt Extensions | IND Paint matched Reflectors | KW HAS Springs | Instagram: Atlantis_S55
|
|
|
Appreciate
1
4everkidd645.50 |
| 03-21-2020, 09:28 PM | #21 | |
|
Major
314
Rep 1,453
Posts |
Quote:
__________________
2017 Atlantis Metallic F80 | Silverstone Interior | 6MT | CF Mirror Covers | CF Front Splitters | CF M Diffusor | CF M-Performance Spoiler | RKP IND Side Skirt Extensions | IND Paint matched Reflectors | KW HAS Springs | Instagram: Atlantis_S55
|
|
|
Appreciate
1
4everkidd645.50 |
| 04-28-2020, 08:44 AM | #22 | |
|
Major
646
Rep 1,336
Posts |
Quote:
|
|
|
Appreciate
0
|
Post Reply |
| Bookmarks |
|
|


