| 10-13-2018, 10:07 PM | #1 |
|
First Lieutenant
 227
Rep 369
Posts |
VRSF cold-side charge pipe DIY
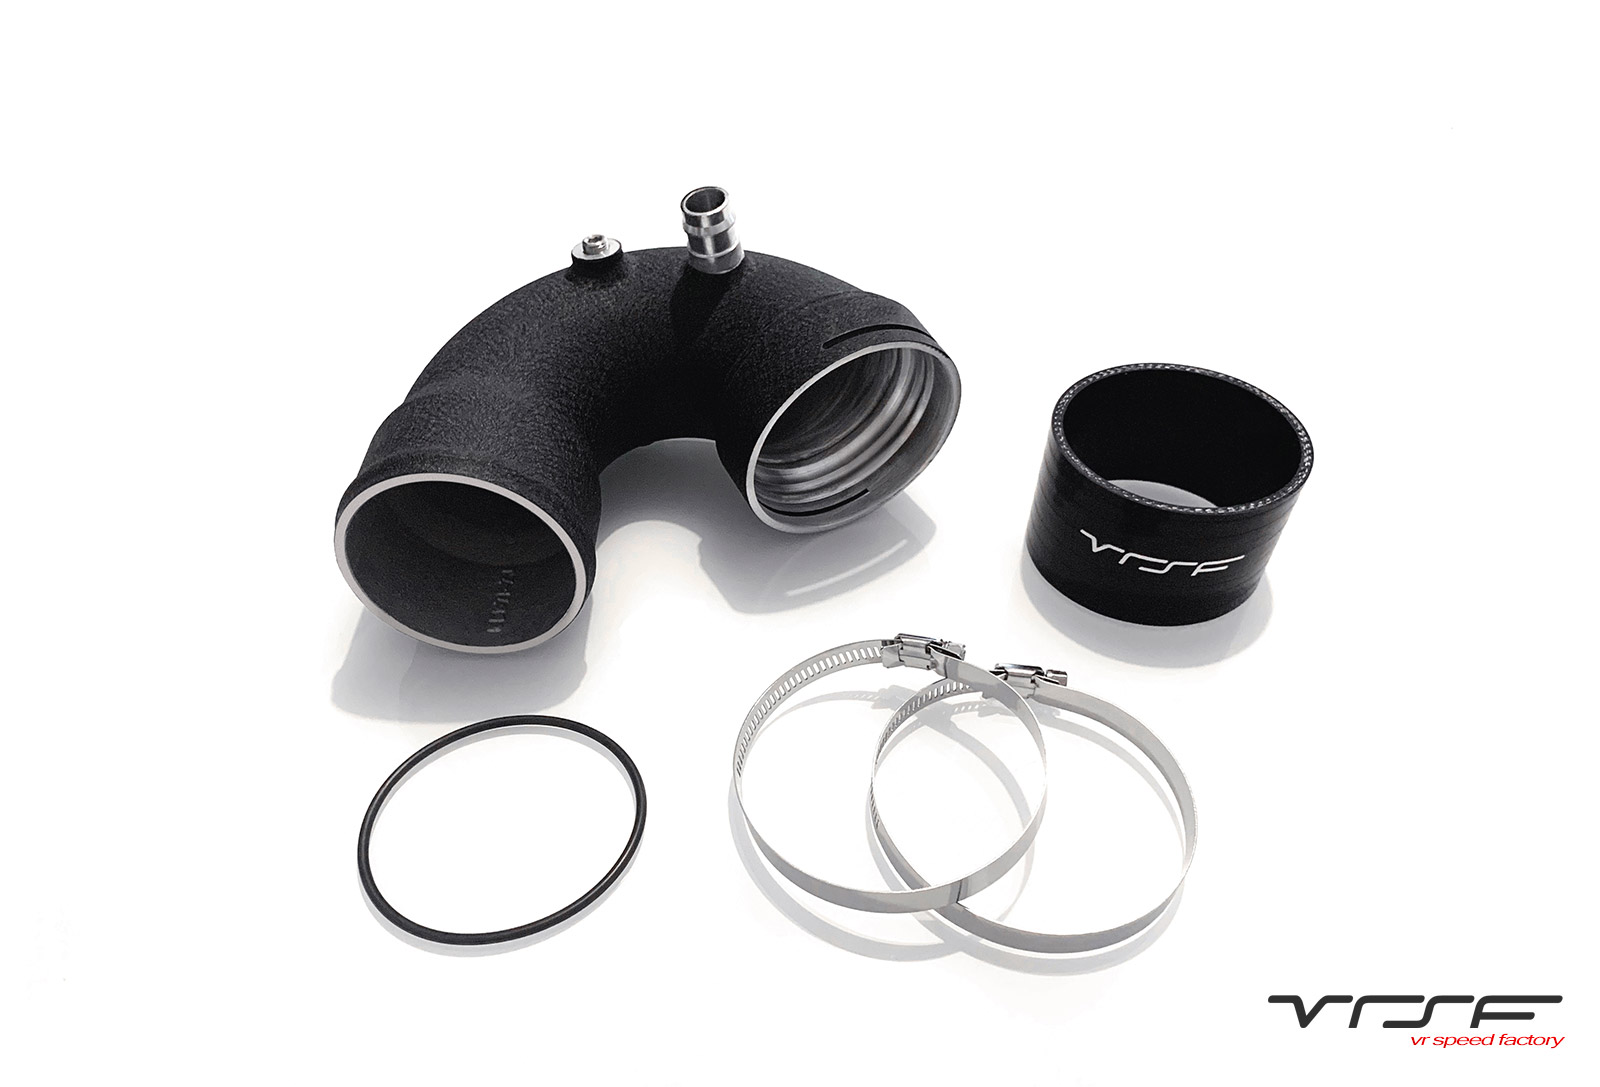
I have been bugging Tiago @VRSF for weeks to make me a cold side charge pipe replacement, and I am pleased to present the finished product. It's is made with the same wrinkle black finish as their hot-side charge pipes, and has the same build quality and fitment that I've come to expect from VRSF. Apparently, there is very little guidance on how to go about the install, so here you go!
 Start by removing the CF brace. It is secured by 8x 13mm bolts and 1x 11mm bolt.  Now, remove the upper engine cover and both intakes. I have SSR intakes, so the removal of what you have installed may vary, but the basics are the same. On the passenger side, remove the MAF plug with a flat head screwdriver. Then loosen the clamp that attaches the upper intake tube to the lower intake tube, and it should wiggle out. On the driver’s side, remove the vacuum line, remove the MAF plug, and loosen the clamp that secures the intake pipe to the lower intake tube. The SSR intake is also secured by a T-40 bolt.   Now, the next part is up to you. I have seen info online regarding intercooler swap that involved removing the charge pipes only from the intercooler, but I found it easier to remove them entirely and have the extra room; It’s literally one extra bolt. I think the stock charge pipes are secured to the turbo outlets with an E-12 bolt (I forget), but I have VRSF hot-side pipes, which are held in with an Allen bolt. I didn’t take pictures of the removal of the hot-side pipes, but there are plenty of DIYs available if you need step-by-step instructions. Next, remove the T-30 bolt that secures the engine coolant overflow tank and pull the tank from the grommet that secures it on the bottom. Place the tank where the stock air box sits. Now is a good time to release the black clip that holds down the coolant line to the intercooler as shown (don’t remove any hoses from the intercooler). This creates some slack in the hose so you can move the intercooler over later.  Remove the vacuum line that connects to the charge pipe. Then loosen the clamps on the coupler that secure the charge pipe to the bottom of the intercooler.  Now, lift the intercooler assembly, beginning from the front. It’s held in by several grommets on the bottom. It will take some well-placed pulling, but take your time and make sure nothing is caught before you try and hulk smash it. When you free the assembly, move it to the left toward the passenger side, and you’ll see something like this.  The charge pipe is held in with a white zip-tie looking piece that is one of the dumbest designs I’ve ever seen. To remove the pipe from the throttle body inlet, use a small flat head screwdriver to pop the end out from the slot, and pull the collar out entirely. Once removed, the pipe should wiggle out.  Why BMW would engineer such a great car with plastic boost pipes is beyond me, but here’s a comparison of the stock piece and the fresh new VRSF piece.  This part is up to you, but I think it’s a good idea. The charge pipe features two bungs for meth injection. To ensure the plugs don’t wiggle loose and create a massive leak/headache later, I put some Teflon tape on them and made sure they were nice and tight.  The throttle body has an indentation that the OEM white collar (and now metal clip) secures to.  In the earlier pictures, I had the clip on the wrong side of the charge pipe. I’m not 100% sure that it matters which side you put it on, but I think that having it on as pictured below will make it easier if you need to pull the clip to remove the pipe later for whatever reason. Just slide the pipe on to the throttle body inlet all the way, and push the clip in the orientation as shown.  That’s about it, there’s no more tricks. Put everything back together, and enjoy your baller status. If you have anything to add to this DIY, please feel free to let me know and I'll update it. If you have any questions, I'd be happy to help if I can. 
__________________
///M3
Last edited by Djdnav; 10-16-2018 at 01:06 PM.. |
| 10-16-2018, 11:09 AM | #3 |
|
Lieutenant
73
Rep 437
Posts |
is there some coolant coming out when you remove the cooling line? I have my BMS pipe at home and wasnt sure if it was worth the headhache to install but now i may try it haha !! Thanks for the DIY
 |
|
Appreciate
0
|
| 10-16-2018, 01:03 PM | #4 | |
|
First Lieutenant
227
Rep 369
Posts |
Quote:
__________________
///M3
|
|
|
Appreciate
0
|
| 10-16-2018, 03:44 PM | #5 |
|
Lieutenant
73
Rep 437
Posts |
I ended up taking some time to install my BMS pipe and its because you did this DIY its great man !! Took me a while to figure out how to move the intercooler but i got it done haha only thing i notice is that the intercooler isnt straight line its a little lower on the cold side pipe side but maybe it was like that prior i just didnt noticed it hehe took me 3hrs and im far from being good at doing my mechanical stuff
|
|
Appreciate
1
mdma-zn51.50 |
| 10-16-2018, 04:03 PM | #6 | |
|
First Lieutenant
227
Rep 369
Posts |
Quote:
Before you put the pipe in, did you take a look inside? I’m curious if it’s a single, mandrel bent piece, or if it’s similar to the VRSF design but smoothed down more.
__________________
///M3
|
|
|
Appreciate
0
|
| 10-16-2018, 06:42 PM | #7 | |
|
Lieutenant
73
Rep 437
Posts |
Quote:
|
|
|
Appreciate
0
|
| 09-14-2019, 02:49 PM | #8 |
|
Major
 
1144
Rep 1,407
Posts |
Will be doing the install next week. OP thanks for the write up.
|
|
Appreciate
0
|
| 04-10-2020, 04:20 PM | #10 |
|
Major General
 
2750
Rep 6,759
Posts |
The aftermarket piece seems to have a more restricted flow than the OEM one, due to its shape. What is the point of replacing the OEM piece if it hasnt failed?
Sometimes Im dumb, and sometimes I ask good questions. Not sure which is today, my apologies.
__________________
 2018 F80 Santorini 2019 Z4 3.0i 2022 X2 M35i |
|
Appreciate
0
|
| 04-12-2020, 01:45 PM | #12 | |
|
Major General
2750
Rep 6,759
Posts |
Quote:
__________________
2018 F80 Santorini 2019 Z4 3.0i 2022 X2 M35i |
|
|
Appreciate
0
|
| 11-26-2021, 01:02 PM | #14 | |
|
First Lieutenant
227
Rep 369
Posts |
Quote:
__________________
///M3
|
|
|
Appreciate
0
|
| 08-08-2022, 05:57 PM | #15 |
|
Private First Class

101
Rep 176
Posts |
installing this right now, is it normal for the clip to not fully go in? i cant seem to make it go in on both sides fully, the top part of the clip sticks out like 3/4 from the J pipe. its also not really tight to the throttle body, little bit of play. is all this normal? it just doesnt feel right to me but maybe thats the way it is. appreciate any response.
|
|
Appreciate
0
|
Post Reply |
| Bookmarks |
|
|