

| 09-29-2018, 05:54 PM | #1 |
|
Private First Class
 
11
Rep 117
Posts |
Mud Flaps for the F8x
*** Disclaimer; I purchased these. I am not receiving any type of kickback or anything in return for doing a review. I wanted to do one and figured I share with the community since I know there are at least one or two individuals out there that are in the same boat as I was.***
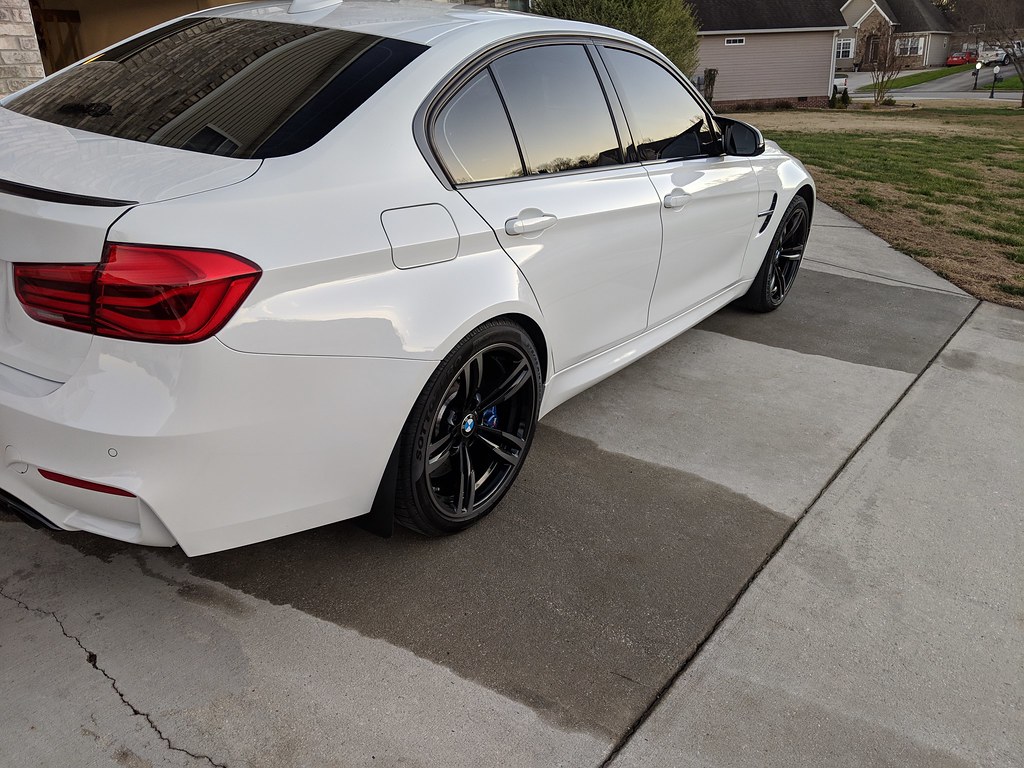
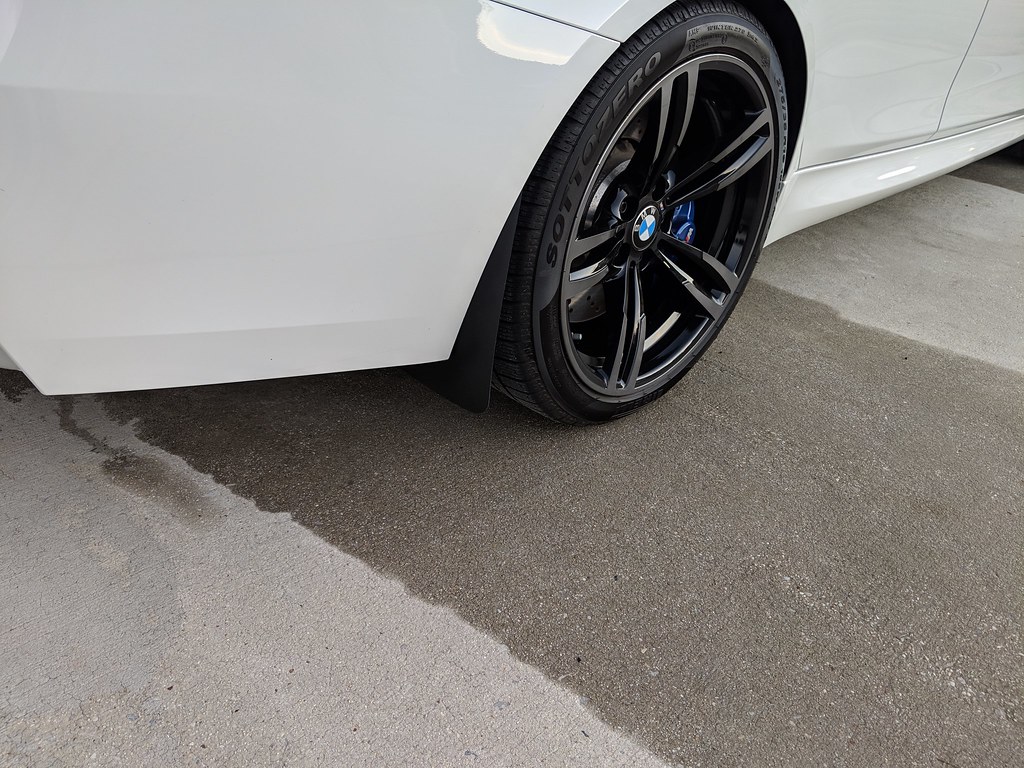
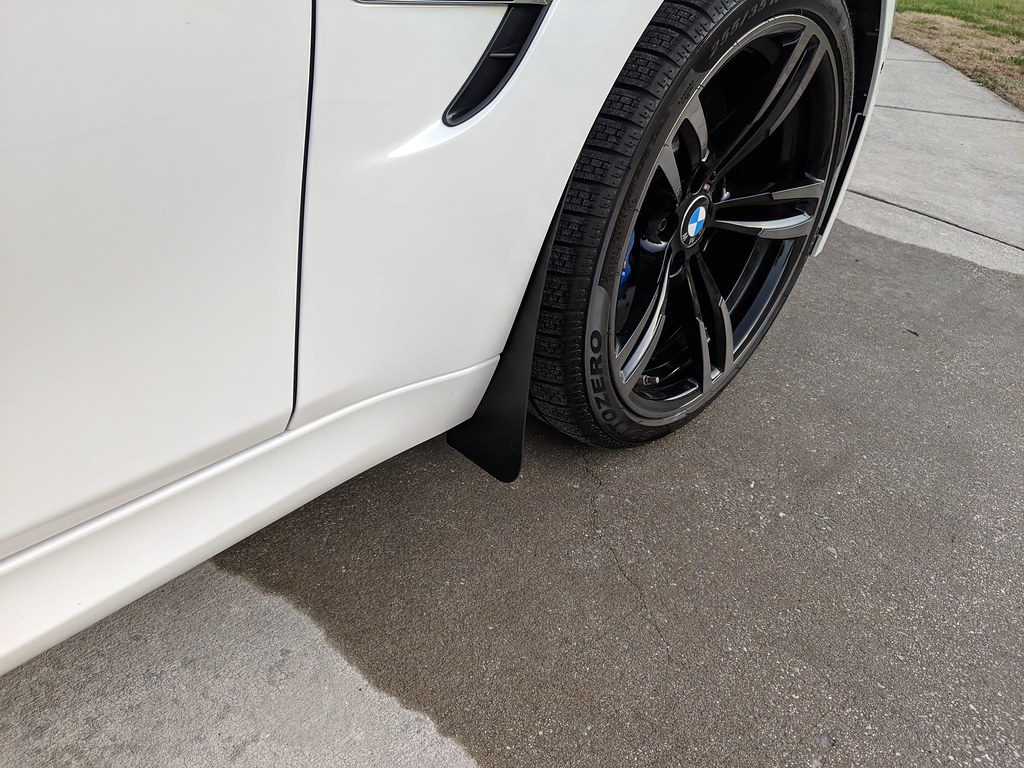
The roads here in the midwest are horrible and have a ton of debris and crap on them. I had been searching for something to help prevent the kick up of the stones and other material. I stumbled across a Youtube from a fellow forum member talking about some mudflaps he made. I reached out to him about them and I purchased some and figured I post a DIY/Review on the mud flaps that I received from him. Build quality/material: They are cut by hand from a urethane plastic material. So they will hold up to pretty much to any type of weather and chemicals thrown at them. They had clean edges and drill holes and looked professionally done.  Installation: Very easy. He made a video (PM for the YT link) He marked the driver's side mud flap where the rivets go and where the screw goes. He includes the necessary hardware and some extra rivets in case you break some. You are going to need to need some tools: Hammer Small punch Screwdriver Turn the wheel towards the side you want to do the install to give yourself some room. You are going to locate the two lower rivets that hold the wheel liner.  Take the hammer and punch and push out the pin in the rivet. If you can find the pin, you can reuse the plastic rivet. If not, use the new ones that came with your mudflaps. Align the correct mudflap with the correct side and install the two rivets in the top two holes of the mudflap. You will then take the self-tapping screw and screw it into the bottom hole to help secure the flap from flopping all over.  This is what it looks like when installed from behind and from the front.   They barely stick out and are not too noticeable. They are not bulky and they do not stand out. I like them and they will get the job done without taking away from the looks of the car. If you want more info you can PM. |
| 09-29-2018, 06:16 PM | #4 | |
|
Major
 554
Rep 1,030
Posts |
Quote:
|
|
|
Appreciate
0
|
| 09-30-2018, 07:15 AM | #7 |
|
New Member
9
Rep 26
Posts |
These stop the chips to the rear arches.
https://f80.bimmerpost.com/forums/sh...&postcount=130 Sorry about the double link! |
|
Appreciate
1
yayaya103.50 |
| 09-30-2018, 09:24 AM | #8 |
|
driver

816
Rep 777
Posts |
[IMG]http://i67.tinypic.com/352gk87.jpg[/IMG]
|
|
Appreciate
0
|
| 09-30-2018, 08:59 PM | #9 |
|
Colonel
 2516
Rep 2,079
Posts |
Thanks for the love everyone!
My account was frozen and it looks like it was finally brought back. I cannot reply to private messages unfortunately but my video contains some good info on the flaps. Moderator - if you're reading this, I sent the main box 7 emails asking why I was banned. If I violated any rules I want to make it right. Thank you to whomever got it unlocked! Thanks again! Last edited by Tommy L Garage; 09-30-2018 at 09:05 PM.. |
|
Appreciate
0
|
| 09-30-2018, 09:13 PM | #10 |
|
Private First Class
11
Rep 117
Posts |
I didn't want list Tommy's name since he told his account had been banned and get into trouble for doing so. Just trying to share something that I felt would benefit others.
|
|
Appreciate
0
|
| 09-30-2018, 09:28 PM | #11 |
|
Colonel
2516
Rep 2,079
Posts |
Thank you Orion - looks like I was unbanned but can't send Private Messages.
Anyways...here's a sneak peek of what I'm personally working on as a side project. Will have a video about it soon and you'll be able to learn more about it from there. FYI - I purposely left the old dirt marks on to demonstrate what these rear ones will protect. Mounting them is very tricky but I found an awesome solution! Thanks for watching!   |
|
Appreciate
6
MisterF80M31047.00 Poiseuille5392.50 secretsquirrel130.00 karlskry40.00 Carb0n M103.50 bmwmdistrict908.00 |
| 01-06-2019, 06:19 PM | #15 |
|
Private
 36
Rep 90
Posts |
I reached out to him through his YouTube channel and ordered a set as well. Actually received them today and installed them (front and rear). Can't beat the Sunday delivery! I'm hoping it really cuts down on the debris that's kicked up. I'm very happy with them so far!
   Last edited by HMM; 01-06-2019 at 06:31 PM.. |
|
Appreciate
0
|
| 01-06-2019, 07:20 PM | #16 |
|
Colonel
2516
Rep 2,079
Posts |
Lots of happy people with my flaps
The two photos below speak for themselves Also. They are awesome for the winter. You need to watch my V66 video to know how to install them. The flaps and my ceramic coating help me keep my car clean all winter. BEFORE  AFTER     |
|
Appreciate
4
|
| 01-09-2019, 09:56 PM | #17 |
|
Second Lieutenant
 46
Rep 211
Posts |
Hey that's me! I still attest to the effectiveness of these front flaps. Ultimately my car still gets dirty, it does rain for 5 months straight, but it takes much longer, and it never actually gets caked on like in the first picture. I thought about getting the rears wrapped in PFF, but now its not necessary. With the grey color of the car and the matte black flaps, you can barely see them and they totally look OEM.
|
|
Appreciate
0
|
| 03-30-2019, 09:25 AM | #18 |
|
Lieutenant Colonel
 1240
Rep 1,972
Posts |
I bought these from Tommy when he first released them
I've been putting them on for bigger road trips, bought a bunch of the push clips off eBay Gearing up for another weekend trip so just put them back on again What I wouldn't mind finding though is a rubber/plastic grommet to hide the screw hole in the fender liner - I'm just ocd about these things, thinking something like the covers they put over screw heads on kitchen cabinets |
|
Appreciate
0
|
| 03-30-2019, 03:24 PM | #19 | |
|
Colonel
2516
Rep 2,079
Posts |
Quote:
|
|
|
Appreciate
0
|
| 04-18-2019, 07:57 AM | #20 | |
|
Private First Class
10
Rep 164
Posts |
Quote:
Want front mud Flaps for my Bmw m4 how can I contact you !? |
|
|
Appreciate
0
|
| 04-18-2019, 07:58 AM | #21 | ||||
|
Colonel
2516
Rep 2,079
Posts |
Quote:
Quote:
|
||||
|
Appreciate
0
|
Post Reply |
| Bookmarks |
|
|


