

| 07-07-2020, 09:39 AM | #111 |
|
Güdentyte
1157
Rep 1,196
Posts |
Had to cut it because the rear rotors were literally touching the top part of the shield and won’t bolt on without modifying. Not enough clearance. Different part numbers between the standard vs CCBs or 2NH.
You could probably get away by bending it back and see if it creates enough clearance.
__________________
CURRENT - 991 GT3 | Future Classic 1M | Model 3 | T4R TRD Pro Lime Rush
SOLD - MB M2 CS | SMB F80 M3 CS | E90 M3 | E90 335i | E46 M3 Vert | E39 M5 | E34 525i  |
|
Appreciate
1
ak_NorCal17.50 |
| 07-07-2020, 10:02 AM | #112 | |
|
Private
 18
Rep 55
Posts |
I have the non-CCB brakes
Quote:
|
|
|
Appreciate
0
|
| 07-07-2020, 11:08 AM | #113 | |
|
Private
18
Rep 55
Posts |
Thanks for reiterating and confirming
Quote:
- if you start out with a non-CCB M3 (or M4), you will need new front and rear dust shields, no matter what people say - if you retrofit the M2C brakes to a CCB M3 (or M4), all you really need are the disks In other words, all those that want to retrofit the M2C brakes must order the entire list of retrofit parts, including the rear dust shields. The non-CCB dust shield won't fit. |
|
|
Appreciate
1
omgf80207.00 |
| 07-07-2020, 12:00 PM | #114 |
|
Güdentyte
1157
Rep 1,196
Posts |
Absolutely! Although the front shield may not be necessary to replace as the bigger rotors will fit just fine, it will need to be trimmed so slightly in order for the 6 pot caliper to bolt on correctly into the knuckle. There's some money savings there if you prefer.
It has always been the case with the rears. Similar issue i ran into when i upgraded to BBK on my E46 M3 and E90 M3. It was no different on the F8x.
__________________
CURRENT - 991 GT3 | Future Classic 1M | Model 3 | T4R TRD Pro Lime Rush
SOLD - MB M2 CS | SMB F80 M3 CS | E90 M3 | E90 335i | E46 M3 Vert | E39 M5 | E34 525i |
| 07-10-2020, 06:51 PM | #116 | |
|
First Lieutenant
 207
Rep 354
Posts |
Quote:
34208094318 was replaced with 34212284745
__________________
|
|
|
Appreciate
1
ak_NorCal17.50 |
| 07-20-2020, 03:05 PM | #117 | |
|
Private
18
Rep 55
Posts |
any way to install the protection plate without...
Quote:
|
|
|
Appreciate
0
|
| 07-20-2020, 03:06 PM | #118 | |
|
Private
18
Rep 55
Posts |
new part number for the protection plate
Quote:
|
|
|
Appreciate
0
|
| 07-20-2020, 03:39 PM | #119 | |
|
First Lieutenant
207
Rep 354
Posts |
Quote:
Here is the workaround: 1. Cut the small piece of the rear dust shield that completes the surrounding so you can now "slide" the original one out and the new one in. 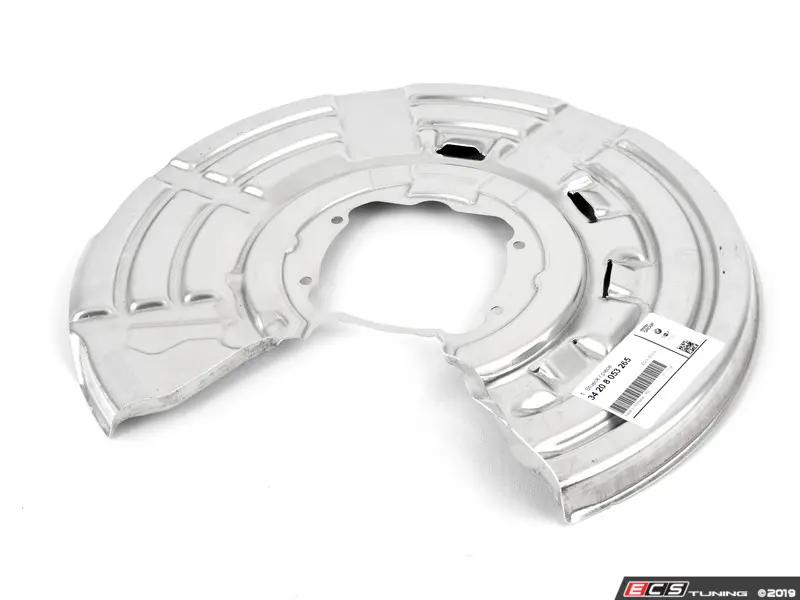 2. Disassemble the Ebrake assembly to give you enough room to pull it out/in. Once everything is reassembled, the shields should be solid.
__________________
|
|
|
Appreciate
1
ak_NorCal17.50 |
| 07-20-2020, 04:08 PM | #120 | |
|
Private
18
Rep 55
Posts |
cutting away
Quote:
|
|
|
Appreciate
0
|
| 07-20-2020, 04:17 PM | #121 | |
|
First Lieutenant
207
Rep 354
Posts |
Quote:
Just disassemble the ebrake assembly to give you enough room to pull the shields off/on. Once you cut this section away from the dust shields, they just slip on and off the hub.
__________________
|
|
|
Appreciate
1
ak_NorCal17.50 |
| 07-25-2020, 05:16 PM | #122 | |
|
Captain


364
Rep 834
Posts |
Quote:
__________________
M Forever!!!!
|
|
|
Appreciate
0
|
| 07-27-2020, 12:55 PM | #124 | |
|
Captain
364
Rep 834
Posts |
Quote:
__________________
M Forever!!!!
|
|
|
Appreciate
0
|
| 07-27-2020, 03:23 PM | #126 | ||
|
Captain
364
Rep 834
Posts |
Quote:
__________________
M Forever!!!!
|
||
|
Appreciate
0
|
| 08-03-2020, 03:21 PM | #128 |
|
Private
18
Rep 55
Posts |
M2C Brakes on F8x M3 and M4
After having performed this upgrade I can confirm that the part list is as indicated upfront in this thread if the starting point is a non-CCB car.
Things I learned along the way: The rear dust shields between the CCB M3/M4 and the M2C versus the non-CCB M3/M4 added a bit of complexity to the upgrade. Yes, these dust shield (or as BMW calls them, protection plates) must be swapped out (or the OEM ones must be severely cut) to accommodate the larger disks but also the larger calipers. Swapping out the front disks, calipers and dust shields is borderline trivial. All screws are easily accessible and a swap is done very quickly as the mounting points are obvious. That is not the case for the rear brakes. While removing the rear disks and calipers is straightforward, the removal of the dust shields is not. The dust shields are attached together with the backing plate for the rear emergency (drum) brakes, and getting to those screws requiring taking apart the drum brake assembly. Even then, the dust shield won't come out was designed to be removed and reinstalled with either the entire wheel carrier off the car, or with the wheel hub and bearing assembly removed. The easiest path is to simply remove the emergency brake components and move them out of the way to expose the four screws that hold the dust shield and the emergency brake backing plate in position, and then wiggle those parts away from the wheel hub as far as possible. That allows an obstructed view of the dust shield, and allows for rather imprecise cuts to the dust shield so that the shield itself can be forced over the wheel hub and taken out. The new dust shields must be treated the same way: the thin connecting piece must be cut away and then the shield must be trimmed to allow it to be forced over the wheel hub into position. Once that is accomplished, the new dust shield can be reinstalled with the emergency brake backing plate. The cutaway does not substantially impair the structural integrity of the dust shield, and I anticipate that in my setup, it will not have any adverse effects. Now the emergency brake can be reassembled, and this is a very good time to adjust it so that it actually can hold the vehicle on a (moderately steep) hill. Once that is accomplished, installing the new brake disk and the new caliper is easy. Remember to bleed the brakes at this stage, as it takes a surprisingly long time for all air to escape, and do remember that each caliper has TWO bleed screws. If you start at the right rear wheel - which is furthest from the brake booster - you'll have an easier time bleeding the brakes. Next come the left rear, then the right front, and last is the left front. Again, don't be surprised at how much brake fluid you'll bleed. I went through two full 250 ml containers to refill. Total capacity is less than 1 L IIRC, so getting the air out of these calipers is not trivial. However, once all is installed and bled and the wheels are back on the car, the work is rewarded by a much better brake pedal feel, much more linear brake force, and in general a better stopping distance. I feel like the rears do more work than in the standard setup. While that might come back to bite me in the butt on slippery roads, I don't really care about that. If the weather is really adverse, I'll take my other car, a '16 328d xDrive, onto which I'll graft the M3 parts that I just removed... The one thing I have to admit that is really noticeable though is the added unsprung weight. The ZCP M3 is not really what I'd describe as compliant or comfortable, but with the M2C update potholes seem to have an even more jarring effect. I did not notice any difference in acceleration, cornering or anything else from a driving dynamics standpoint, but I feel like the M3 and M4 should have come standard with the M2C brakes. They just seem to work better - more bite, better linearity, better pedal feel, very likely better performance on repeated stops and hard use due to higher thermal mass and larger pads for a larger swept area of the disk. The upgrade in disk diameter from 380 to 400 and 370 to 380 mm certainly is not going to be the deciding factor, but the greater clamping force and the stiffer calipers and the much larger pads account for an overall improved brake. Another caveat is that of course the M2C brakes require larger wheels. What I should have done (and I skipped it) is compare the brake performance in single and repeated stops from higher speeds (I am thinking 100 to 0 and 200 to 0 km/h). I have a disused airport relatively close by, and I am sure I could have rented it, but I simply forgot. If someone is willing to do a comparison with a car that is substantially similar to mine ('18 ZCP, CF roof, 6MT) and where the only difference is the standard versus the M2C brakes I'd be willing to do a retrospect comparison. |
| 08-03-2020, 04:38 PM | #129 |
|
Private

49
Rep 91
Posts |
great info. something i'd like to do in the future. red BBK is great to look at. maybe there will be a vid of how to reassemble the rear to install the dust shield, etc. will the dealer install this for me if go through them? it's not official M3/4 BBK but only for M2, but they should know that they're all the same
|
|
Appreciate
1
ak_NorCal17.50 |
| 08-03-2020, 05:53 PM | #130 | |
|
Private
18
Rep 55
Posts |
Brake upgrade done at the dealer
Quote:
|
|
|
Appreciate
0
|
| 08-04-2020, 12:12 PM | #131 | |
|
Lieutenant
362
Rep 518
Posts |
Quote:
 |
|
| 08-04-2020, 04:23 PM | #132 | |
|
Private
18
Rep 55
Posts |
larger rims
Quote:
|
|
|
Appreciate
0
|
Post Reply |
| Bookmarks |
|
|


