|
|||||||
Post Reply |
|
|
Thread Tools | Search this Thread |
| 08-03-2019, 07:23 PM | #1 |
|
///M SubDriver

1832
Rep 2,782
Posts
Drives: 2017 M3, 2020 X7 40i
Join Date: Jul 2016
Location: DMV
|
DIY: S55 Valve Cleaning Service Using CRC GDI Intake Valve & Turbo Cleaner
As many of you may know, Gasoline Direct Injection (GDI) engines have the issue of carbon build-up on the intake valves. Over time, this carbon build-up can lead to poor engine performance. Older GDI engine designs from BMW and other manufactures suffered from this pretty bad. Fortunately, BMW made improvements to the PCV system on the S55 that does a much better job at preventing this intake valve carbon build-up (and there are a few engine pics floating around on the forum that show this). Another popular mod to help prevent carbon build up is an Oil Catch Can (OCC).
I installed an OCC shortly after purchasing my M3. However, since I intend to keep my M3 for the long haul, I also decided to use CRC GDI Intake Valve & Turbo Cleaner as additional preventative maintenance - I have been using it since my first oil change at 5k miles. I have posted in a few threads that discussed valve cleaning in the S55, where I mentioned using this product - and was frequently asked how I used it on the S55. It is very easy to use, but I figured I would post a very quick DIY of how I use this product on the S55 to help others who may be interested. The product recommends using it every 10k miles or before every oil change. I do my oil changes every 5k miles so that is when I use this product. From start to finish, it takes 25 min or so. Now on to the DIY... 1. Ensure your engine is at normal operating temperature before you begin this service. 2. The product says to inject the chemical into the intake, downstream of the MAF sensor (since it will damage the MAF sensor), as close to the throttle body as possible. Just about any vacuum connection in the intake path could work. Below is a pic of a vacuum line connection (left) and MAF/HFM connection (right) on the driver side intake.  3. I chose not to use that location as the injection point since the chemical would have to travel through the turbo (cold side) and then through the charge cooler, before getting to the throttle body - thus minimizing the amount of chemical actually getting to the intake valves. Instead, I chose to inject the chemical into the MAP sensor port on the rear of the charge cooler seen in this pic below. 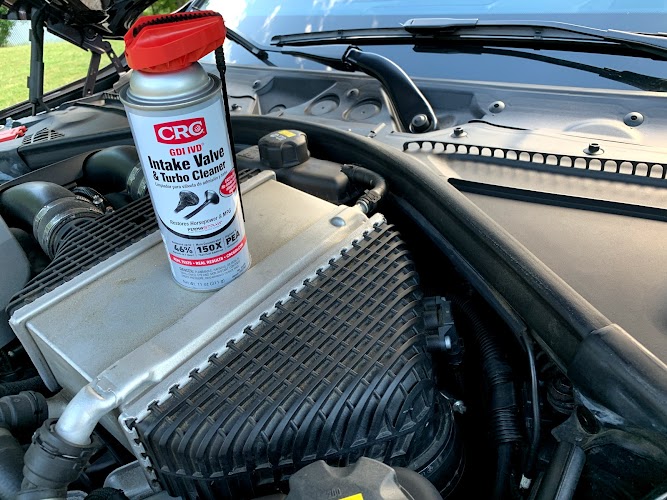 4. The MAP sensor is held in place with two torx screws. I used a T35 torx bit with a "mini" ratchet to unscrew the MAP sensor (I purchased the mini ratchet at my local auto parts store). This combo was necessary since it is pretty tight in that area, especially to get access to the rear torx screw. A torx allen key could work as well, but will be a bit slower to get the screws out. Once removed, just set the MAP sensor aside. You do not need to disconnect the MAP sensor harness (if you did, you might get a CEL when you start the engine).    5. Get your assistant to start up the car. You will need your assistant to keep engine RPM at 2k while you inject the chemical. This will prevent the engine from bogging and/or stalling as you inject the chemical. The throttle on the S55 can be a bit touchy at those lower RPMs, even in Efficient Mode, but it is not too difficult (if my wife can do it, anybody can  ). Flip the can upside down and insert the straw into the MAP sensor port on the charge cooler (angling it slightly downward). I also put a paper towel in the area since there is a small bit of blowback. The paper towel is not necessary, but it makes cleanup a bit quicker. I spray the chemical in ~3 second bursts. Do this until the can is empty. If the engine is kept at ~2k RPM, the engine should not bog, but it if it does, just have your assistant blip the throttle a bit (still keeping the engine below 3.5k RPM). ). Flip the can upside down and insert the straw into the MAP sensor port on the charge cooler (angling it slightly downward). I also put a paper towel in the area since there is a small bit of blowback. The paper towel is not necessary, but it makes cleanup a bit quicker. I spray the chemical in ~3 second bursts. Do this until the can is empty. If the engine is kept at ~2k RPM, the engine should not bog, but it if it does, just have your assistant blip the throttle a bit (still keeping the engine below 3.5k RPM). 6. Once the can is empty, blip the throttle 2-3 times, not exceeding 3.5k RPM. You will most likely see some white smoke come out of your tail pipes here (think James Bond smoke screen). The stuff smells pretty bad too. After that, let the car idle for a minute and shut it down. Let it sit for 1 hr to heat soak and re-install the MAP sensor at this time. 7. After the 1 hr heat soak period, it is Italian Tune-Up time! Well not really, but the instructions do say to run the engine at highway speeds for at least 10 min. I like to take my car out on the highway, operating at lower gears and higher rpms than normal highway cruising (i.e. driving in 4th & 5th gear vice just cruising in 6th gear) just to keep internal combustion temps a bit higher. But basic highway driving should be fine. And that is it, your DIY intake valve cleaning service is complete. A note on the first engine start after the heat soak period. Your engine may take a few split seconds longer to crank over the first time. Or when it does start, it may run a bit rough at idle and as you drive off. After one cleaning, my car sputtered as I accelerated and when into limp mode (when that happened, I just turned off the engine, did a re-start, and everything was fine). Also, during the first several minutes after driving off, you will see some residual white smoke coming out of your tail pipes - looking like you are burning some oil. All this is normal as the remainder of the chemical (and any loose carbon deposits) are burned off and blown out of the engine. So is this service absolutely necessary to prevent catastrophic engine failure? I don't think so, especially since the S55 PCV design does a very good job at keeping the intake tract clean of oily residue - especially in combination with an OCC. However, the S55 is still a GDI engine. Also, I consider this service preventative maintenance, just like more frequent oil changes. It is very easy to do, does not take long, and for approx $13 a can at your local auto parts store, this is a no brainer for me. Below is a link to more info on this stuff (from CRC)... http://crcforshops.com Hope you find this helpful...  Edit: When I first started doing this in conjunction with my 5k mile oil changes two years ago, CRC was the only product on the market that I saw which specifically targeted GDI intake valve cleaning (other than old school internal engine cleaning methods like sea foam, etc. which have been around forever). When I purchased my recent can of CRC stuff to do this cleaning, I noticed two other brands with chemicals specifically designed for this purpose, one by Lucas and another by Gumout. The specs on the can, procedure and pricing were all similar.
__________________
///M3 COMPETITION 6MT - 2017 F80 Smoked Topaz Metallic
BM3 / MP-HAS / GC Camber Plates / Carbonstructure Interior X7 XDrive 40i ///M-SPORT - 2020 G07 Arctic Grey Metallic  X3 XDrive 30i - 2019 G01 Mineral White (wife's) / 128i 6MT - 2009 E82 Jet Black (son's) Last edited by jmciver; 12-01-2019 at 10:28 AM.. |
|
Appreciate
12
moonluv8102492.50 Racer201029.50 Sahbatage502.50 SYT_Shadow11468.50 Mikster56.50 smm310.50 BigdawggyM40.00 Xrygrl2348.50 k-lo37.00 DLSJ5500.50 maniz617.00 overlook637244.50 |
| 08-04-2019, 05:11 PM | #2 | |
|
Lieutenant

503
Rep 571
Posts |
Quote:

__________________
"If you have everything under control, you're not moving fast enough"
|
|
|
Appreciate
0
|
| 08-11-2019, 07:40 PM | #4 |
|
Captain

538
Rep 817
Posts
Drives: bmw M3 F80
Join Date: Dec 2013
Location: france
|
Thank you
 |
|
Appreciate
0
|
| 10-29-2019, 08:29 AM | #6 |
|
Major General
 5029
Rep 5,093
Posts |
Just did this as well, first time for the car at 26k miles, she seems pretty darn happy and peppy afterward!
__________________
|
|
Appreciate
0
|
| 10-29-2019, 01:21 PM | #8 | |
|
///M SubDriver
1832
Rep 2,782
Posts
Drives: 2017 M3, 2020 X7 40i
Join Date: Jul 2016
Location: DMV
|
Quote:
__________________
///M3 COMPETITION 6MT - 2017 F80 Smoked Topaz Metallic
BM3 / MP-HAS / GC Camber Plates / Carbonstructure Interior X7 XDrive 40i ///M-SPORT - 2020 G07 Arctic Grey Metallic X3 XDrive 30i - 2019 G01 Mineral White (wife's) / 128i 6MT - 2009 E82 Jet Black (son's) |
|
|
Appreciate
1
coldsoup92.00 |
| 01-29-2020, 06:53 PM | #12 | |
|
///M SubDriver
1832
Rep 2,782
Posts
Drives: 2017 M3, 2020 X7 40i
Join Date: Jul 2016
Location: DMV
|
Quote:
__________________
///M3 COMPETITION 6MT - 2017 F80 Smoked Topaz Metallic
BM3 / MP-HAS / GC Camber Plates / Carbonstructure Interior X7 XDrive 40i ///M-SPORT - 2020 G07 Arctic Grey Metallic X3 XDrive 30i - 2019 G01 Mineral White (wife's) / 128i 6MT - 2009 E82 Jet Black (son's) |
|
|
Appreciate
1
Kilabyte3946.50 |
| 02-16-2020, 04:24 AM | #13 |
|
Captain

152
Rep 706
Posts |
Great write up
Couple of questions: Does spraying into the MAF sensor port still put the product through the turbos? Can carbon still build up in the turbo impellers? Is it crucial to change the oil after doing this? |
|
Appreciate
0
|
| 02-16-2020, 07:19 AM | #14 | |
|
///M SubDriver
1832
Rep 2,782
Posts
Drives: 2017 M3, 2020 X7 40i
Join Date: Jul 2016
Location: DMV
|
Quote:
2. Yes, carbon can still build up on the hot side of the turbos as the hot side is part of the exhaust gas path. 3. Probably not "crucial" to change out your oil after you do this. But it makes sense as there could be extra/larger carbon deposit particles that could be floating around in your oil after the service is complete. I either do this service on the same day I change my own oil, or within a few days of the dealer changing the oil.
__________________
///M3 COMPETITION 6MT - 2017 F80 Smoked Topaz Metallic
BM3 / MP-HAS / GC Camber Plates / Carbonstructure Interior X7 XDrive 40i ///M-SPORT - 2020 G07 Arctic Grey Metallic X3 XDrive 30i - 2019 G01 Mineral White (wife's) / 128i 6MT - 2009 E82 Jet Black (son's) |
|
|
Appreciate
0
|
| 04-06-2020, 07:28 AM | #16 | |
|
///M SubDriver
1832
Rep 2,782
Posts
Drives: 2017 M3, 2020 X7 40i
Join Date: Jul 2016
Location: DMV
|
Quote:
__________________
///M3 COMPETITION 6MT - 2017 F80 Smoked Topaz Metallic
BM3 / MP-HAS / GC Camber Plates / Carbonstructure Interior X7 XDrive 40i ///M-SPORT - 2020 G07 Arctic Grey Metallic X3 XDrive 30i - 2019 G01 Mineral White (wife's) / 128i 6MT - 2009 E82 Jet Black (son's) |
|
|
Appreciate
0
|
| 07-06-2020, 08:44 AM | #17 |
|
Private
 
42
Rep 69
Posts |
Being new to the M3 platform and having 36k miles on the vehicle from previous owner, I perform this yesterday. Upon start up, had some white smoke but when I went to drive, a plume was created.
I did get a drivetrain malfunction error and car went into limp mode. Shut the car down and restarted with the limp mode gone but CEL still on. Waiting on a OBDII adapter to read the codes. Normal to have drivetrain malfunction error upon driving? |
|
Appreciate
0
|
| 07-06-2020, 09:46 AM | #18 | |
|
///M SubDriver
1832
Rep 2,782
Posts
Drives: 2017 M3, 2020 X7 40i
Join Date: Jul 2016
Location: DMV
|
Quote:
The white smoke during your initial start and drive is normal as the car burns through the residual cleaner in the combustion chamber.
__________________
///M3 COMPETITION 6MT - 2017 F80 Smoked Topaz Metallic
BM3 / MP-HAS / GC Camber Plates / Carbonstructure Interior X7 XDrive 40i ///M-SPORT - 2020 G07 Arctic Grey Metallic X3 XDrive 30i - 2019 G01 Mineral White (wife's) / 128i 6MT - 2009 E82 Jet Black (son's) Last edited by jmciver; 07-06-2020 at 09:54 AM.. |
|
|
Appreciate
0
|
| 07-06-2020, 10:46 AM | #19 |
|
Private
42
Rep 69
Posts |
Thank you for the quick response and clarification of normality.
By chance, what is the best way to look at the back side of the valves? Would it be in the same location as CRC is being injected? |
|
Appreciate
0
|
| 07-06-2020, 11:29 AM | #20 | |
|
///M SubDriver
1832
Rep 2,782
Posts
Drives: 2017 M3, 2020 X7 40i
Join Date: Jul 2016
Location: DMV
|
Quote:
__________________
///M3 COMPETITION 6MT - 2017 F80 Smoked Topaz Metallic
BM3 / MP-HAS / GC Camber Plates / Carbonstructure Interior X7 XDrive 40i ///M-SPORT - 2020 G07 Arctic Grey Metallic X3 XDrive 30i - 2019 G01 Mineral White (wife's) / 128i 6MT - 2009 E82 Jet Black (son's) |
|
|
Appreciate
0
|
| 08-09-2020, 06:56 PM | #21 |
|
Second Lieutenant
367
Rep 257
Posts |
jmciver thanks for posting this DIY. Did my first CRC valve clean today. Will do a 5K interval oil change this week. I get about 19-20 MPG, so Im going to keep an eye on it to see if this cleaning impacts the engine efficiency and thus the MPG.
Additionally, I dont know if there is a correlation between the amount of smoke and carbon deposits, but I noticed an appreciable amount of smoke. |
|
Appreciate
1
jmciver1832.00 |
| 09-07-2020, 03:08 PM | #22 |
|
Banned
246
Rep 282
Posts |
Hey thanks for putting this together! I did followed your procedure today and made a little DIY video of it, so if anyone wants to see this same tutorial in video form you can find it here:
|
|
Appreciate
5
|
Post Reply |
| Bookmarks |
|
|